This will be a very simple native iOS app tutorial geared toward beginners. I’ll assume you have no experience making apps, so this should be approachable for everyone. This will be a two part tutorial. Today, we will make the app roughly functional. Next time, we will fill out the features and polish things up.
The Idea
One of my friends used to play an interesting game of chance to determine where he went on dates. He would write several date destinations on pieces of paper, then let the girl randomly draw one of the options to determine their date for the evening. I could write an entire article on the merits of this system, but instead I’ll modernize the idea into app form. I witnessed this system during the archaic year of 2006. It was a simpler time. These days people need apps to complement the dating experience, so let’s get started!
Create the Project in Xcode
If you don’t already have Xcode on your computer, go ahead and download it. You can find it in the Mac App Store. You have to have a Mac to make apps for iPhone and iPad. I’ll wait while you go buy a Mac and/or download Xcode.
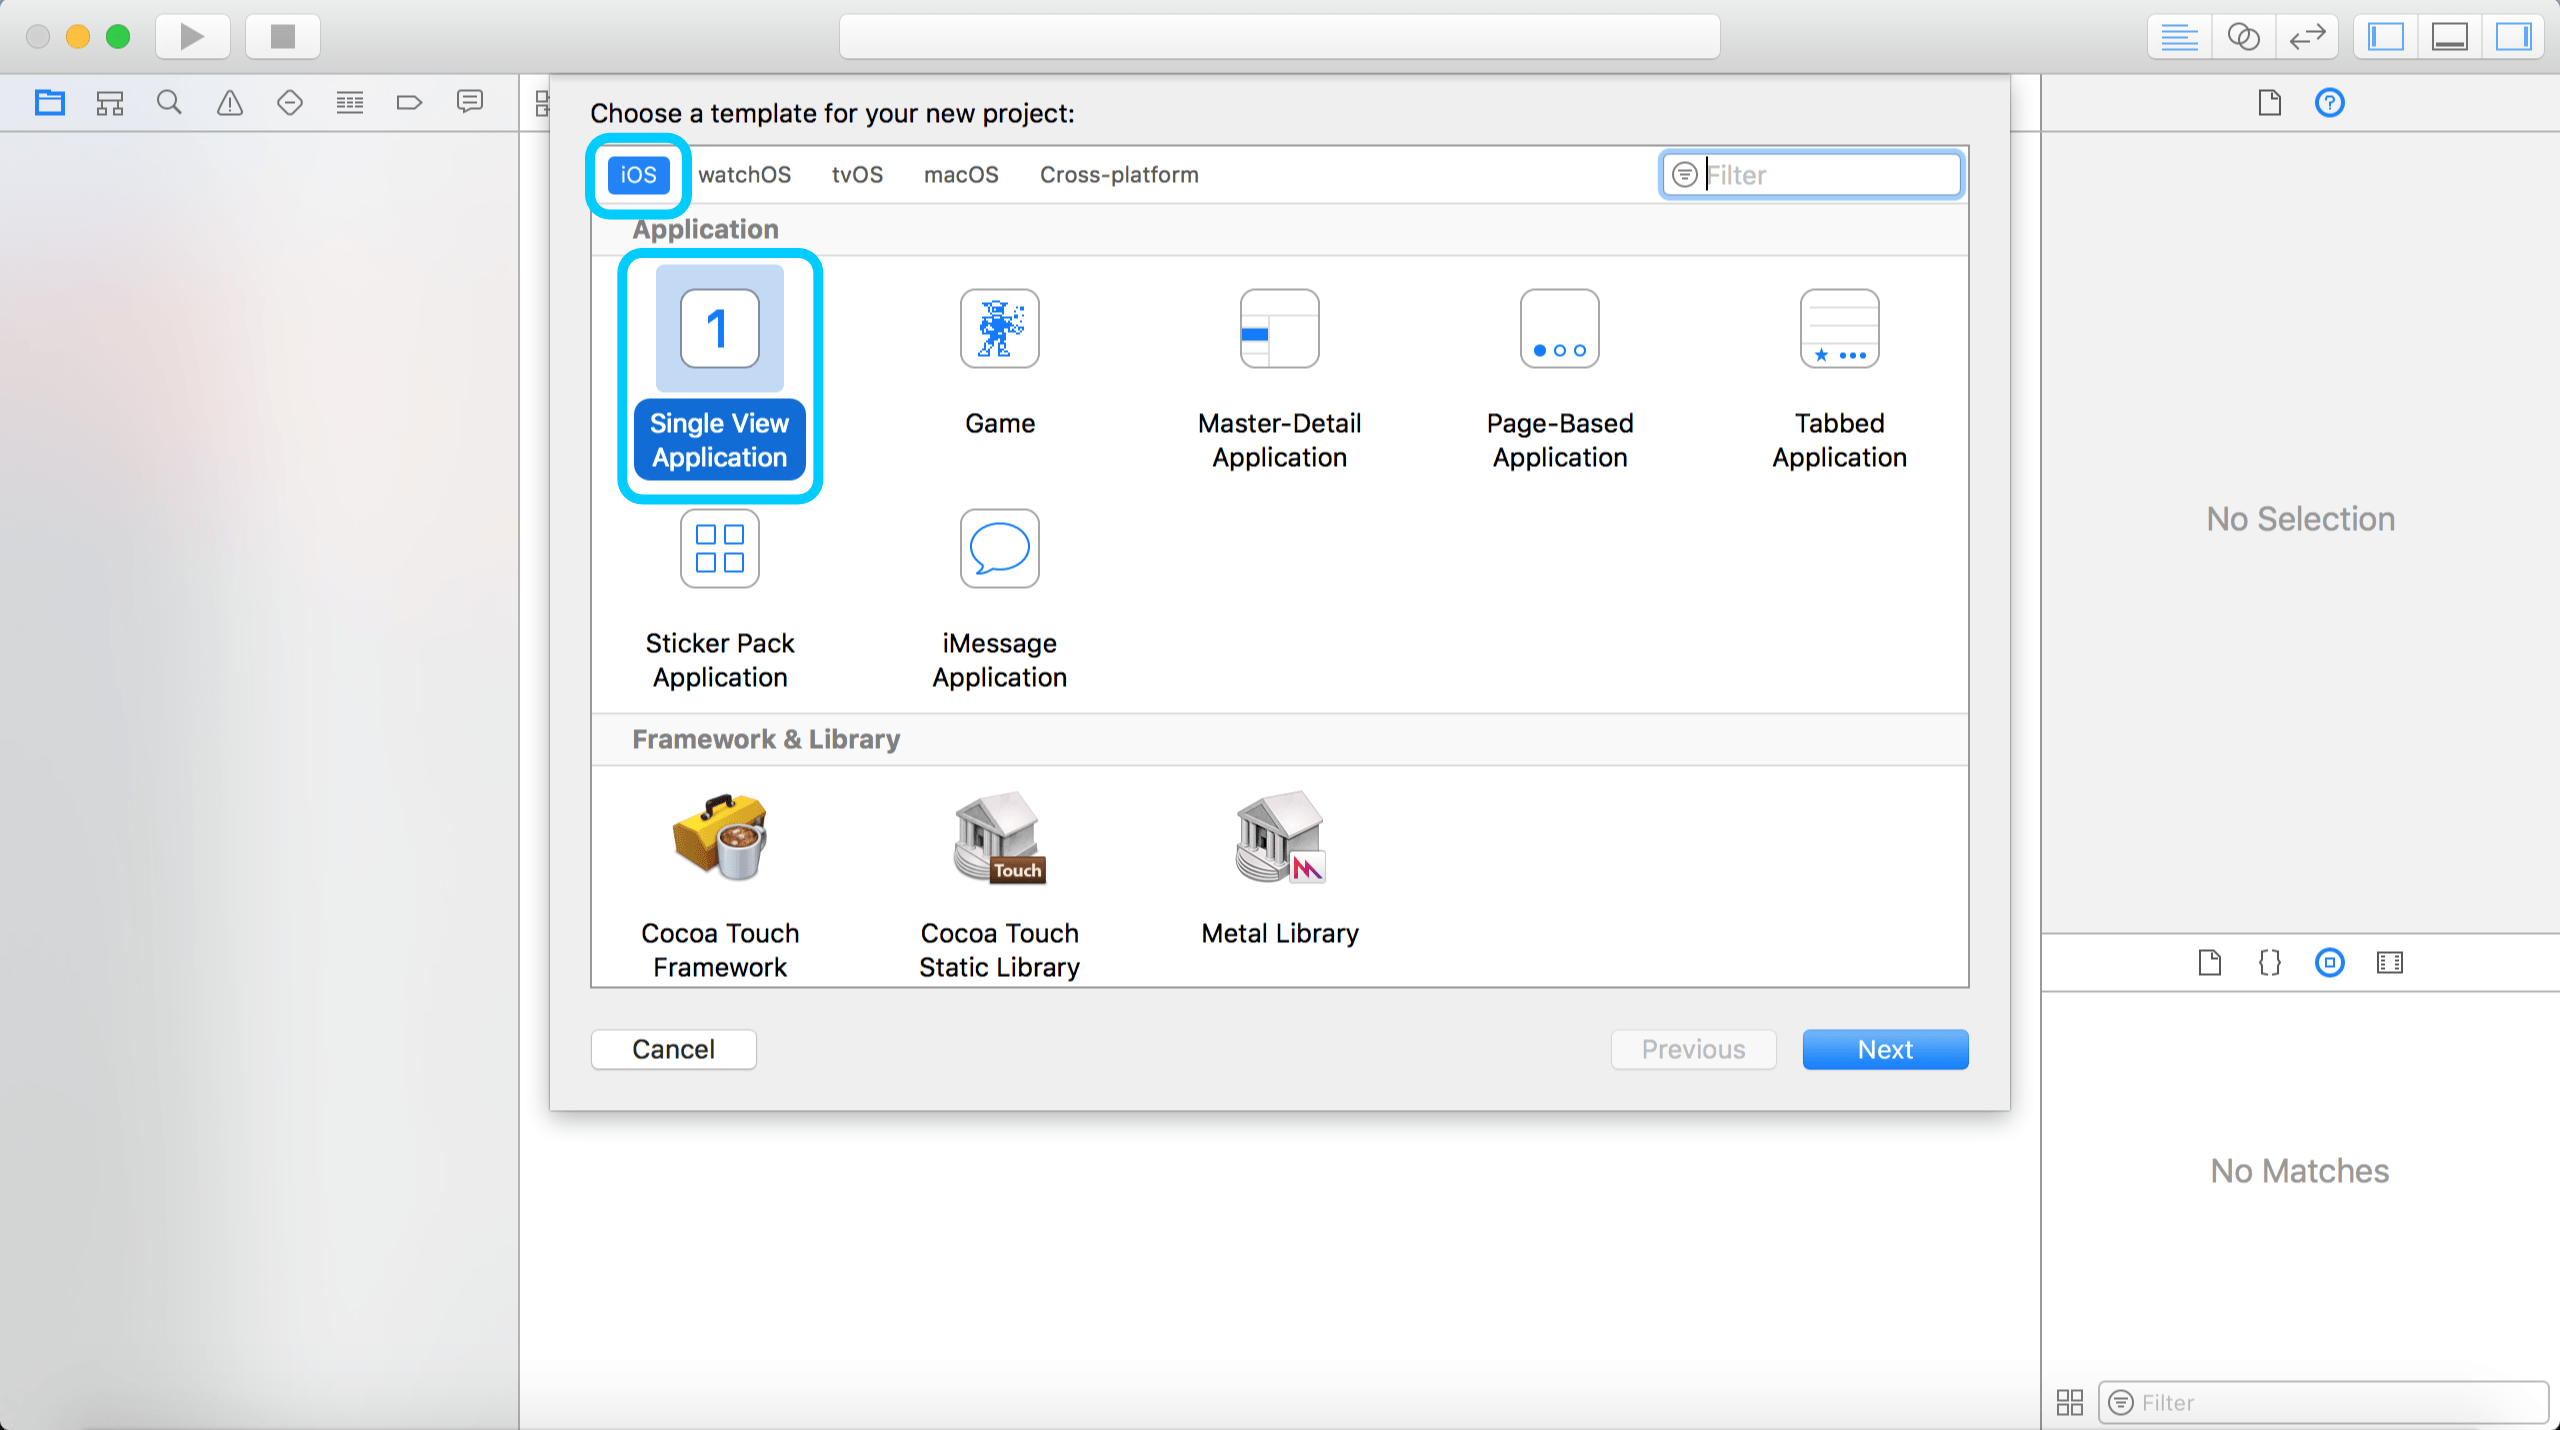
Open up Xcode. You’ll see a few choices. Select Create a new Xcode project. On the top navigation bar of the open window, select iOS. Then choose Single View Application, and hit the Next button.
I’ll fill out the next set of blanks as follows:
- Product Name: RandomDate
- Team: HangZone, LLC (You can leave it blank, unless you have a team.)
- Organization Name: HangZone (You can put your own name here if you like.)
- Organization Identifier: com.HangZone (You generally put com. before your organization name.)
- Bundle Identifier: com.HangZone.RandomDate (This will be generated automatically from your product name and organization identifier.)
- Language: Swift (This tutorial will be in Swift, Apple’s newest native language.)
- Devices: Universal (This allows us to deploy to both iPhone and iPad.)
- Uncheck the bottom options. We’re keeping this simple.
Once you proceed to the next menu, you’ll have to select where you want to save the project. I have a folder where I keep all my iOS projects, so I’m going to navigate there and click the Create button. Feel free to save your project wherever you like.
The Anatomy of an iOS Project
You now have a new project in front of you. In case you haven’t used Xcode, let me quickly review the different files you’ll see on the left side of the screen. If you don’t see a menu of files on the left side of the screen, click the corresponding button in the top right (see the image below) to display the files.
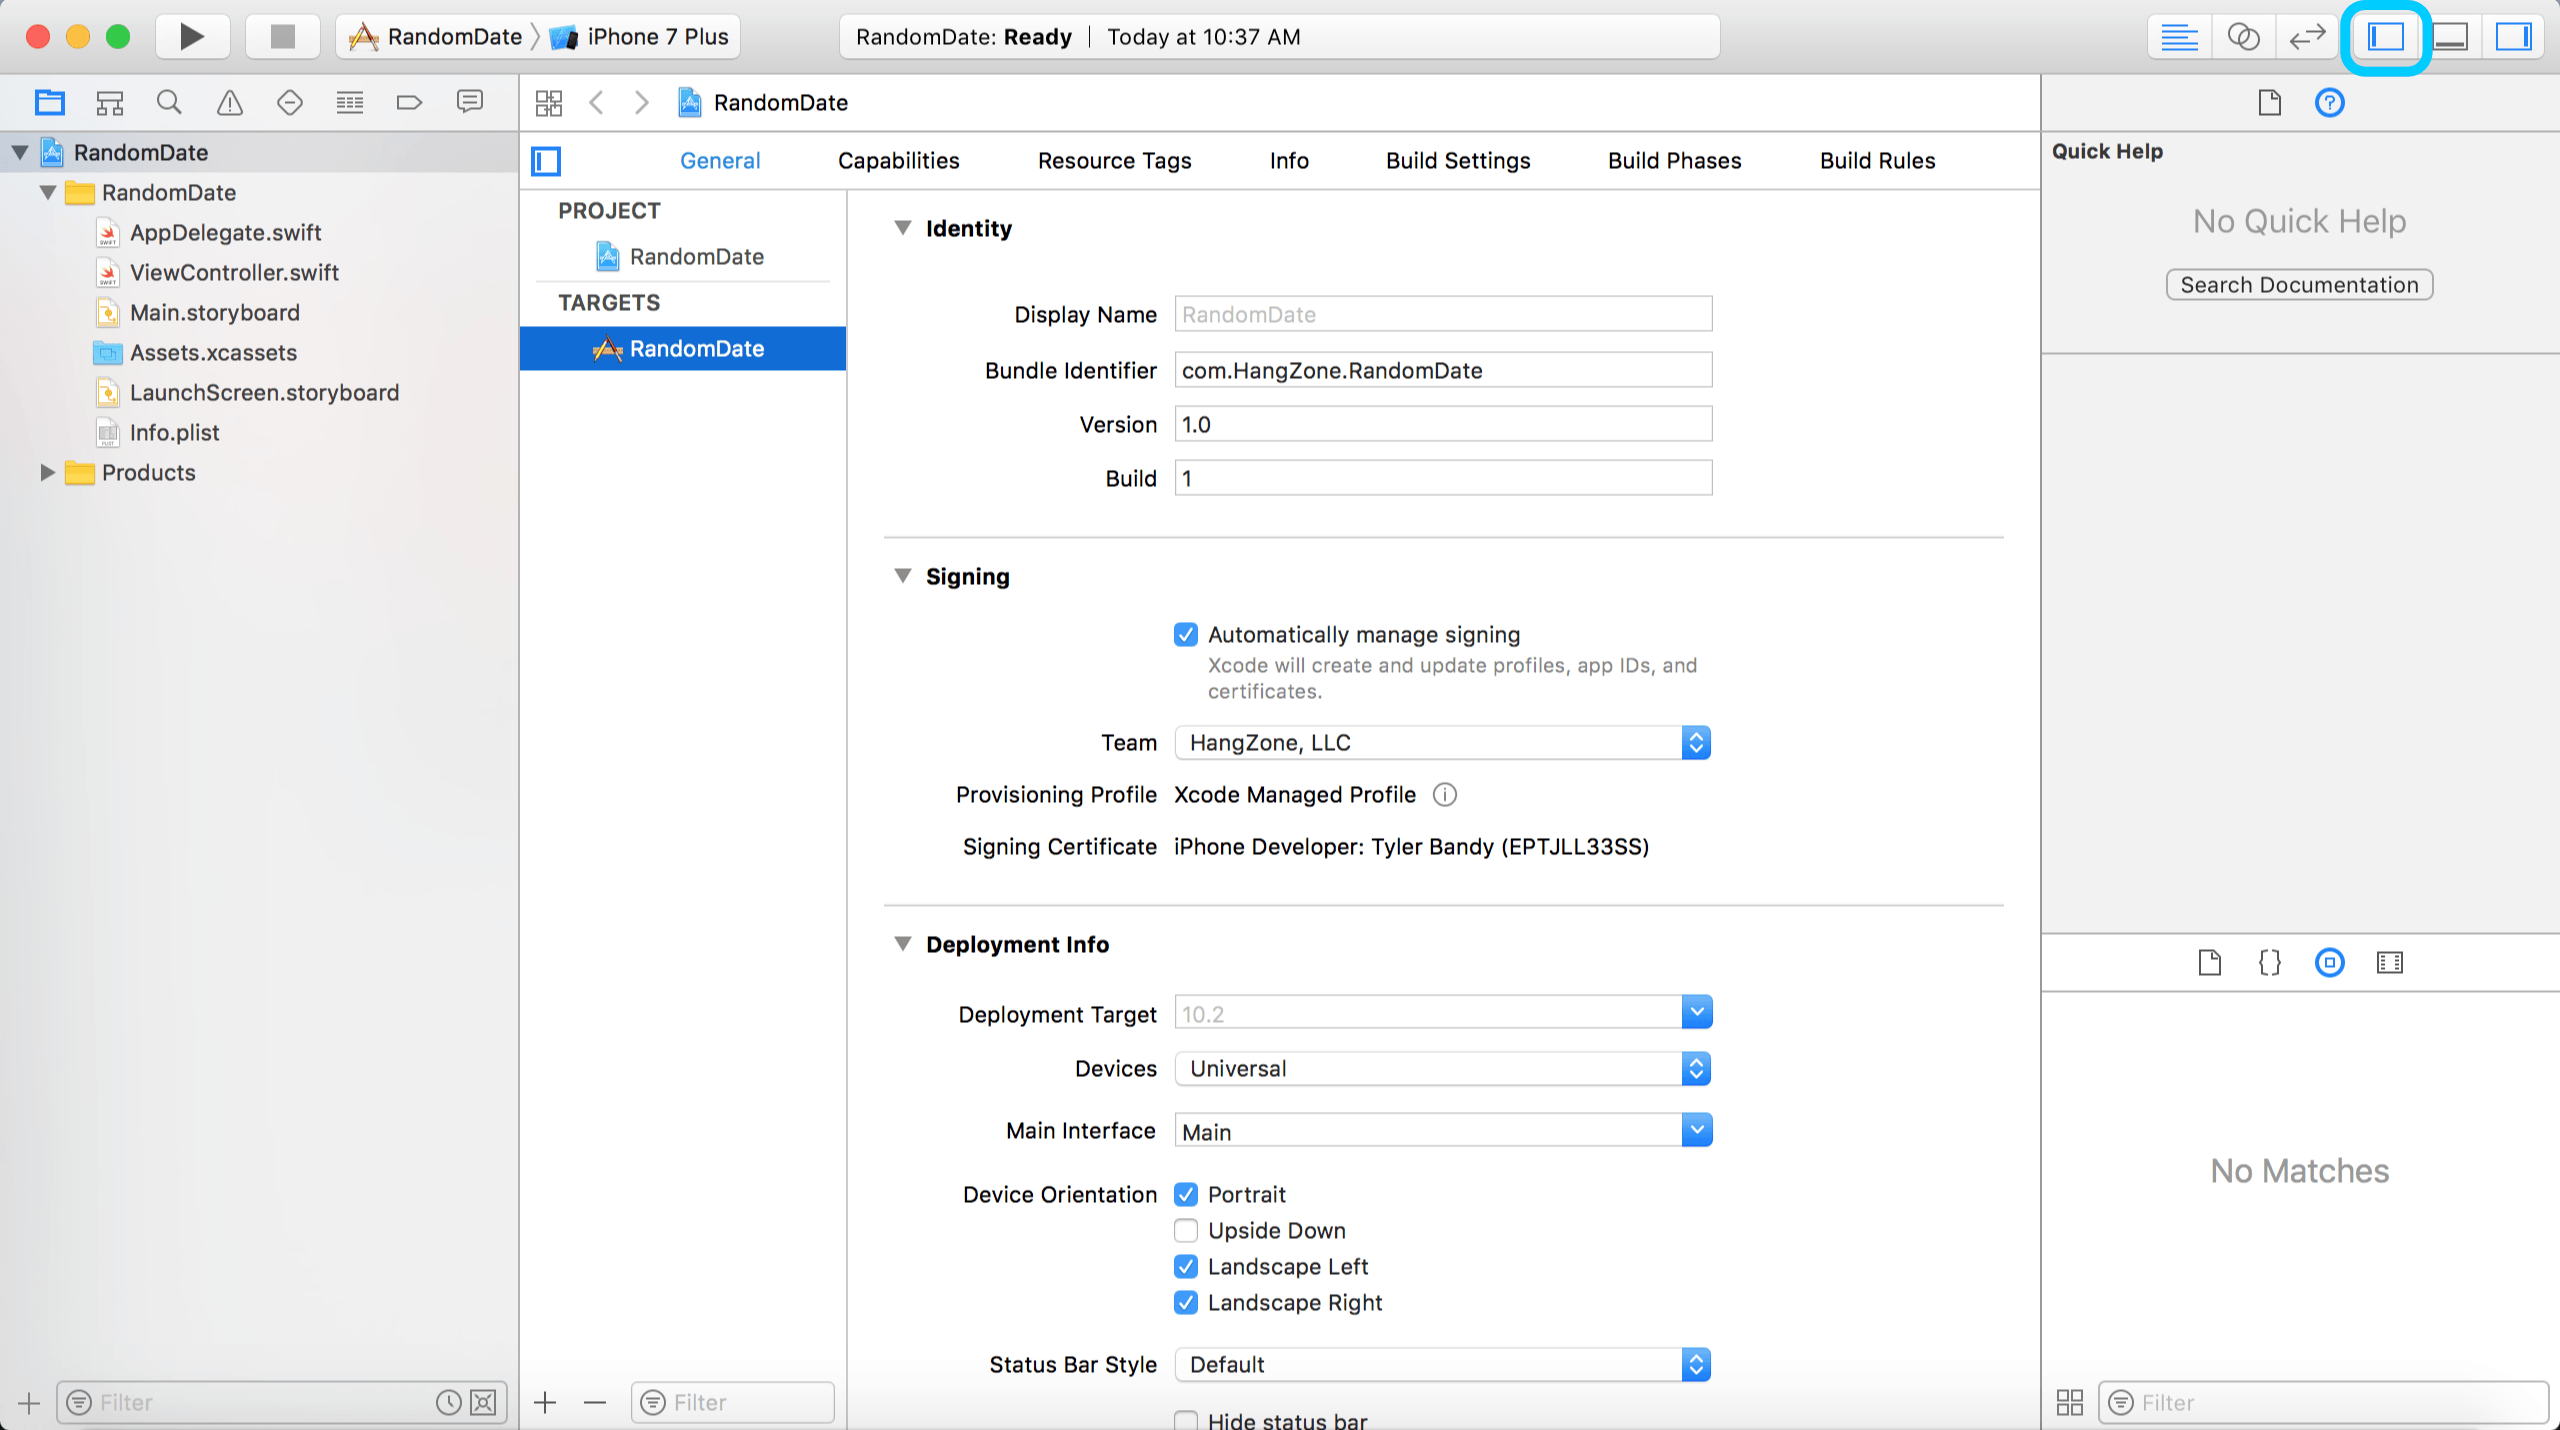
The RandomDate project file with the blue icon next to it lets you adjust various project settings. AppDelegate.swift has a set of methods for handling operations when your app starts up or closes down. ViewController.swift includes methods for controlling what’s on the screen. We selected a single view app, so we only have one view controller. More complex apps will have more views which are controlled by more view controllers. Main.storyboard lays out the views that will be controlled by the view controllers. Note that it is a blank white rectangle now, since we haven’t done anything yet. Assets.xcassets will hold all of our image files. LaunchScreen.storyboard is for laying out the screen that displays while our app is loading. Info.plist has some additional app settings. We will go into more detail with these different files as needed.
Lay Out the Screen
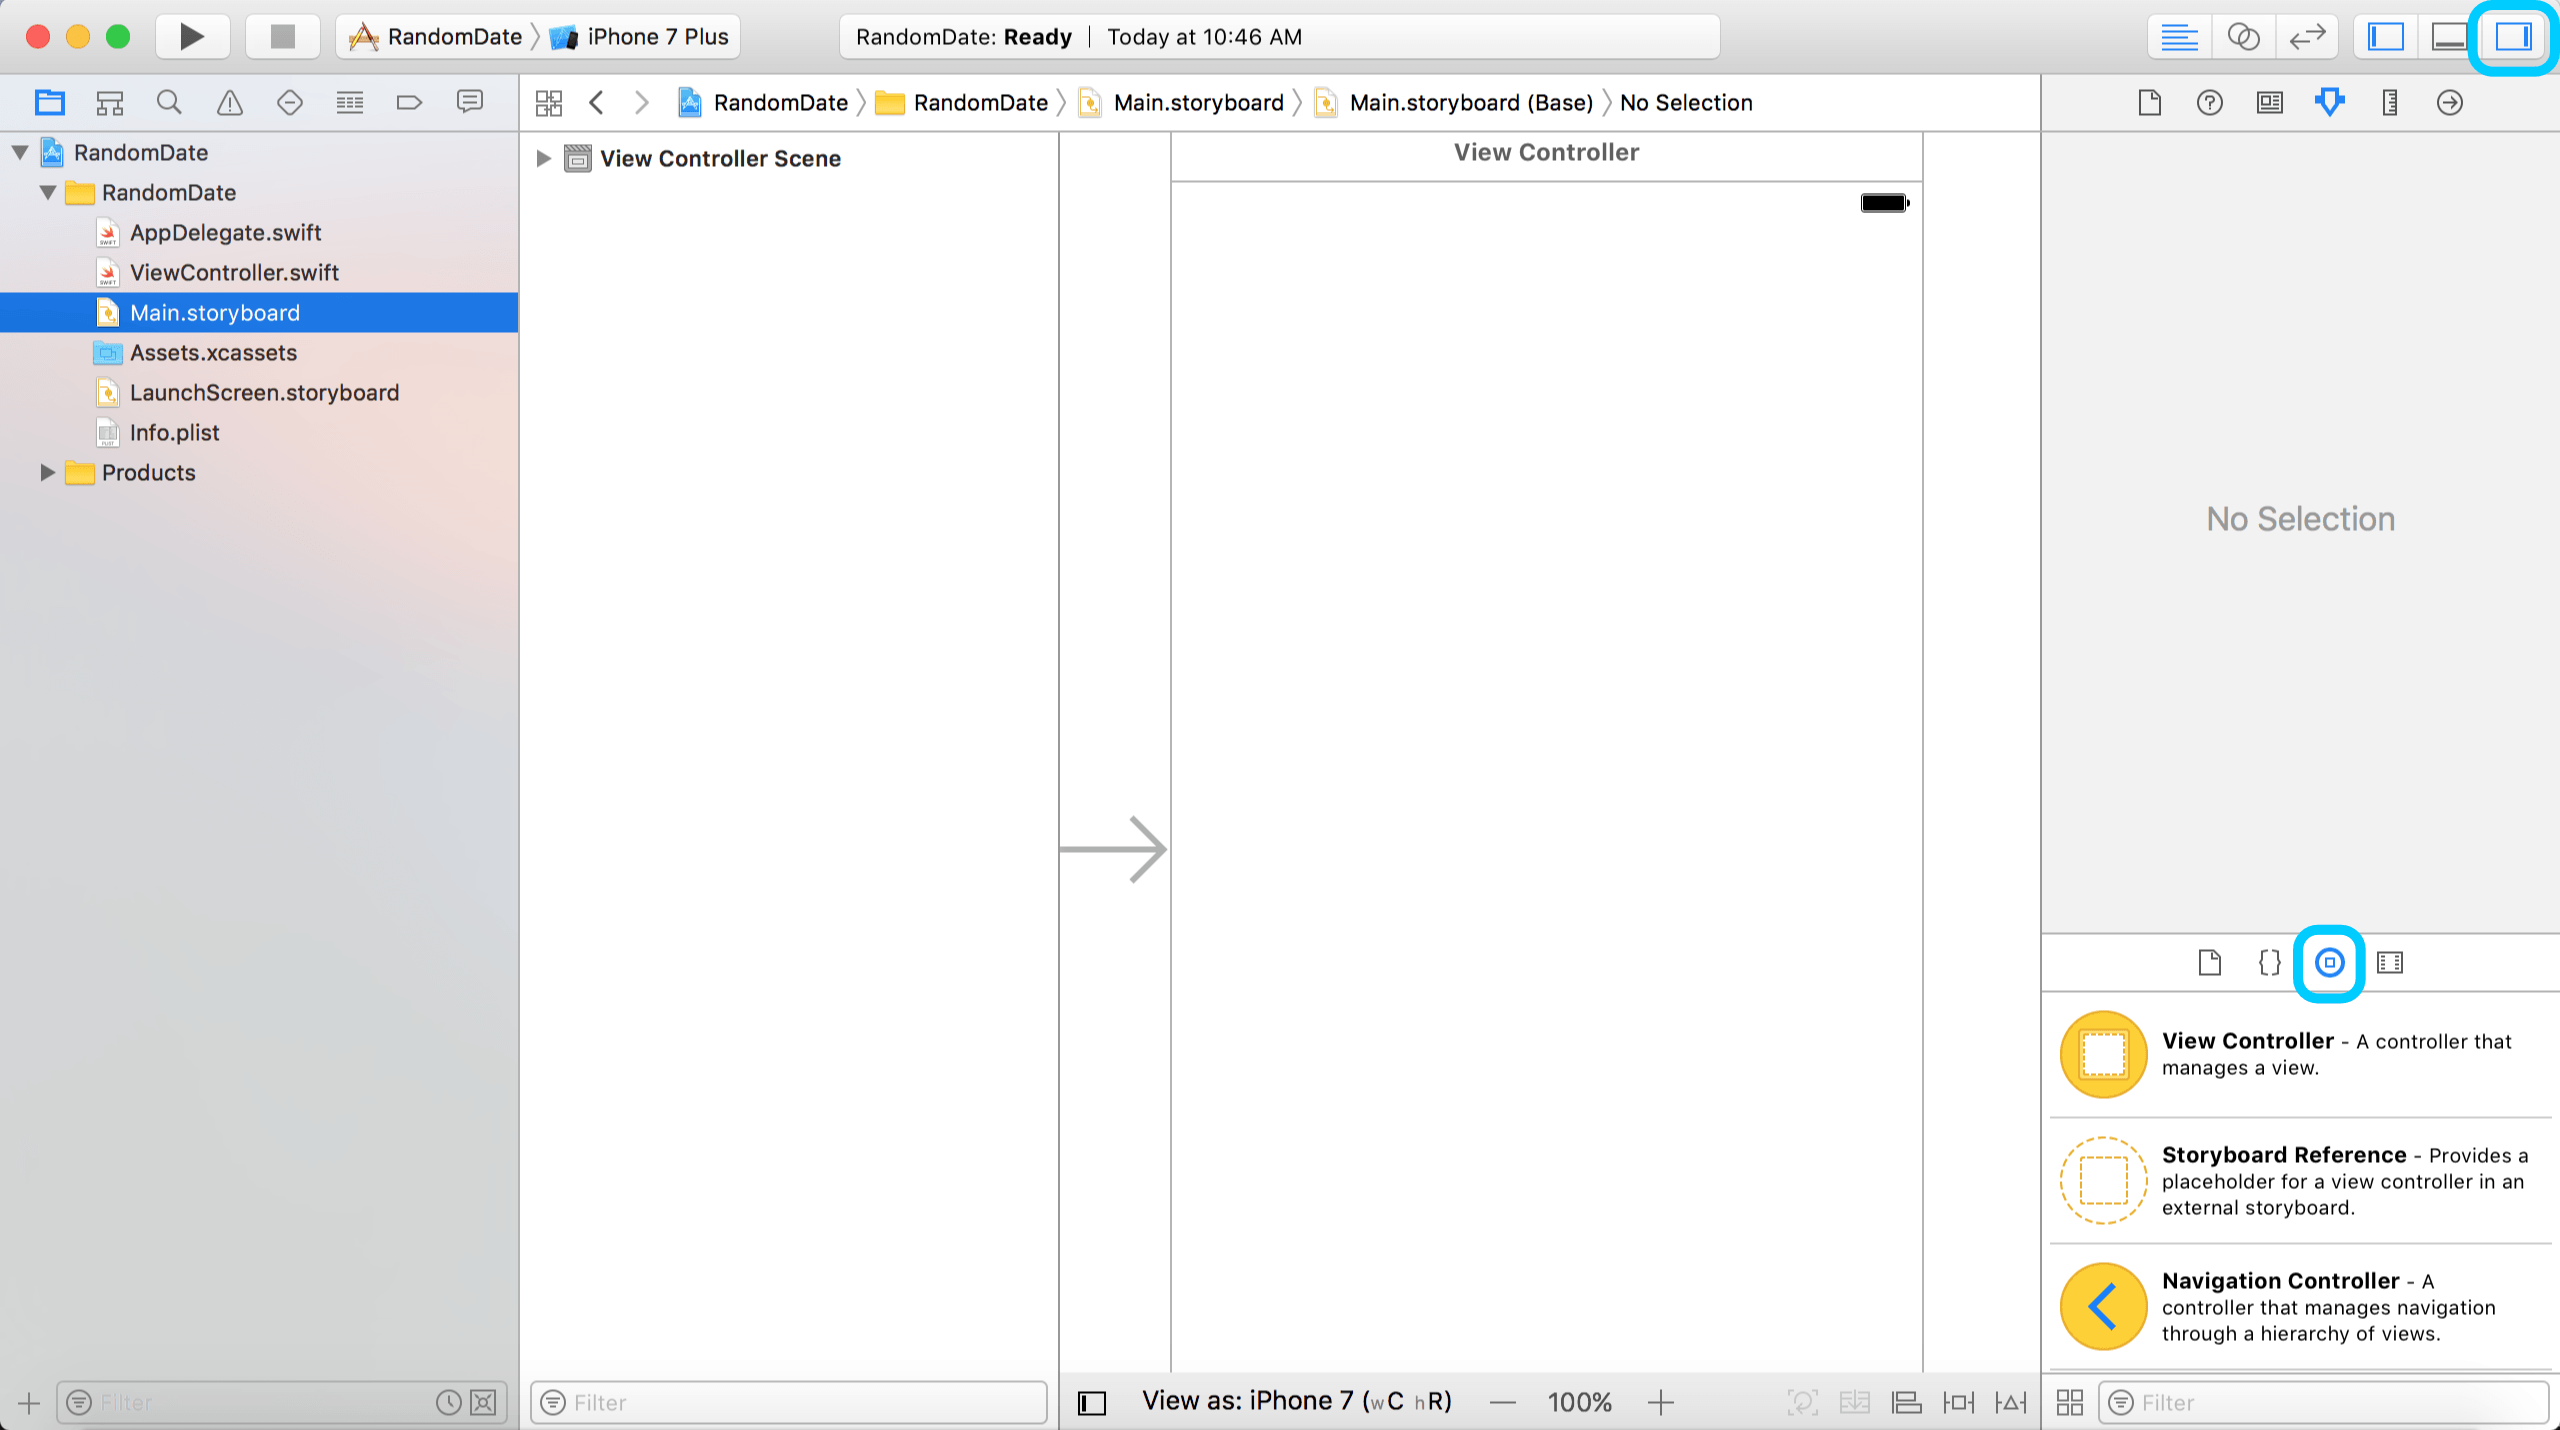
Click on Main.storyboard. You should see a white canvas that says View Controller at the top. You should also have a panel on the right with different objects for us to drag into the canvas. If you don’t see the right panel, there is a button at the top right of the screen, two buttons to the right of the button that reveals the left panel. In the bottom half of the right panel, make sure you’re displaying the Object Library, the third button over.
Scroll through the Object Library until you find an Image View. Drag it into your canvas. If you’re too zoomed out, Xcode may not let you drop the object onto the canvas. Let’s place it in the middle of the canvas. This image will be a visual representation of the activity your date has randomly selected. Perhaps we could use a lion to represent the zoo.
We would also like a button that we can press to randomly select the date. Find a Button in the Object Library and drag it to the bottom-middle of the canvas. I’m not actually putting it at the very bottom of the canvas. Xcode provides some helpful guiding lines that show you an appropriate margin to keep your objects away from the edges. Don’t worry. We’ll place these objects more precisely later. After you’ve placed the button, double click the text and change it to Select a Date. That’s more self-explanatory than Button.
We also need a label to clarify the nature of the date, just in case the picture isn’t clear enough. Did that lion mean you’re going to the zoo or going big game hunting? In this current political climate, you might not want to bring up a hot button issue right off the bat (or maybe you do—I’m just here to teach you about apps).
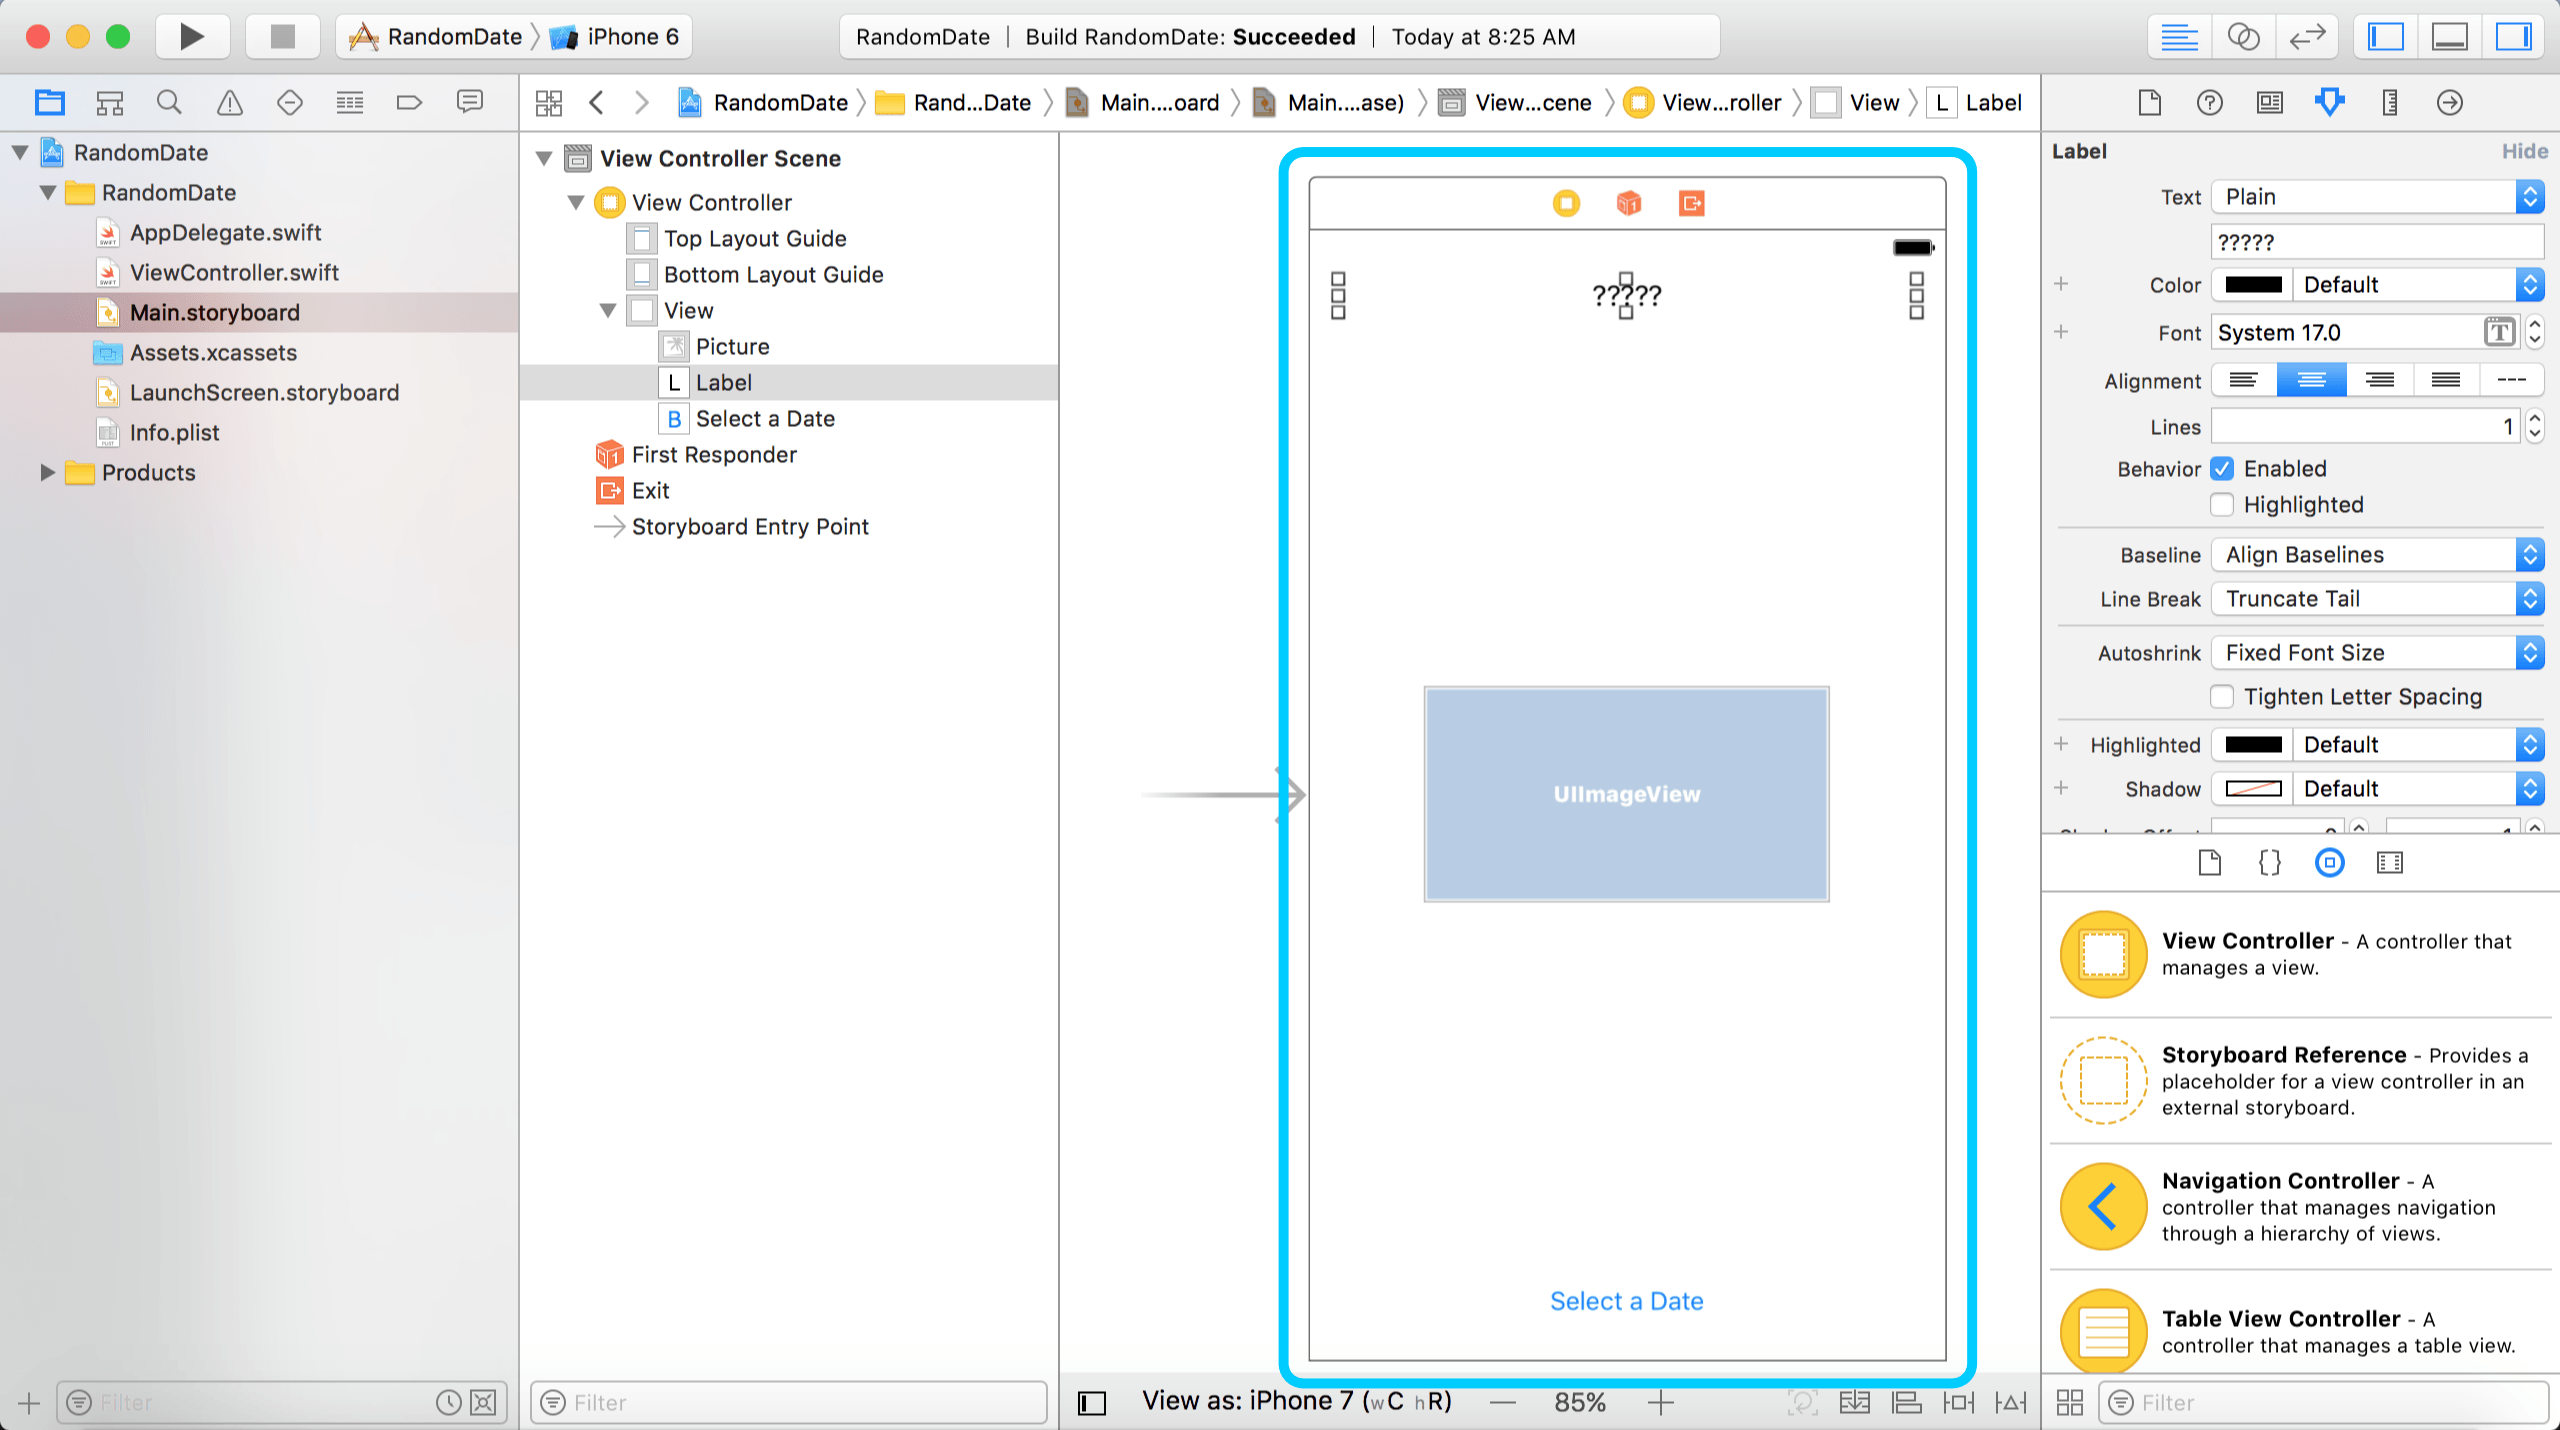
Find a Label in the Object Library and drag it to the top-middle of your canvas. Stretch out the label so its box reaches the left and right guiding lines of the canvas. Now, double click the label and change the text to ?????. That will heighten the sense of mystery. We also want the text centered. At the top of the right panel, there are 6 buttons. The fourth one from the left is the Attributes Inspector. Click that, then you should see an option to center the text. Great! Your storyboard now has all the basic objects your app needs to operate. Your screen should look something like this.
Connecting to the Code
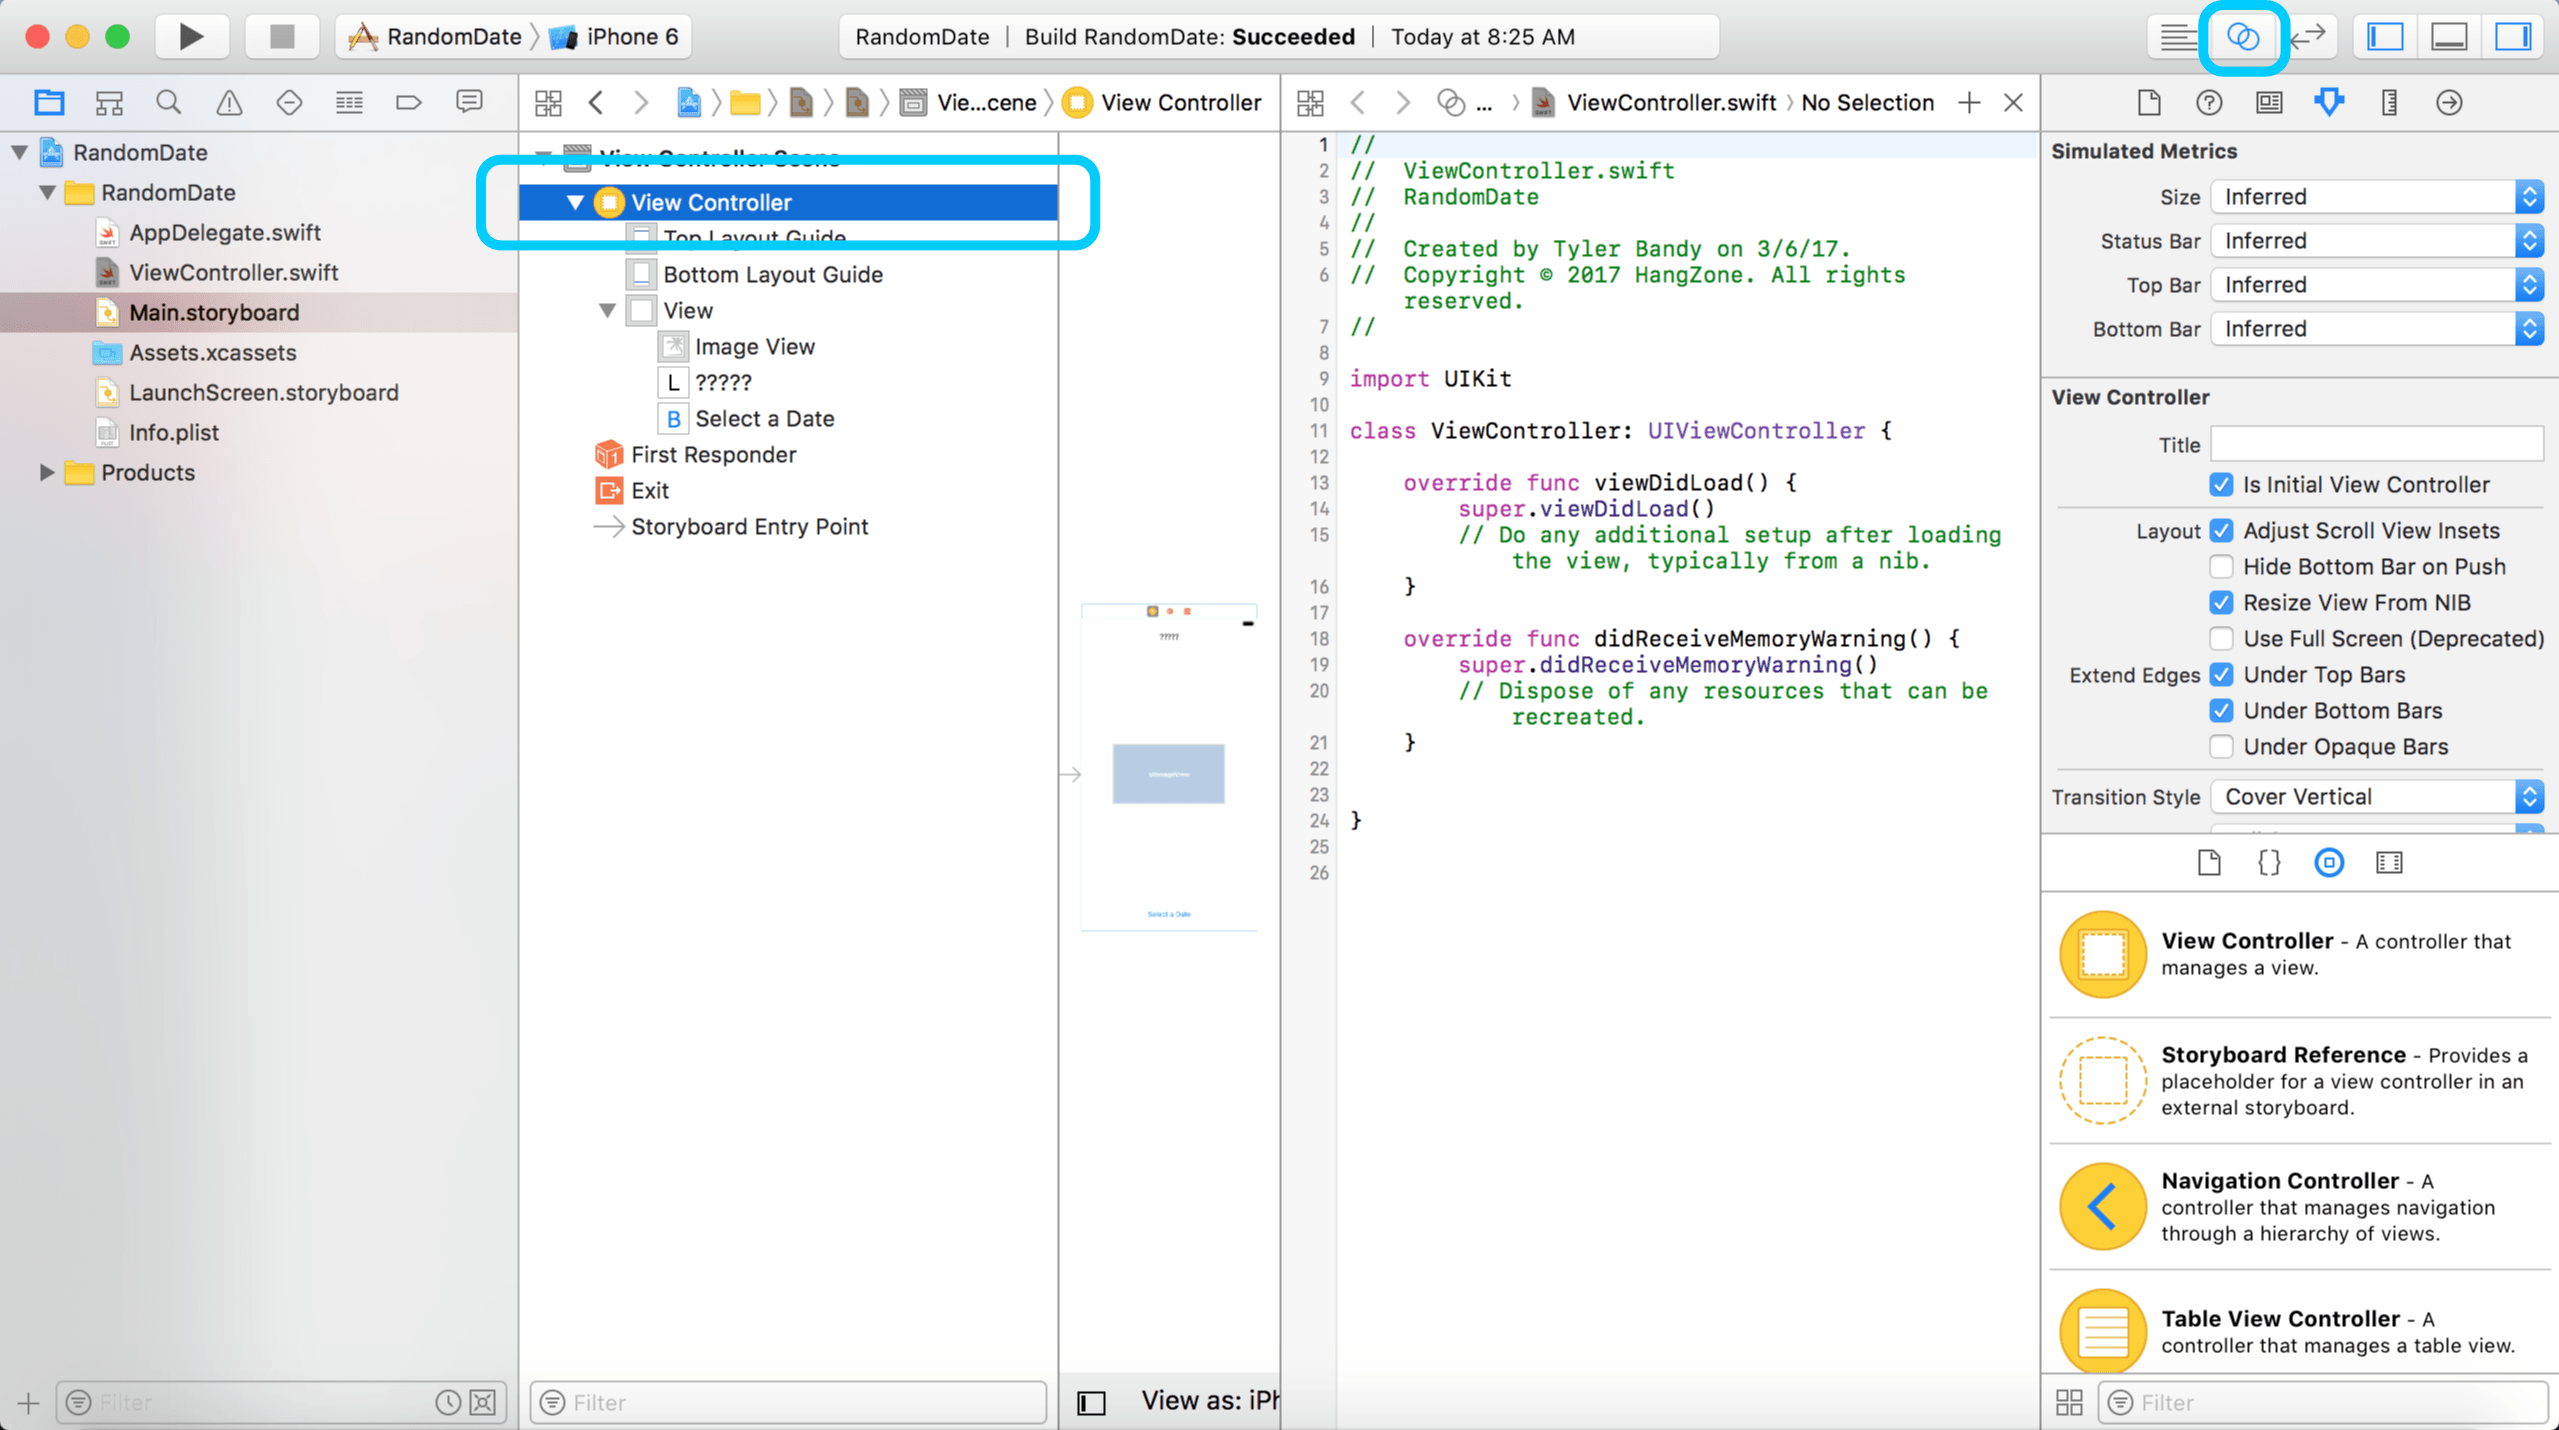
Although we have a label, a placeholder for an image, and a button, they don’t do anything yet. They need some logic to make our app do its thing. That’s going to take some code in our ViewController.swift file. First, we need to let ViewController.swift know about these great objects we just made, so it can manipulate them. We will do that by using Assistant Editor mode. While still in Main.storyboard, select View Controller from the outline on the left. Then we will activate the Assistant Editor by tapping the button at the top with the two circles.
If for some reason you don’t see the ViewController.swift code, make sure you have View Controller selected in the storyboard. If that’s not the problem, go to the Product dropdown menu at the top of the screen and select Clean. I had to do that as I was making this app. If all else fails, try restarting Xcode. Hopefully, everything worked fine and you don’t need any troubleshooting.
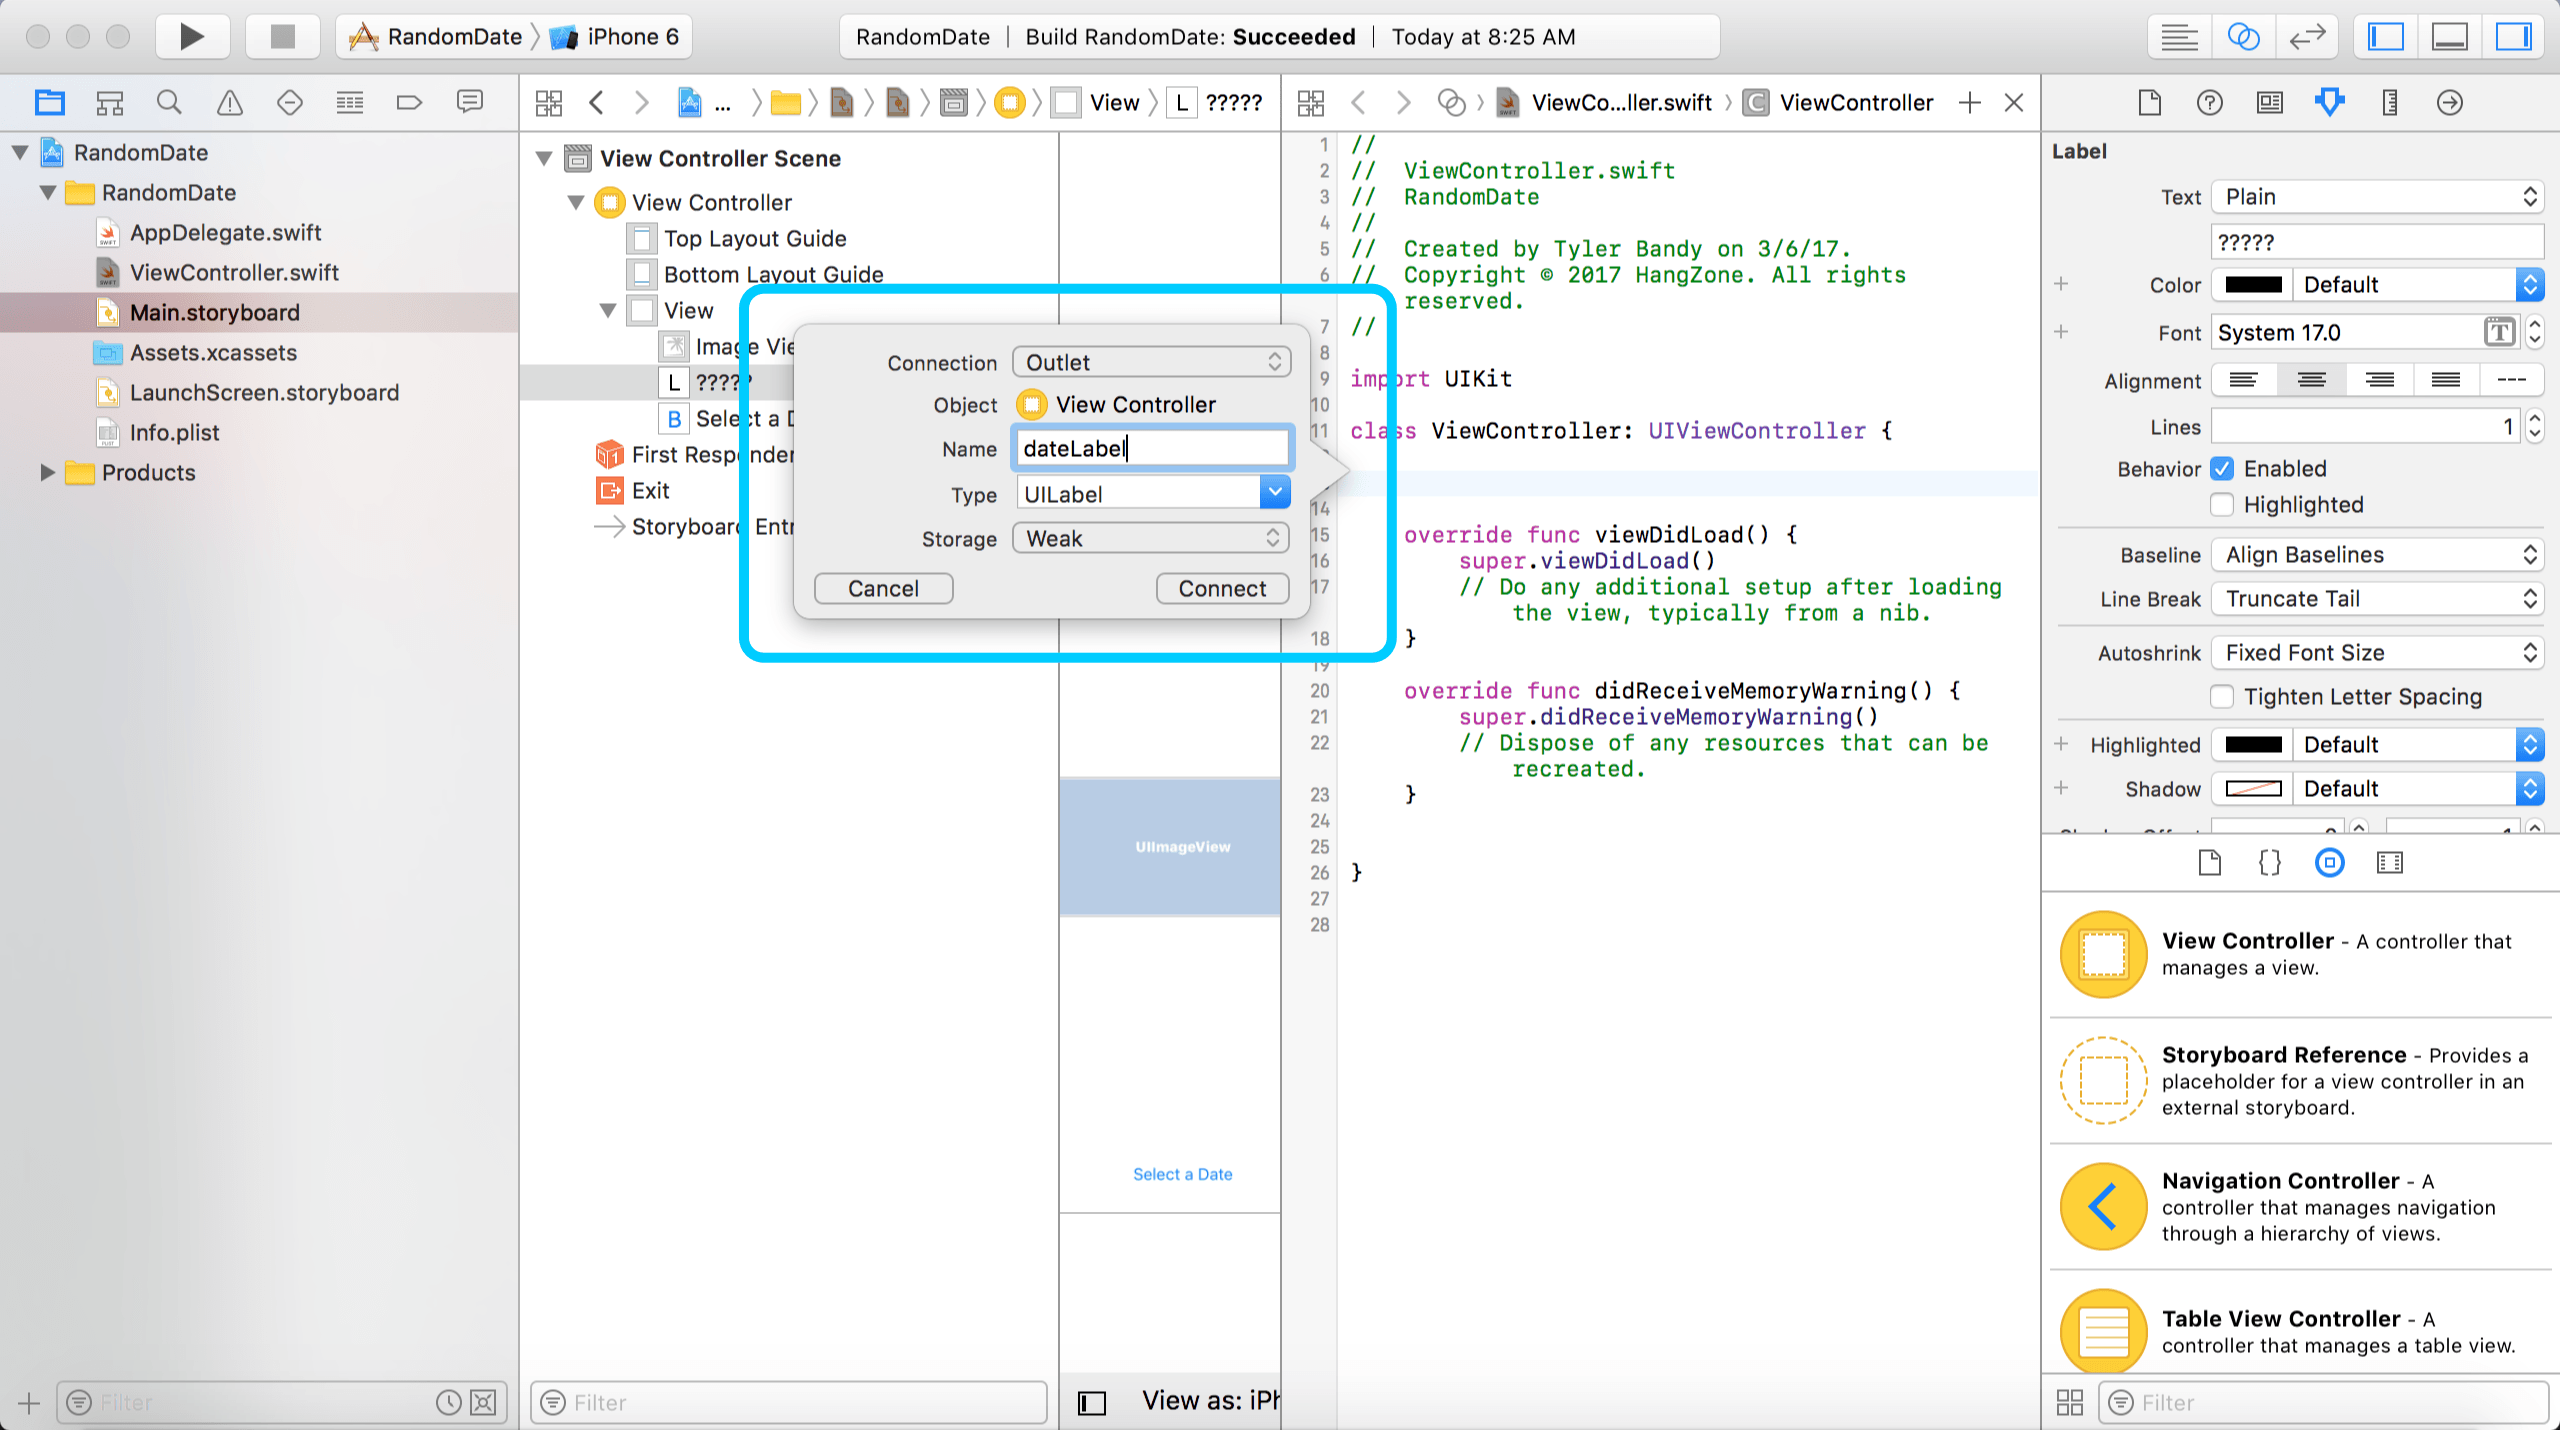
Now that we have the storyboard and code open at the same time, hold down the control key on your keyboard and drag from the storyboard label to the line below the first brace in the code.
You’ll get a popup box that allows you to name the object. Name it dateLabel. Leave the other options as their defaults.
Do a control drag for the image as well. Drag it right below where you dragged the label. We will use dateImage for its name.
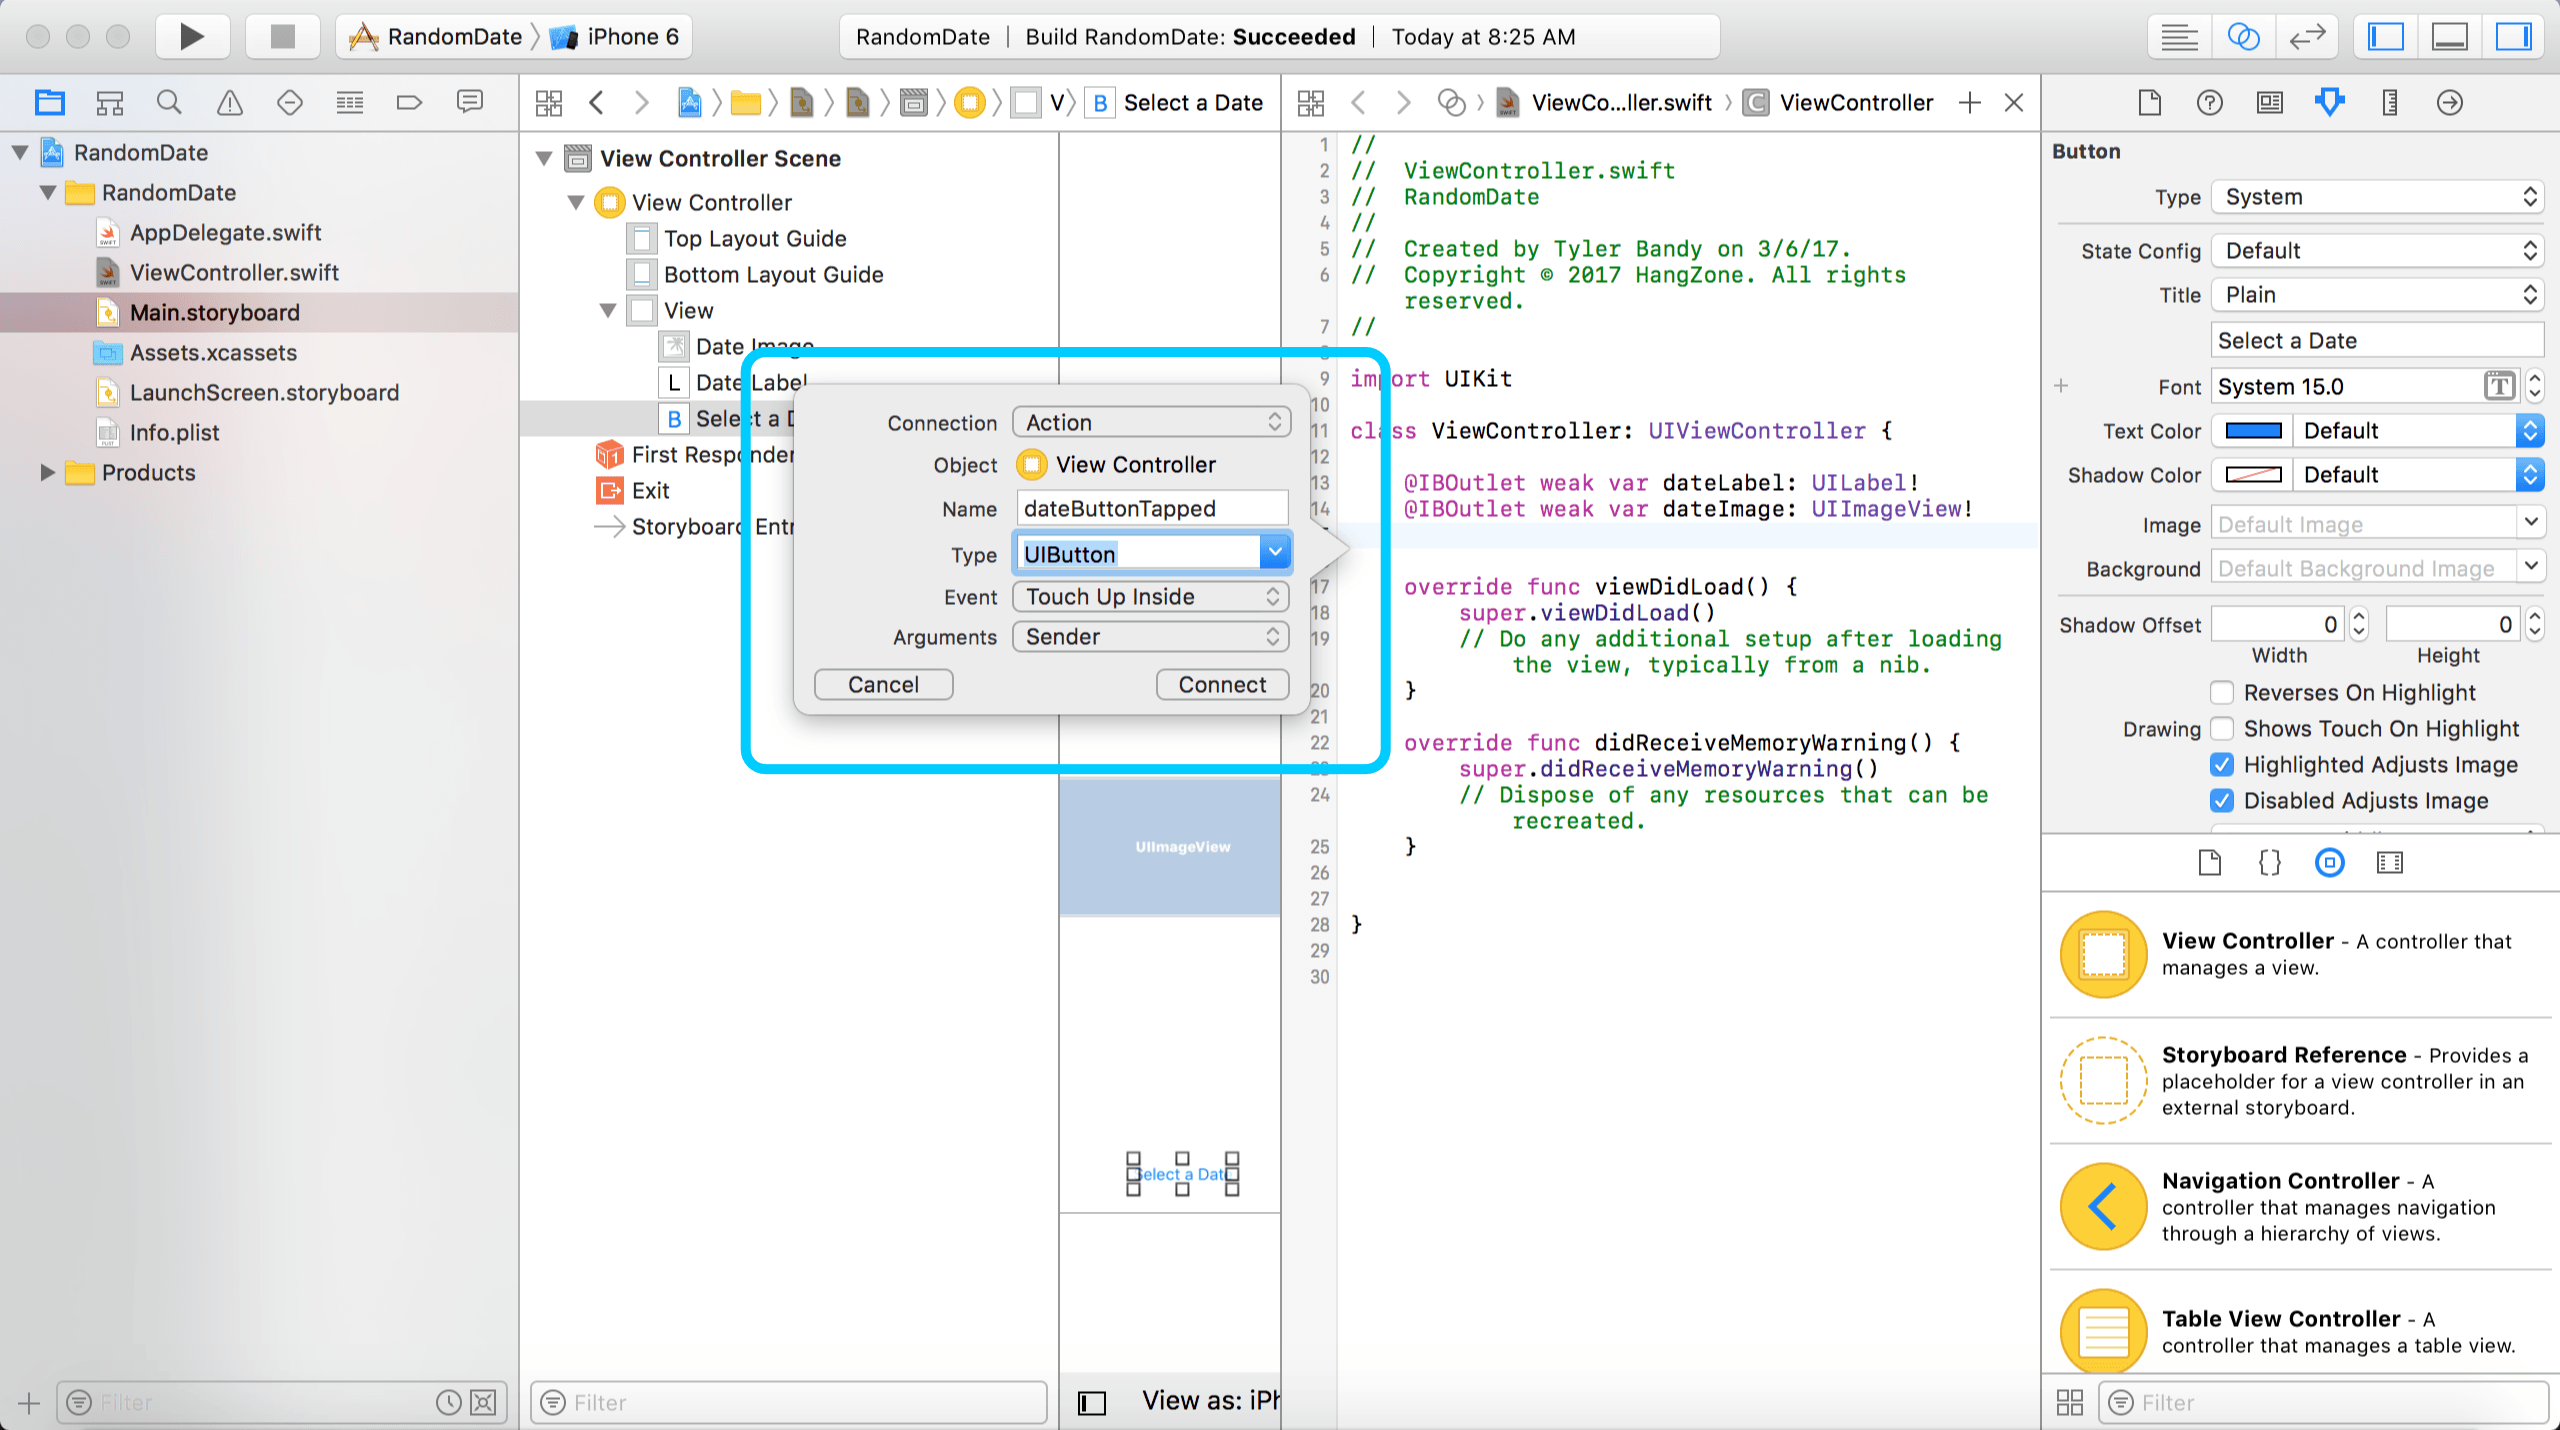
Now control drag the button. On the Connection choice, change it from Outlet to Action. Name the action dateButtonTapped. Change the Type from Any to UIButton. Now hit Connect.
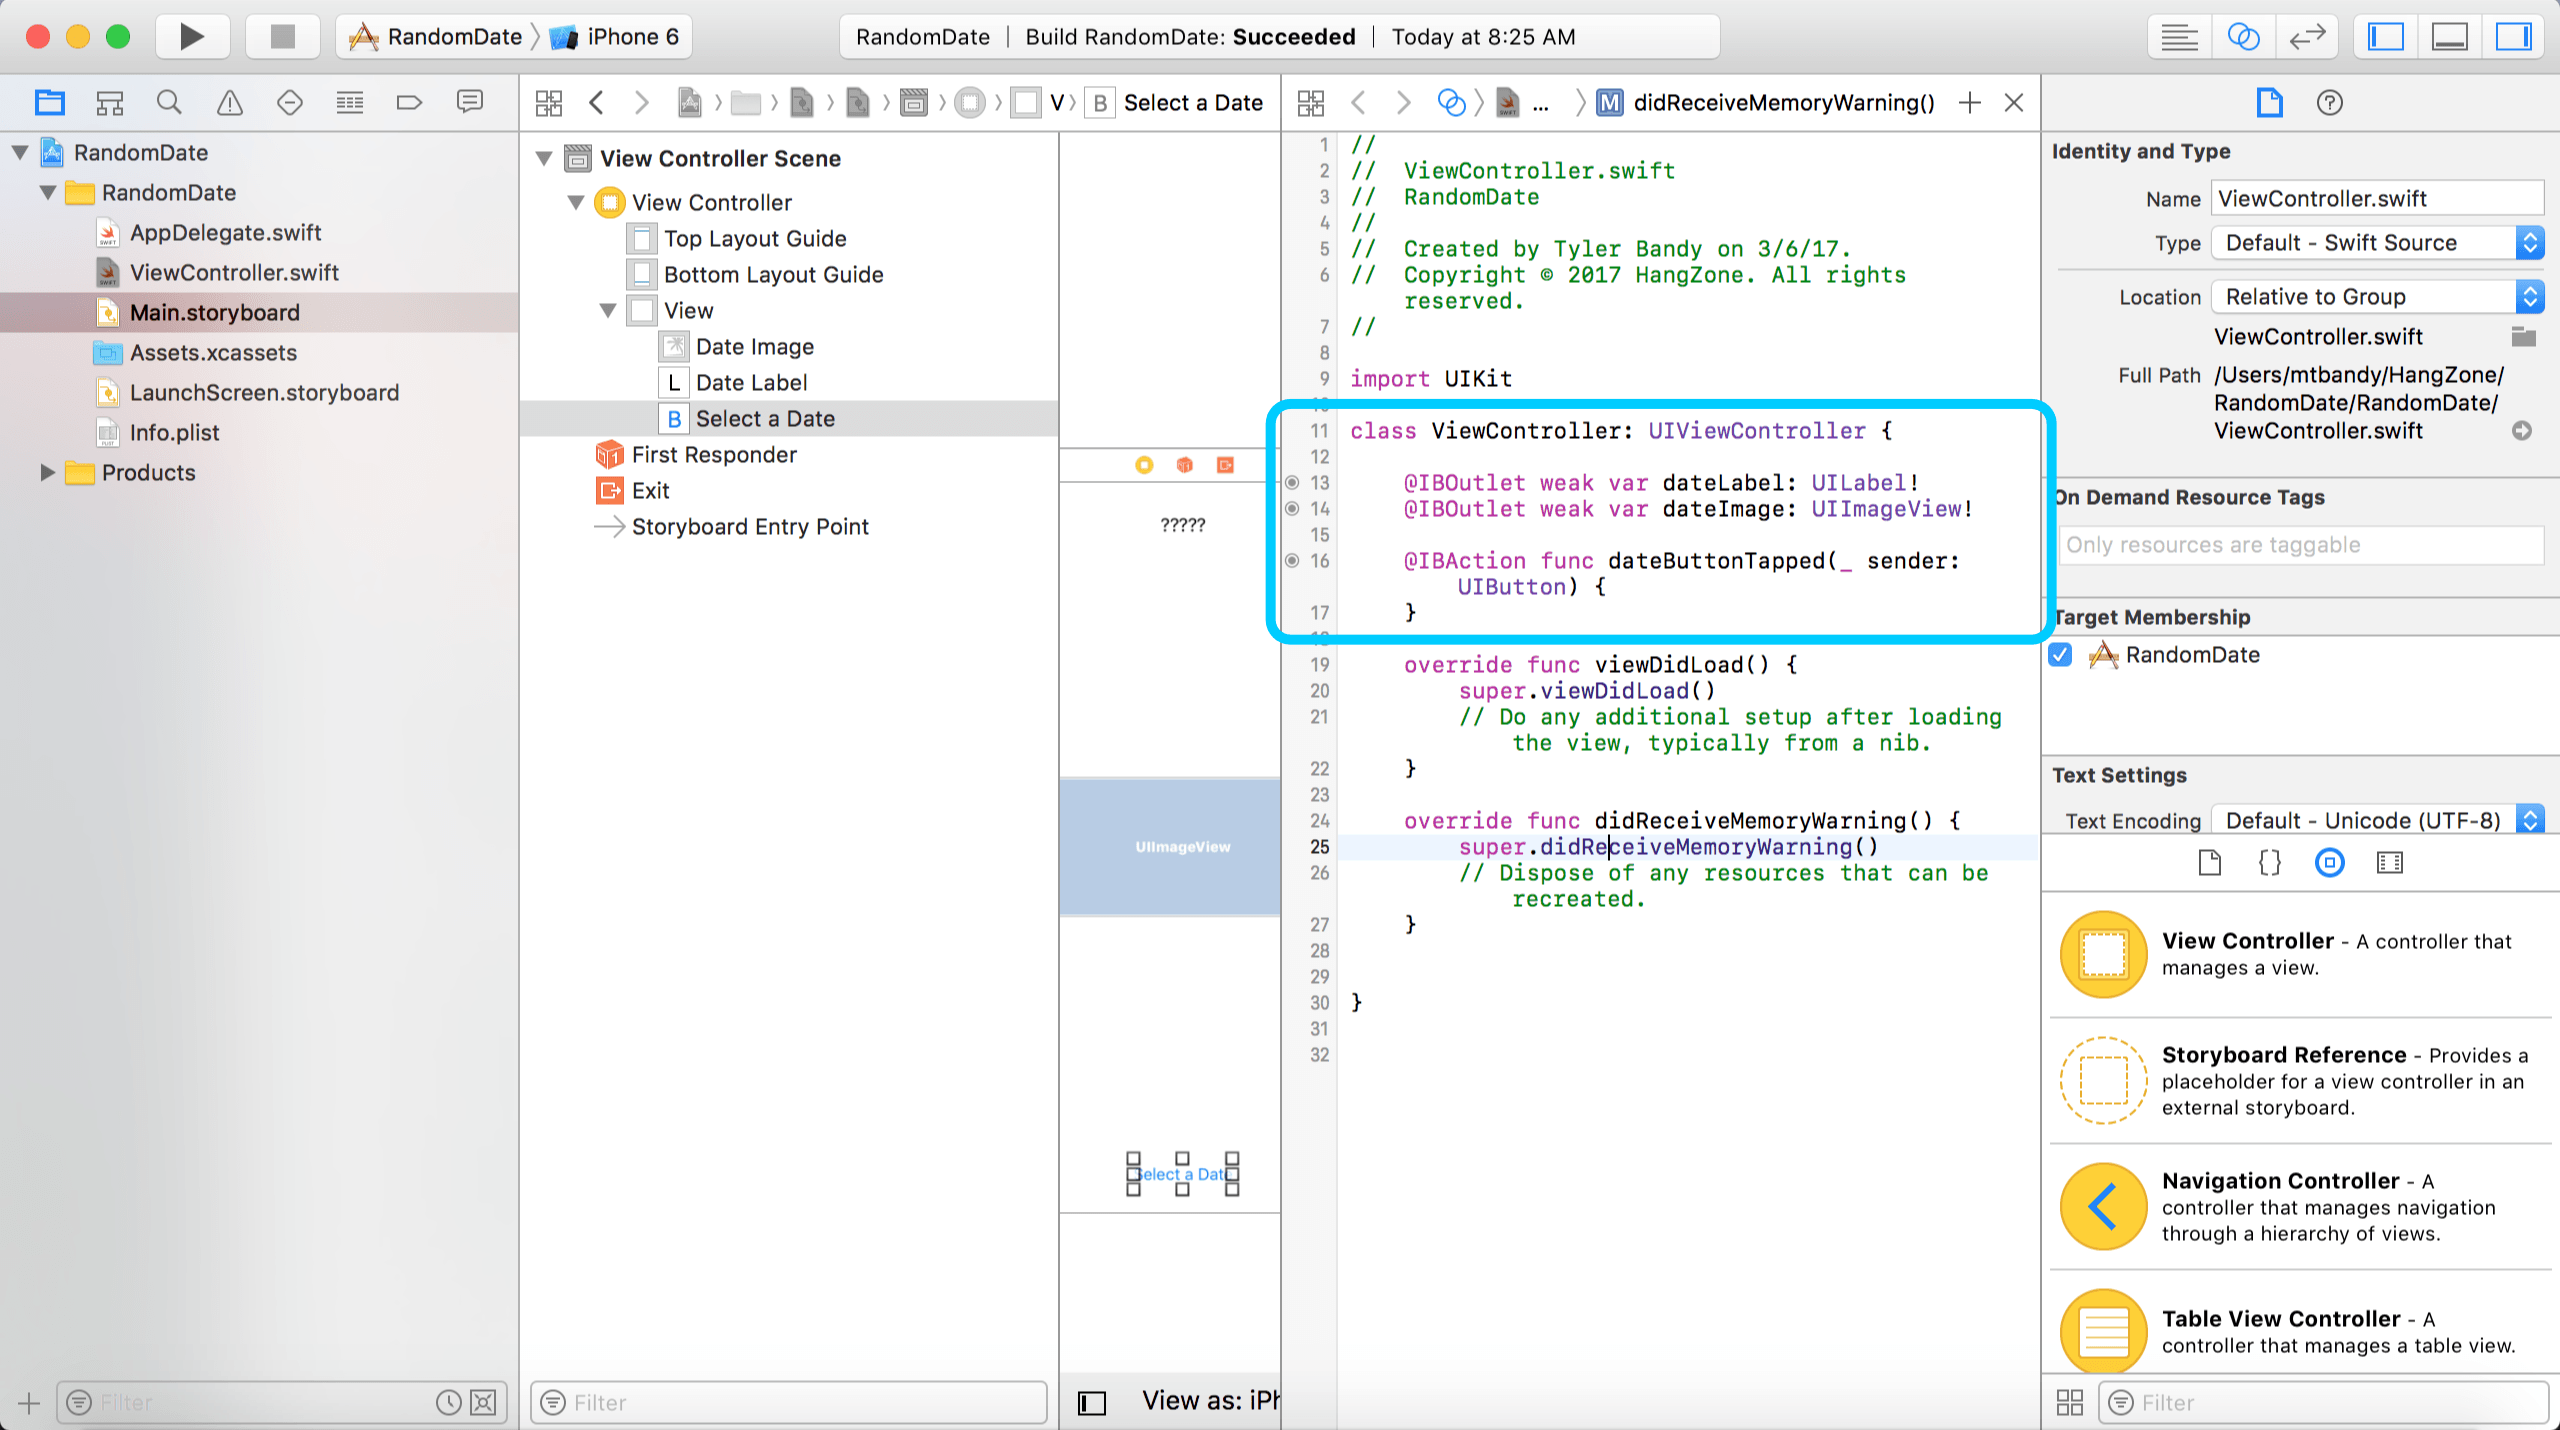
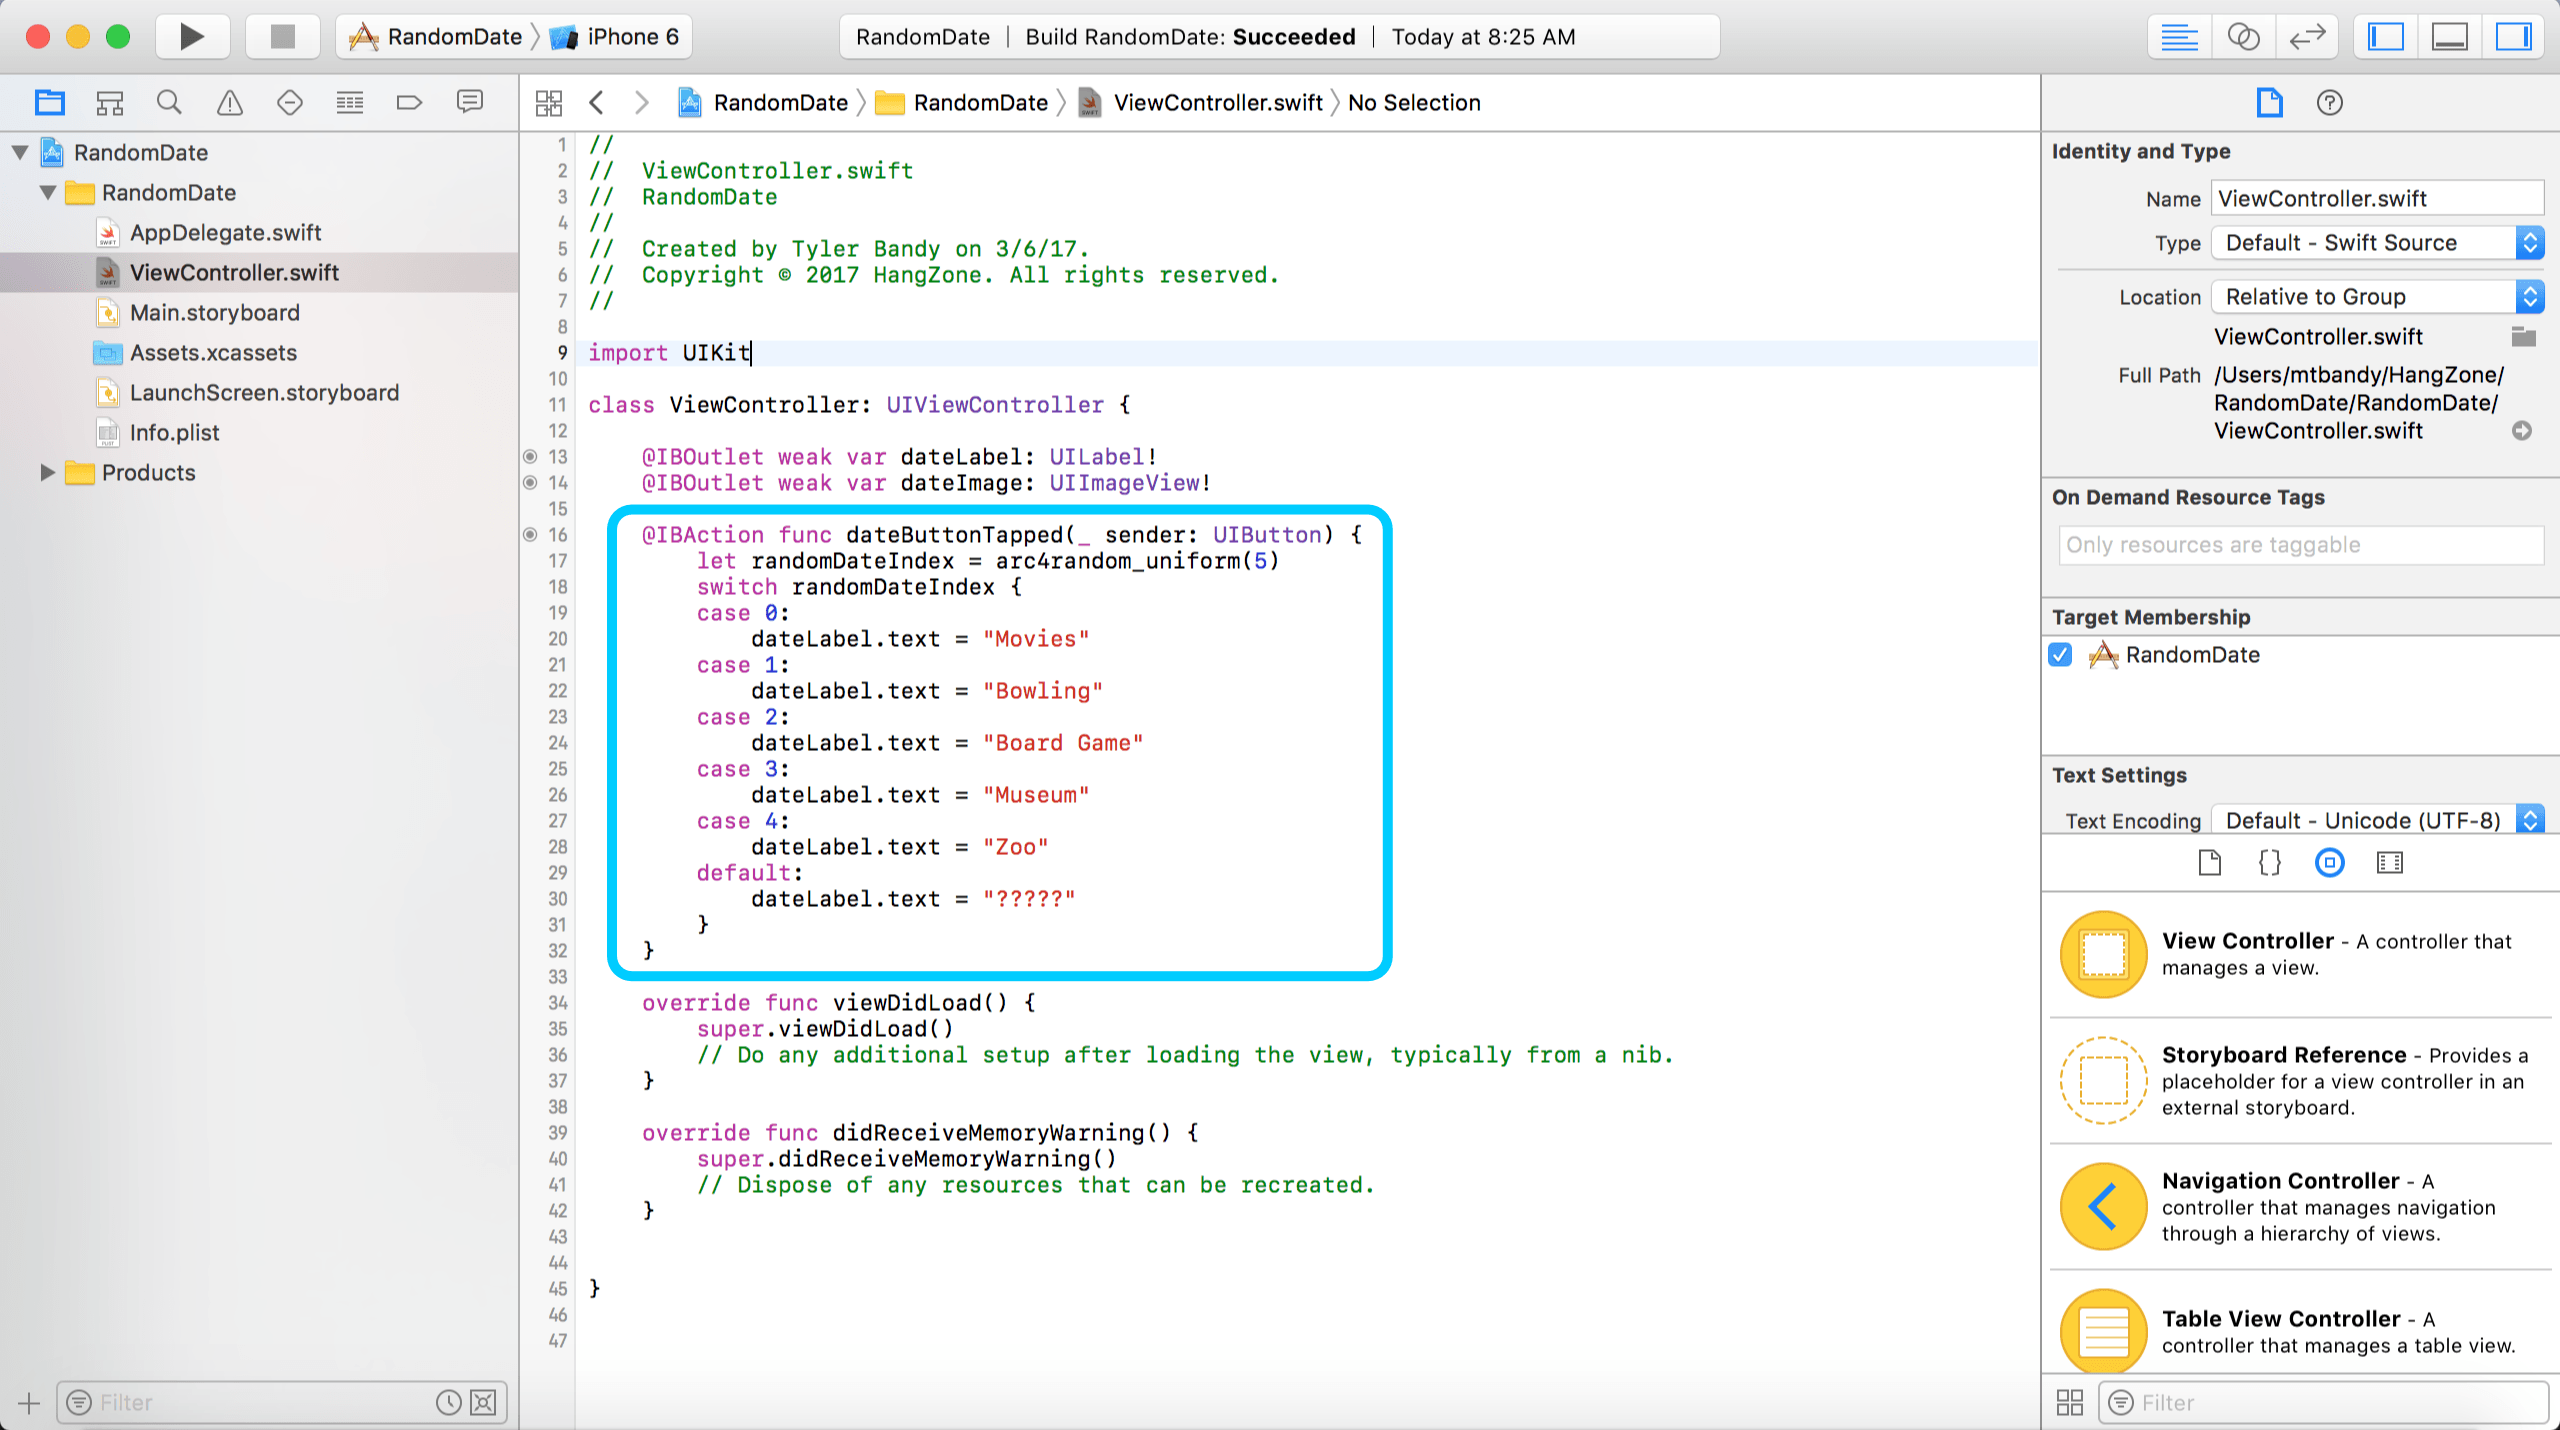
Your code should look something like this. I added some line breaks to separate the dateButtonTapped connection from the other two connections, but line breaks are purely cosmetic.
We’re done making connections now, so let’s close the Assistant Editor. The button to the left of the Assistant Editor button returns you to the Standard Editor. You should see a full screen of your storyboard. On the left side of the screen, select ViewController.swift. You should see the code where you were just making connections.
Before we write some code, let me explain the the purpose of the connections we added into the code. dateLabel and dateImage are variables. When we determine the random date, we’re going set the appropriate text into dateLabel and the corresponding image into dateImage. dateButtonTapped is a method. When the button is tapped, the code written in this method will execute. There’s no code here yet, so let’s add some!
Time to Code
Between the braces of buttonTapped, write the following code:
let randomDateIndex = arc4random_uniform(5)
switch randomDateIndex {
case 0:
    dateLabel.text = "Movies"
case 1:
    dateLabel.text = "Bowling"
case 2:
    dateLabel.text = "Board Game"
case 3:
    dateLabel.text = "Museum"
case 4:
    dateLabel.text = "Zoo"
default:
    dateLabel.text = "?????"
}
Xcode should help you out and autocomplete some of the structure. Let me explain what it all does. First we create a constant called randomDateIndex. It will be a random nonnegative integer that doesn’t exceed 5. In other words, it will equal 0, 1, 2, 3, or 4, with a uniform probability of being any of those numbers.
The next bit of code is called a switch statement. Based on what value we stored in randomDateIndex, we will execute the code in the corresponding case of the switch statement. Notice that each case has a different potential date. There’s also a default case. Switch statements in Swift have to cover every possible case. Using default is a catch-all for all of the other cases. It’s not actually possible for our randomDateIndex to equal anything other than 0, 1, 2, 3, or 4, so it doesn’t particularly matter what we write in the default case in this situation.
Our dateLabel has a property called text. We can access it by writing dateLabel.text. Let’s say our randomDateIndex is 4. In this case, we set dateLabel’s text to Zoo. In other words, the text will change to Zoo when you tap the button. Your code should now look like this.
Wrap-up
Now, this is hardly the final product. We still need pictures to go with all of these dates. That includes different size pictures for different devices. We also need to position our label, image, and button a bit more elegantly. We need an app icon. There are steps to take in order for all of this to work on Apple’s various device types.
That’s a lot of stuff!
Don’t worry, though. We’ll get to that next time. Until then, you can run our incomplete project on your device or a simulator to see how it’s coming. You probably see the big triangular play button at the top left of the screen. That runs the app. The square button next to that stops the app from running. To the right of that, you’ll see a bunch of simulator choices you can choose from, or you can select your own device if it’s plugged into your computer. Choose one of the options and run it!
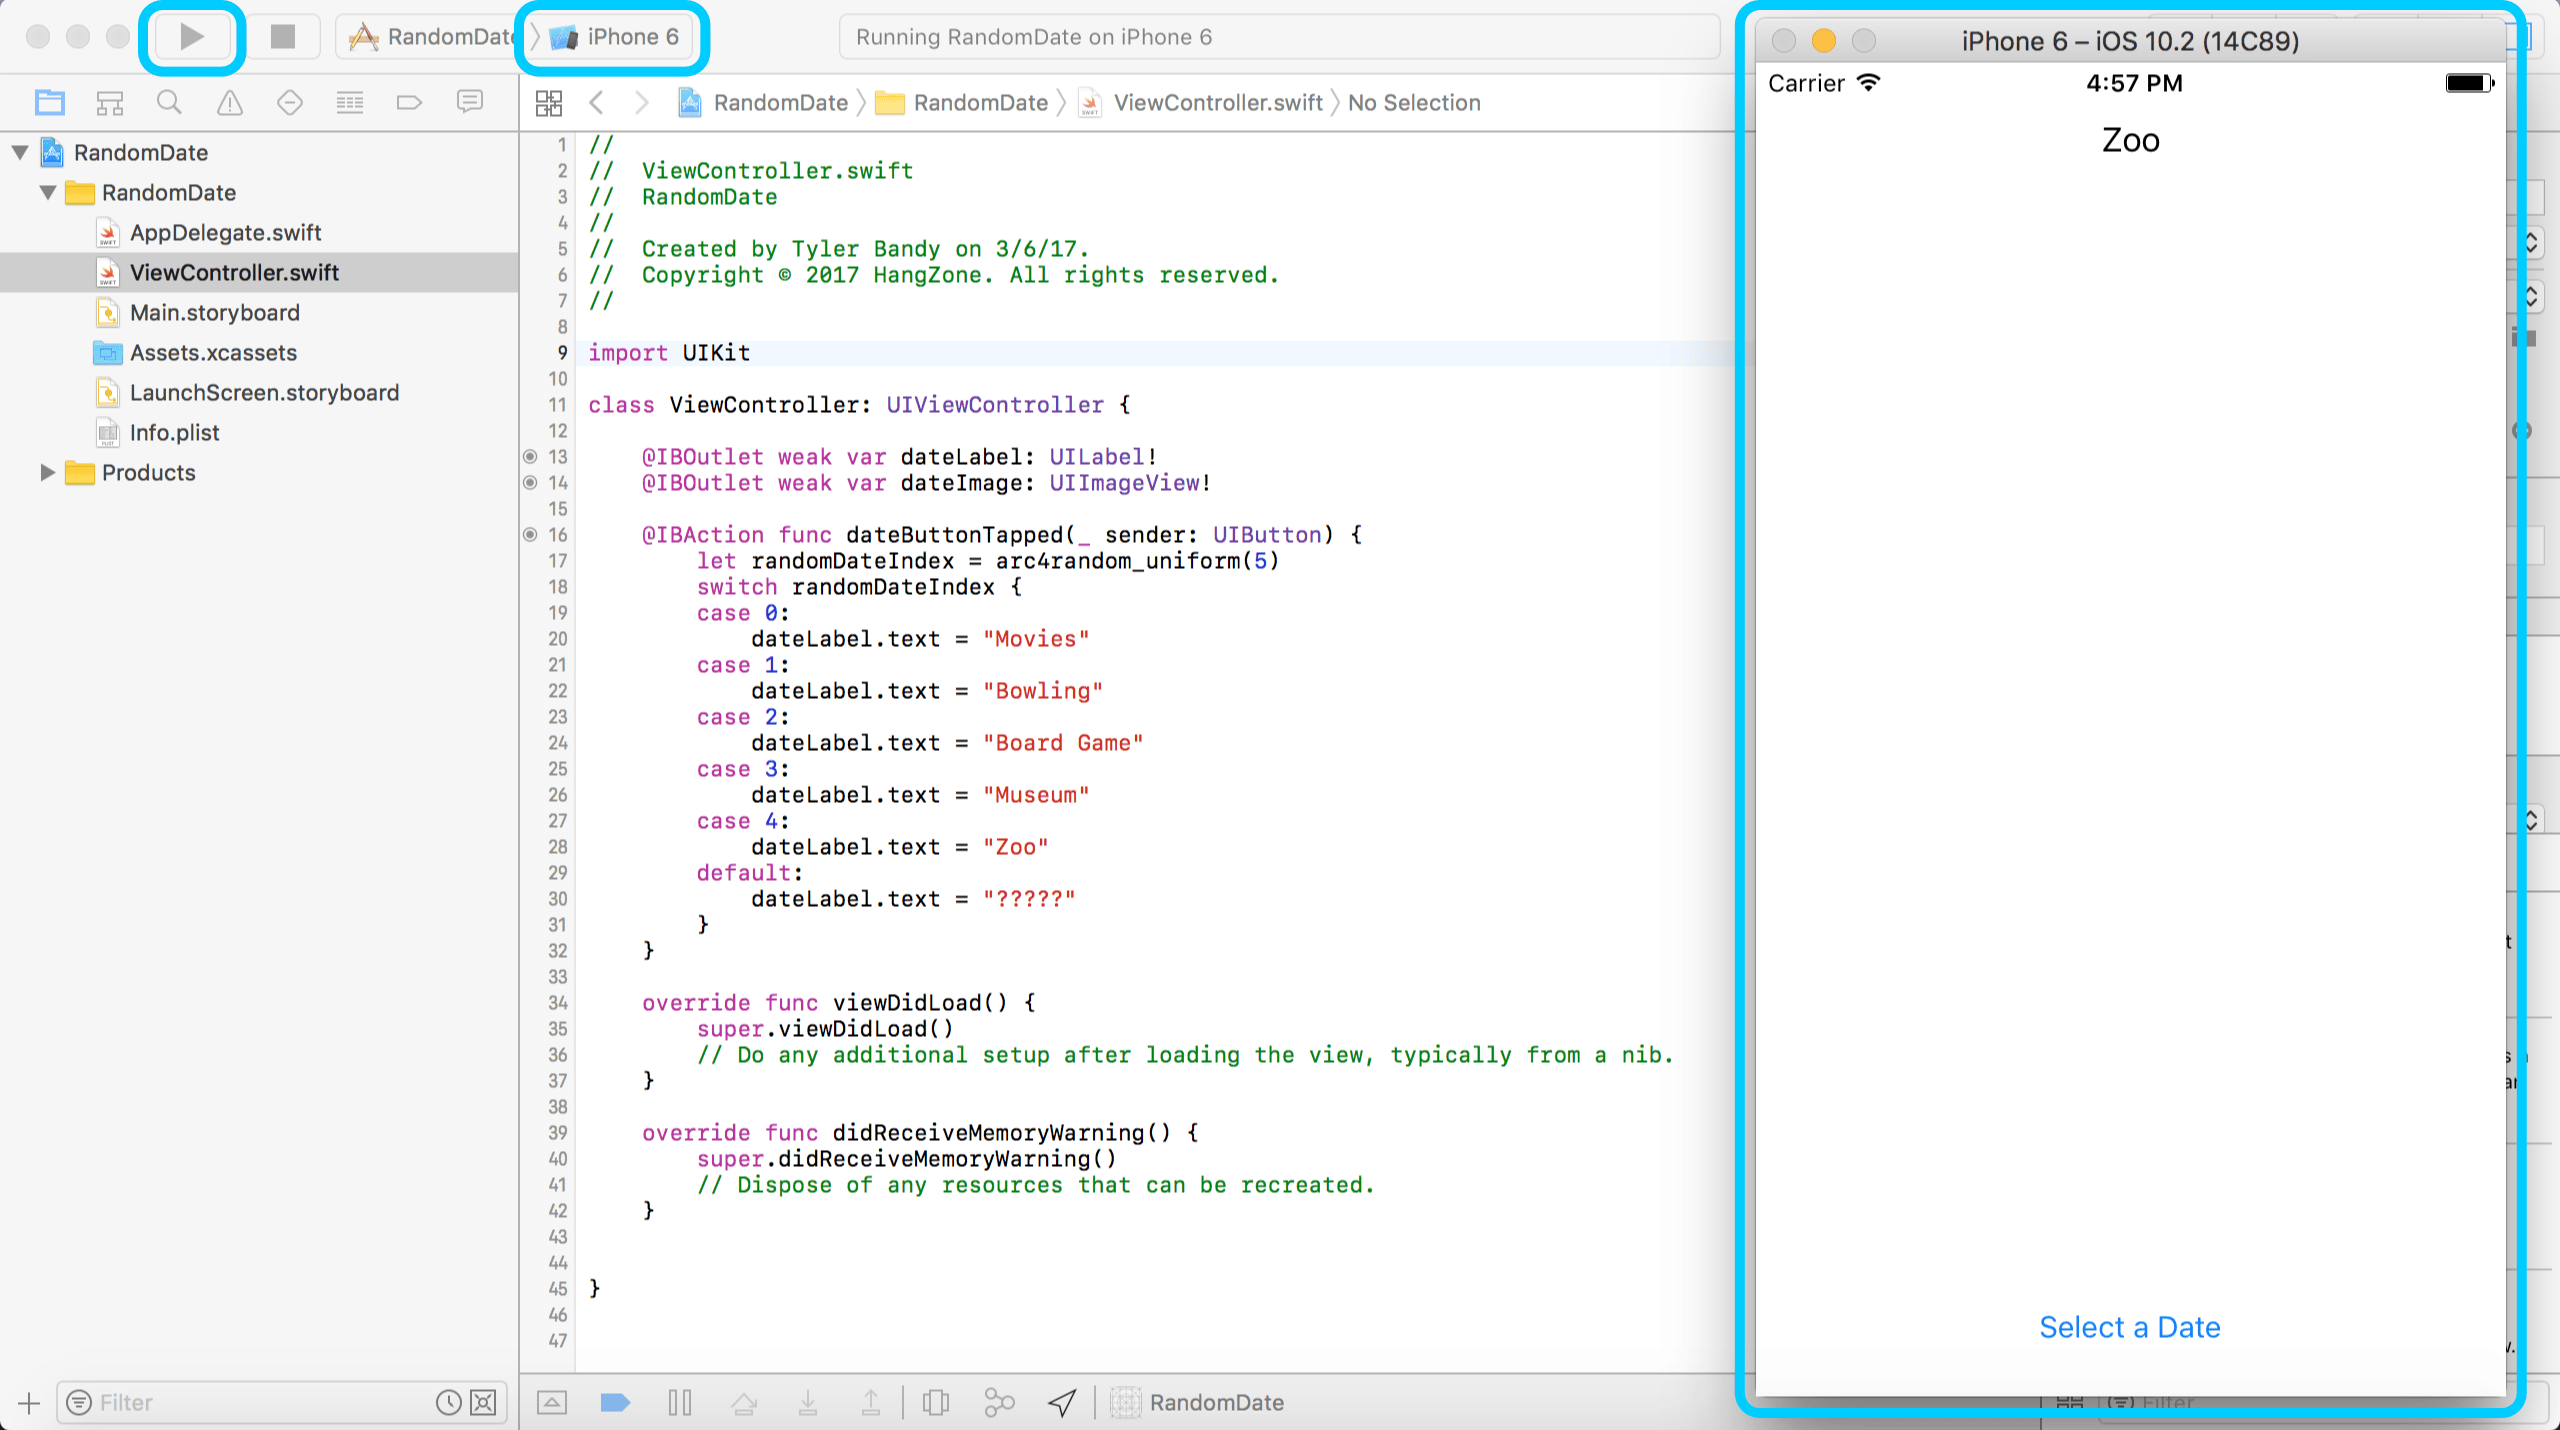
Did you press the button? Riveting stuff. We’ll get things fully operational next time. Until then, have fun at the zoo or whatever other venue fate throws your way!