Note: Many of the “‑” used in the code examples are non-line breaking hyphens. If you are copying and pasting code into Xcode, you will get an error. These need to be replaced with standard hyphens.
In part 1, we set up Cocos2d-x on our computer. Part 2 starts where we left off–with an untouched Cocos2d-x project in Xcode. If you build and run the current project, “Hello World” should be displayed on the device or emulator. Please visit part 1 of this blog post to get to this point.
Creating the Art Assets
Before we get started programming, we need art assets for the game. I made simple images in a free vector art program called Inkscape (you can read more about Inkscape and other free art programs here). Feel free to use these assets or make your own. You can download these images here. For now, I am only making one size asset for our game. These assets are designed for the 12.9-in iPad Pro, and we will rely on the cocos2d-x game engine to scale the images to fit every device size. Although it should not be an issue with the basic art assets that we are using, we are making images at the largest size so that we don’t experience blurriness or loss in detail by scaling images up. In future blog posts, I may add additional art sizes, or at least one set of iPhone images to prevent skewing of the images for devices with different aspect ratios.
Adding the Images to the Project
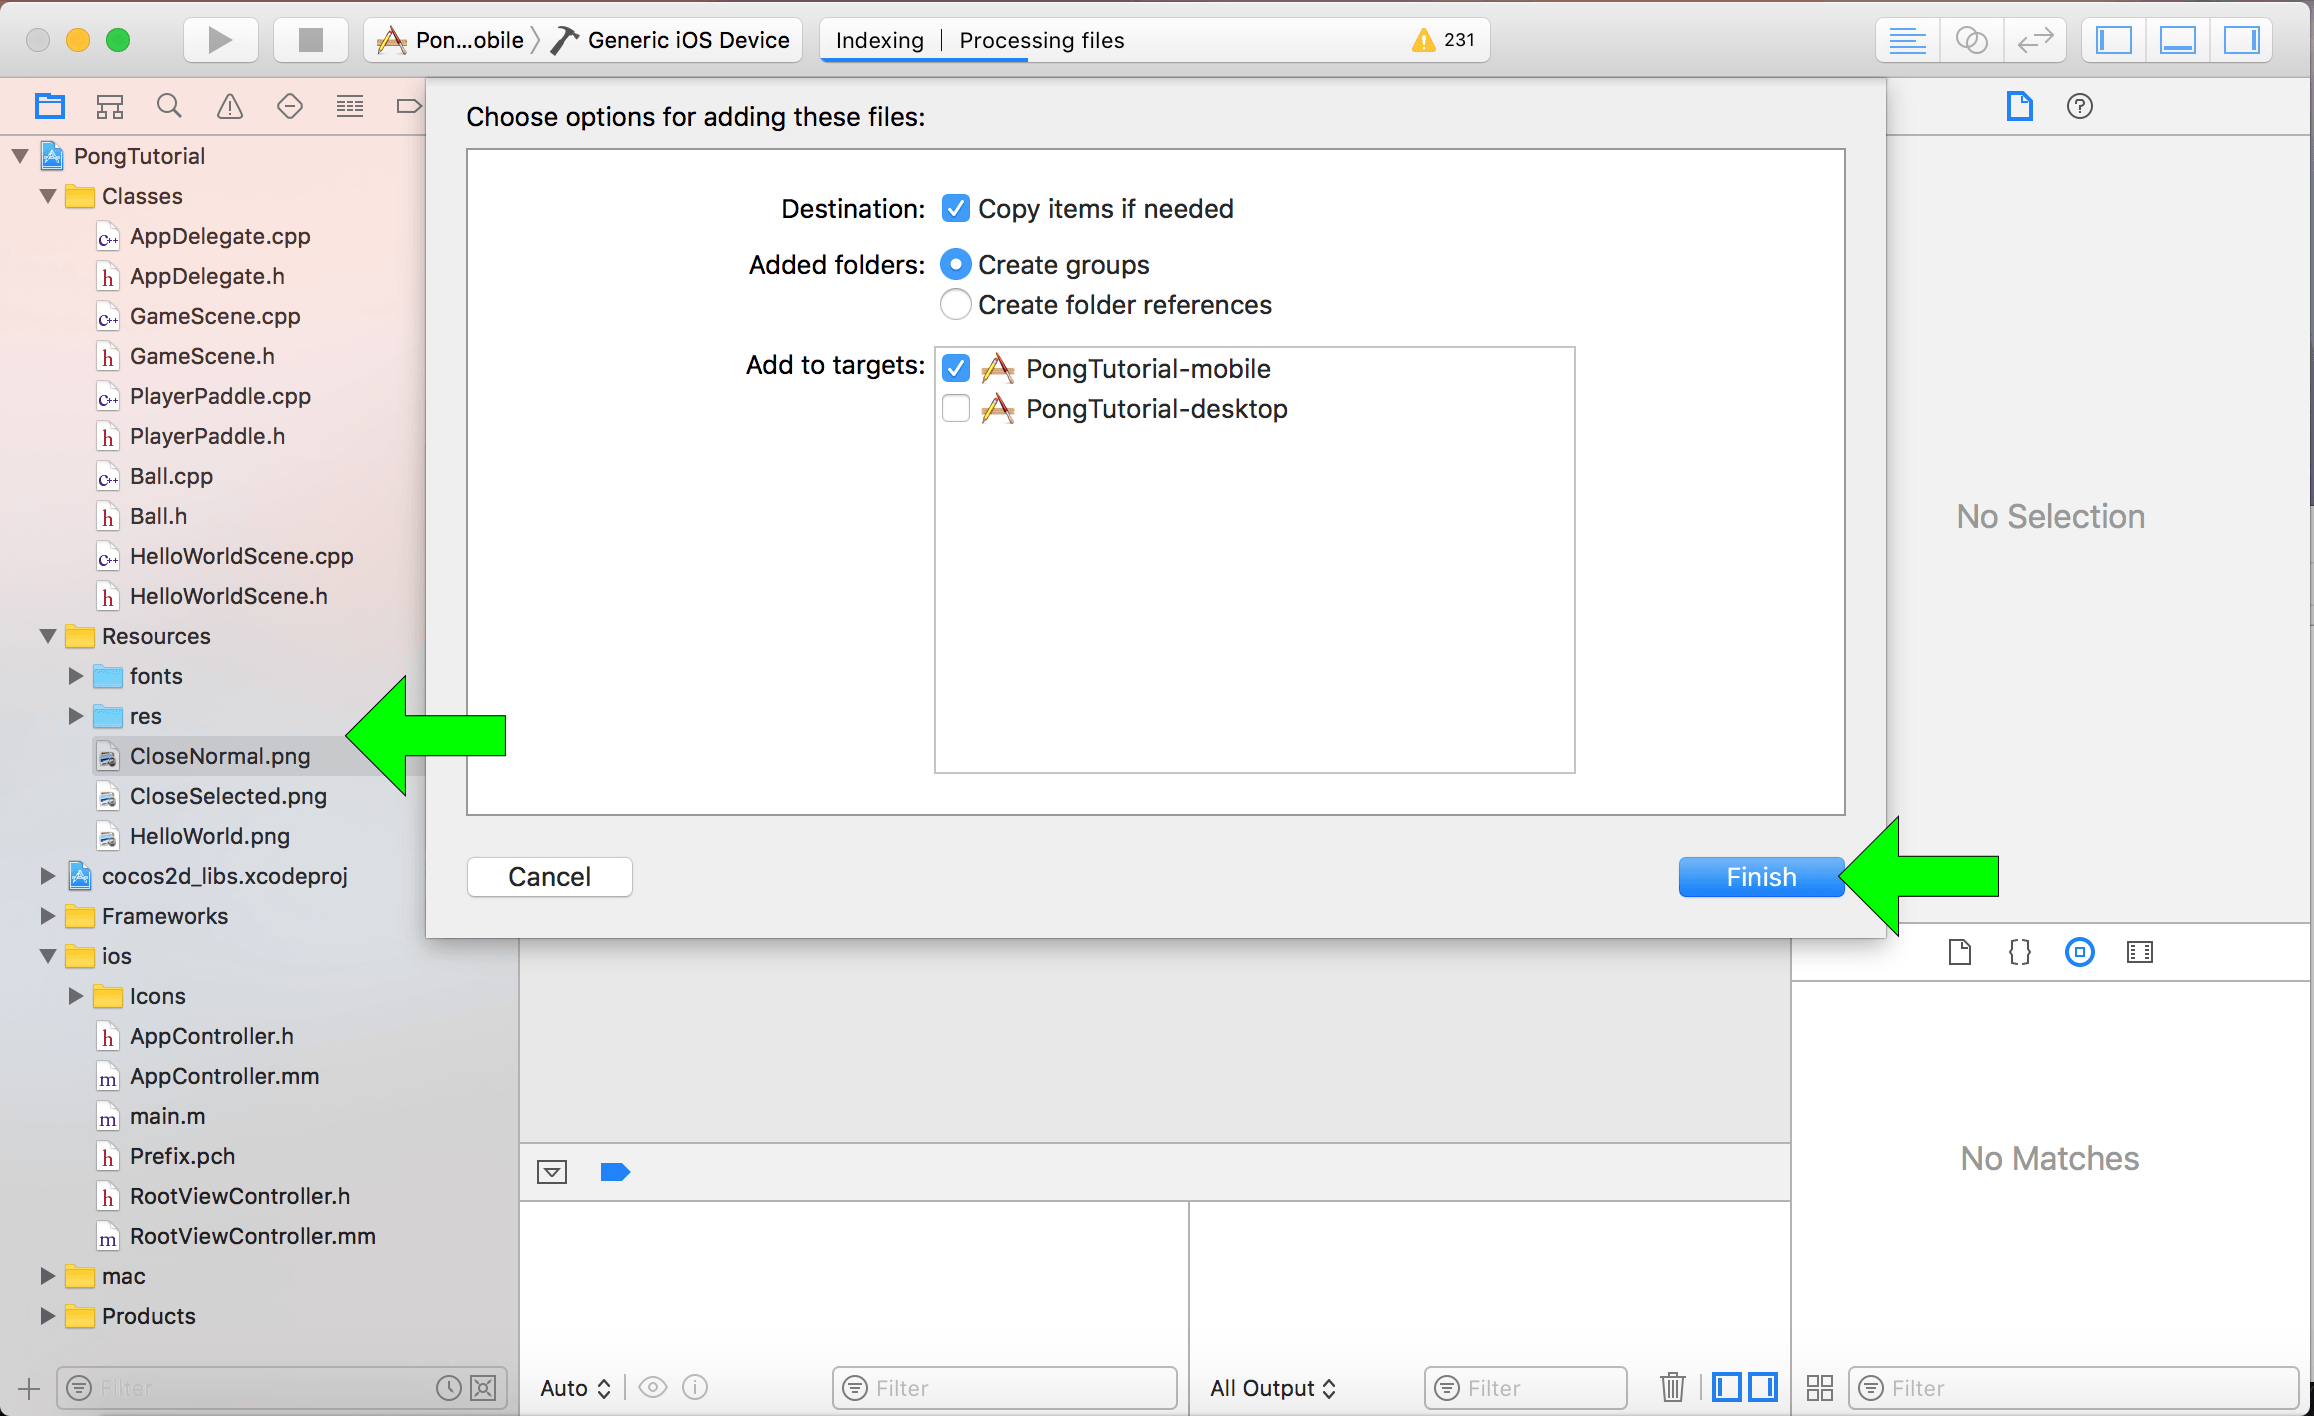
Now, it’s time to get started programming! You may remember that we left off our app with the base Cocos2d-x “Hello World” program. Let’s start by adding the images and setting up the scaling for them. Assuming you are using the 3 images that I provided, highlight those images in Finder, and drag them into Xcode inside the Resourses Folder. You should see other images here (ie CloseNormal.png). A green arrow points to the correct position on the left side of the image below. Once you drag in the images, a popup will come up with option for adding these files. Make sure “Copy Images if Needed”, “Create Groups”, and “PongTutorial-mobile” are all selected, and then press finish. All of our images are now imported into our project.
Scaling Images for All Device Sizes
Next, we need to setup the images to scale for all device sizes. Click on AppDelegate.cpp under the Classes folder. At the top of this file, you should see several static variables created that define resolution sizes. We want to change design resolution size to be the size of a small iPad, delete the small, medium, and large resolution size variables, and add an iPad Pro resolution size variable.
static cocos2d::Size designResolutionSize = cocos2d::Size(1024, 768);
static cocos2d::Size smallResolutionSize = cocos2d::Size(480, 320);
static cocos2d::Size mediumResolutionSize = cocos2d::Size(1024, 768);
static cocos2d::Size largeResolutionSize = cocos2d::Size(2048, 1536);
static cocos2d::Size iPadProResolutionSize = cocos2d::Size(2732, 2048);
We now change the design resolution policy to exact fit. This allows our art assets to be stretched to perfectly fit any device that is being used. If you don’t want your art assets to be skewed, you can pick a different policy, but that may result in images not fitting quite right or black bars on the edge of the screen.
// Set the design resolution
glview->setDesignResolutionSize(designResolutionSize.width, designResolutionSize.height, ResolutionPolicy::EXACT_FIT);
Then, we need to adjust the content scale factor to our new resolution size variables.
// if the frame's height is larger than the height of medium size.
if (frameSize.height > mediumResolutionSize.height)
{
    director‑>setContentScaleFactor(MIN(largeResolutionSize.height/designResolutionSize.height, largeResolutionSize.width/designResolutionSize.width));
}
// if the frame's height is larger than the height of small size.
else if (frameSize.height > smallResolutionSize.height)
{
    director‑>setContentScaleFactor(MIN(mediumResolutionSize.height/designResolutionSize.height, mediumResolutionSize.width/designResolutionSize.width));
}
// if the frame's height is smaller than the height of medium size.
else {
    director‑>setContentScaleFactor(MIN(smallResolutionSize.height/designResolutionSize.height, smallResolutionSize.width/designResolutionSize.width));
}
director‑>setContentScaleFactor(MIN(iPadProResolutionSize.height/designResolutionSize.height, iPadProResolutionSize.width/designResolutionSize.width));
The images are now all set to be used in our project.
Programming the Game
Now, let’s create our game scene, which is where most of the action in our game will take place. Click on AppDelegate.h. This is to give a position where our new files will be created. In Xcode, press File->New->File…. Next, we choose a template for our new file. Make sure you are under iOS from the top options, click on “C++ File” under “Source”, and then click the “Next” button. Now we name our file, which we will call “GameScene”. The box next to “Also create a header file” needs to be checked, and then press next. Our screen now shows where the new file is being created. It should look like the image below; then press “Create”.

The classes GameScene.hpp and GameScene.cpp have now been created. Before we start programming these new files, we want to have GameScene replace HelloWorldScene as the first scene loaded in our project. Click on AppDelegate.cpp and change the included header file from HelloWorldScene.h to GameScene.hpp.
#include "GameScene.hpp"
#include “HelloWorldScene.h"
Scroll down the file and change the scene to an instance of GameScene.
// create a scene. it's an autorelease object
auto scene = GameScene::createScene();
auto scene = HelloWorldScene::createScene();
Great job! GameScene will be created when the app is run. Let’s go to the GameScene.hpp file to start to set it up. Put the following code in your GameScene.hpp file.
#ifndef GameScene_hpp
#define GameScene_hpp

#include "cocos2d.h"

using namespace cocos2d;

class GameScene : public cocos2d::Layer
{
public:
    Size screenSize;
    Vec2 origin;

    static cocos2d::Scene* createScene();
    virtual bool init();

    // implement the "static create()" method manually
    CREATE_FUNC(GameScene);
};

#endif // __GAMESCENE_SCENE_HPP__
Now, let’s go to the GameScene.mm file to define these methods and variables. We need to write our createScene and init methods to setup the scene. It should look like this.
#include "GameScene.hpp"

USING_NS_CC;

Scene* GameScene::createScene()
{
    // 'scene' is an autorelease object
    auto scene = Scene::create();

    // 'layer' is an autorelease object
    auto layer = GameScene::create();

    // add layer as a child to scene
    scene‑>addChild(layer);

    // return the scene
    return scene;
}

// on "init" you need to initialize your instance
bool GameScene::init()
{
    // super init first
    if ( !Layer::init() )
    {
        return false;
    }

    screenSize = Director::getInstance()‑>getVisibleSize();
    origin = Director::getInstance()‑>getVisibleOrigin();

    auto *bg = Sprite::create("pongBG.png");
    bg‑>setPosition(Vec2(origin.x + screenSize.width * 0.5, origin.y + screenSize.height * 0.5));
    this‑>addChild(bg);

    return true;
}
This code creates the scene and initializes an instance of it. In our init method, we first initialize the super class if it has not already been done. We return false if this has already occurred to prevent the class from being initialized twice. This is standard code for any subclass of Layer. Then, we are setting our instance variable screenSize to be the size of the the screen and origin to be the visible origin. We will use these variables to position sprites in our scene throughout this class. Next, we set our background on the layer. We create a local variable bg to be a sprite with our image pongBG.png. We will not make any future changes to the background, so using a local variable to create it works fine. Then, we position the background to be in the middle of our screen and add it to the layer. Our scene and layer are created with a background, and now it’s time to create our sprites!
The basic game pieces that we need are a paddle for the player, a paddle for the opponent, and a ball. We are going to make a new class for the player’s paddle and the ball. Let’s do the ball class first. We create the class the same way we created the GameScene class earlier. In Xcode, press File->New->File…. Then, under the iOS options, click on “C++ File” inside “Source”, and click the “Next” button. Next, we name the file “Ball”. Make sure that “Also create a header file” is checked and press next. Press “Create” to finish creating the file.
The only method we are putting in the Ball class for now is createBall. Let’s go to the Ball.hpp class.
#ifndef Ball_hpp
#define Ball_hpp

#include <stdio.h>
#include "cocos2d.h"

using namespace cocos2d;

class Ball : public Sprite
{
public:
    static Ball* createBall();
};

#endif /* Ball_hpp */
Now we will define the method in the Ball.cpp file.
#include "Ball.hpp"

Ball * Ball::createBall() {
    Ball *self = NULL;
    self = new Ball();

    if (self && self->initWithFile("ball.png")) {
        //nothing for now
    } else {
        delete self;
    }
    return self;
}
We aren’t extending the ball or paddle class at this point, so we could just create the variables in game scene as subclasses of Sprite, but these custom classes allow us the option to extend the classes as we add new features to the game. Next, we will create a class called PlayerPaddle. Create it the same way we created Ball. In PlayerPaddle.hpp, add the following code.
#ifndef PlayerPaddle_hpp
#define PlayerPaddle_hpp

#include "cocos2d.h"

using namespace cocos2d;

class PlayerPaddle : public Sprite
{
public:
    static PlayerPaddle* createPlayerPaddle();
};

#endif // __PlayerPaddle_SCENE_HPP__
In PlayerPaddle.cpp, define the createPlayerPaddle method.
#include "PlayerPaddle.hpp"

PlayerPaddle * PlayerPaddle::createPlayerPaddle() {
    PlayerPaddle *self = NULL;
    self = new PlayerPaddle();

    if (self && self‑>initWithFile("paddle.png")) {
        //nothing for now
    } else {
        delete self;
    }
    return self;
}
Now that these classes are defined, we can go back to the GameScene and start to put the game in motion. Back in the GameScene.hpp file, we first need to include Ball.hpp and PlayerPaddle.hpp at the top of the class. Then, we will add new instance variables to the file. The game sprites that we are adding are pongBall, playerPaddle, and opponentPaddle. We also need to add text to the screen, which is a label called startText. An int called ballVelocity and a 2d vector called ballDirection will be used to keep track of the speed and direction of the ball. Finally, a bool called gameHasStarted will be used to keep track of the the game state.
Next, we add methods to the GameScene.hpp file. We add the update method, which will be used to move the ball, move the opponent’s paddle, and check for collisions, and all of the onTouch methods to track touches. Add the methods to the file as seen below.
#ifndef GameScene_hpp
#define GameScene_hpp

#include "cocos2d.h"
#include "Ball.hpp"
#include "PlayerPaddle.hpp"

using namespace cocos2d;

class GameScene : public cocos2d::Layer
{
public:
    Ball *pongBall;
    PlayerPaddle *playerPaddle;
    Sprite *opponentPaddle;
    Label *startText;
    bool gameHasStarted;
    Vec2 ballDirection;
    int ballVelocity;
    Size screenSize;
    Vec2 origin;

    static cocos2d::Scene* createScene();
    virtual bool init();
    void update(float delta);

    bool onTouchBegan(Touch *touch, Event *unused_event);
    void onTouchMoved(Touch *touch, Event *unused_event);
    void onTouchEnded(Touch *touch, Event *unused_event);
    void onTouchCancelled(Touch *touch, Event *unused_event);

    // implement the "static create()" method manually
    CREATE_FUNC(GameScene);
};

#endif // __GAMESCENE_SCENE_HPP__
It’s now time to move on to the GameScene.cpp. In the GameScene::init() method, add the following code below the line “this->addChild(bg);”.
pongBall = Ball::createBall();
pongBall‑>setPosition(Vec2(origin.x + screenSize.width * 0.5, origin.y + screenSize.height * 0.5));
this->addChild(pongBall);

playerPaddle = PlayerPaddle::createPlayerPaddle();
playerPaddle‑>setPosition(Vec2(origin.x + screenSize.width * 0.05, origin.y + screenSize.height * 0.5));
this->addChild(playerPaddle);

opponentPaddle = Sprite::create("paddle.png");
opponentPaddle‑>setPosition(Vec2(origin.x + screenSize.width * 0.95, origin.y + screenSize.height * 0.5));
this->addChild(opponentPaddle);

startText = Label::createWithTTF("Tap to Start", "fonts/arial.ttf", 50);
startText‑>setPosition(Vec2(origin.x + screenSize.width * 0.5, origin.y + screenSize.height * 0.8));
this‑>addChild(startText);

gameHasStarted = false;
ballDirection = Vec2(0, 0);
ballVelocity = 300;

auto eventListener = EventListenerTouchOneByOne::create();
eventListener‑>onTouchBegan = CC_CALLBACK_2(GameScene::onTouchBegan, this);
eventListener‑>onTouchMoved = CC_CALLBACK_2(GameScene::onTouchMoved, this);
eventListener‑>onTouchEnded = CC_CALLBACK_2(GameScene::onTouchEnded, this);
eventListener‑>onTouchCancelled = CC_CALLBACK_2(GameScene::onTouchCancelled, this);
this‑>getEventDispatcher()‑>addEventListenerWithSceneGraphPriority(eventListener, playerPaddle);
First, we created, positioned, and added the ball, paddles, and text to the screen. The ball starts in the middle with the player’s paddle on the left and the opponent’s paddle on the right. The text is in the top part of the middle of the screen. Don’t worry about this obscuring gameplay. Once the game begins, we will hide the text. Next, we define our variables used to keep track of the game state and ball properties. Finally, we add an event listener to call our touch methods when the device detects touches. If you run the project now, you should see all of the elements on the screen, but the ball is frozen in the middle of the screen and there is no way to move your paddle. We’ve made progress, but we still aren’t there yet.
In our game, everything should remain static until the user taps to start the game. Since touch is the first point of action, let’s go to the touch methods next. First, we will look at onTouchBegan. If the game has not started yet and the device registers a touch began, we will remove the label, set a direction and speed for the ball, start our update method to handle ball movement and check for collisions, and change our game state to indicate that the game has started. For now, we are hard coding an initial direction and speed for the ball, but in future versions, we may go back and make these properties random. It could also be a fun thing to try on your own. If the game has already started, onTouchBegan will set the height of the player’s paddle to be equal to that of touch. We have to be careful though that part of the paddle doesn’t go off the screen since we are setting the midpoint and the game piece extends both above and below. We must make sure that the height is not above the maximum or below the minimum height when we set the new position for the paddle. See the onTouchBegan method below.
bool GameScene::onTouchBegan(Touch *touch, Event *unused_event) {
    if (!gameHasStarted) {
        //remove label
        this‑>removeChild(startText);
        startText = NULL;

        //start the ball in a random direction
        pongBall‑>setPosition(Vec2(origin.x + screenSize.width * 0.5, origin.y +         screenSize.height * 0.5));
        ballDirection = Vec2(1, 1);
        this‑>scheduleUpdate();

        gameHasStarted = true;

    } else {
        Vec2 touchLocation = touch‑>getLocation();

        //make sure paddle can't go off screen
        float paddleY = MIN(MAX(touchLocation.y, origin.y + playerPaddle‑>getContentSize().height * 0.5 ), origin.y + screenSize.height - playerPaddle‑>getContentSize().height * 0.5 );
        playerPaddle‑>setPosition(Vec2(playerPaddle‑>getPosition().x, paddleY));
    }

    return true;
}
There is much less to do in the move, ended, and cancelled touch methods. For now, all we will do is set a new height position for the player’s paddle in onTouchMoved. We aren’t going to do anything in onTouchEnded or onTouchCancelled yet. See the methods below.
void GameScene::onTouchMoved(Touch *touch, Event *unused_event) {
    Vec2 touchLocation = touch->getLocation();

    //make sure paddle can't go off screen
    float paddleY = MIN(MAX(touchLocation.y, origin.y + playerPaddle‑>getContentSize().height * 0.5 ), origin.y + screenSize.height - playerPaddle‑>getContentSize().height * 0.5 );
    playerPaddle‑>setPosition(Vec2(playerPaddle‑>getPosition().x, paddleY));
}

void GameScene::onTouchEnded(Touch *touch, Event *unused_event) {
    //nothing for now
}

void GameScene::onTouchCancelled(Touch *touch, Event *unused_event) {
    //nothing for now
}
Try running the game. You will see that we can now move our paddle around, but the ball is stuck in place. It’s time to move on to the update method where the rest of our code will take place. This method will execute every frame, which should be running at 60 frames/second for all current mobile devices. First, we are going to set a very basic artificial intelligence for the opponent’s paddle. For this stage of the project, we will simply make it where the opponent’s paddle tracks the ball as it moves. This will make it where the opponent cannot lose, but it makes our game playable. We will extend the AI in the future to a scheme that is more competitive. Next, we will look at ball movement. We get the new position of the ball, look to see if it is intersecting the top or bottom of the screen, or a paddle, and change direction accordingly. In a future version, we will change the ball’s direction and possibly speed based on where it hits a paddle, but for now, we will simply reverse the direction. Finally, if the ball reaches the right or left side of the screen, that means that it was missed, and the game is over. The game resets to its initial appearance.
void GameScene::update(float delta) {
    //find new opponent paddle position
    float paddleY = MIN(MAX(pongBall‑>getPosition().y, origin.y + opponentPaddle‑>getContentSize().height * 0.5), origin.y + screenSize.height - opponentPaddle‑>getContentSize().height * 0.5 );
    opponentPaddle‑>setPosition(Vec2(opponentPaddle‑>getPosition().x, paddleY));

    //find new ball position
    Vec2 newPosition = pongBall‑>getPosition() + ballDirection * ballVelocity * delta;

    if (newPosition.y < origin.y || newPosition.y > origin.y + screenSize.height) {
        //reverse y direction of the ball
        ballDirection = Vec2(ballDirection.x, -ballDirection.y);
        newPosition = Vec2(newPosition.x, pongBall‑>getPosition().y + ballDirection.y * ballVelocity * delta);
    }
    if (playerPaddle‑>getBoundingBox().containsPoint(newPosition) || opponentPaddle‑>getBoundingBox().containsPoint(newPosition)) {
        //reverse x direction of the ball & y direction based on paddle hit later
        ballDirection = Vec2(-ballDirection.x, ballDirection.y);
        newPosition = Vec2(pongBall‑>getPosition().x + ballDirection.x * ballVelocity * delta, newPosition.y);
    }
    if (newPosition.x < origin.x + 0) {
        //game over--enemy wins
        startText = Label::createWithTTF("You Lose", "fonts/arial.ttf", 50);
        startText‑>setPosition(Vec2(origin.x + screenSize.width * 0.5, origin.y + screenSize.height * 0.8));
        this‑>addChild(startText);

        gameHasStarted = false;
        ballDirection = Vec2(0, 0);
        ballVelocity = 300;

        this‑>unscheduleUpdate();
    } else if (newPosition.x > origin.x +  screenSize.width) {
        //game over--player wins
        startText = Label::createWithTTF("You Win", "fonts/arial.ttf", 50);
        startText‑>setPosition(Vec2(origin.x + screenSize.width * 0.5, origin.y +         screenSize.height * 0.8));
        this‑>addChild(startText);

        gameHasStarted = false;
        ballDirection = Vec2(0, 0);
        ballVelocity = 300;

        this‑>unscheduleUpdate();
    }
    pongBall‑>setPosition(newPosition);
}
Run the code and see how it works. Congratulations! We now have a functional pong game. The ball moves, the paddles move, the ball bounces off objects, and the game resets! There are still a lot of features that could be added to the game though. Feel free to try extending the game further on your own, and join us for part 3 of this tutorial! We will make a better AI for the opponent paddle, make the ball move off the paddles in a more interesting way, format the images to work better for the iPhone, and add some other fun new features. Thanks for following along with our Cocos2d-x Pong Tutorial!