When I’m not writing apps, I like to follow stocks. I’ve even had the opportunity to combine those interests in the past with quantitative trading strategies. We’ll keep things simple today and just query stock and currency quotes from our iPhone.
Get an Alpha Vantage API Key
There are a lot of financial datasources, and many of them cost a good bit of money. That’s no surprise considering the massive budgets successful hedge funds have to spend on these products. Yahoo Finance was traditionally the most popular free source for stock price data, but that’s no longer an option. Fortunately, other free alternatives have emerged to fill the void.
Today, we’ll use Alpha Vantage. They have realtime and historical data for stocks and currencies, including cryptos. The assortment of technical indicator data is also quite robust. Head on over there and get a free API key, and let’s get started.
Create an Xcode Project
Open up Xcode and create a new tabbed app. Call the app Quotes, and set the language as Swift. Open up Main.Storyboard. You should see a tab bar controller and two view controllers. We’ll use one view controller for stocks and the other for currency.
Stock Storyboard
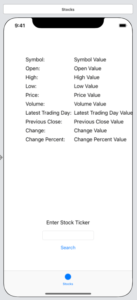
The first controller will be for getting stock quotes. In fact, we actually want more than just the current price of the stock. We’d like all sorts of valuable peripherals. You can see I’ve added quite a few labels on my storyboard to cover all the data.
To recap, the fields are Symbol, Open, High, Low, Price, Volume, Latest Trading Day, Previous Close, Change, and Change Percent. With that in mind, go ahead and drag 20 labels onto your storyboard, positioned in 2 columns of 10. The left column has the field names, and the right column has the values. You won’t actually see those filler names for the values in the app. That’s just for readability in the storyboard. We’ll clear them in the code. Now embed each column of labels into a stack view. Then you can use constraints to get the left stack view away from the top and left edges of the device. Center the right stack view vertically with the left one, and use a standard amount of leading space.
At the bottom of the view controller, I added an instructional label (“Enter Stock Ticker”), a text field, and a search button. They’re all centered horizontally with about 40 vertical spacing between each object. Remember to set your text field to capitalize all characters and not autocorrect anything. That’s important for dealing with stock tickers. You can set those properties in the attributes inspector.
Once you’ve finished with the objects and constraints, tap the tab bar item at the bottom of the view controller, and go to the attributes inspector. Change its title to “Stocks”. That takes care of this view controller on the storyboard!
Currency Storyboard
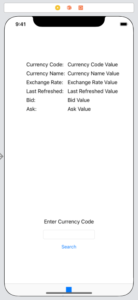
The currency view controller is laid out basically the same way, only it has fewer fields. We only need pairs of labels for the following: Currency Code, Currency Name, Exchange Rate, Last Refreshed, Bid, and Ask. Here’s a picture for reference.
The instructional label should say “Enter Currency Code”. The tab bar title will say “Currency”.
Linking Storyboard
There are quite a few labels to link from out storyboard to the code. Let’s get started. Hook-up the following IBOutlets using the value labels in our stock view controller. These will all link to the code in FirstViewController. Please note that these are from the value column on the right. We don’t need to hook-up the labels on the left.
@IBOutlet weak var stockSymbolLabel: UILabel
@IBOutlet weak var stockOpenLabel: UILabel!
@IBOutlet weak var stockHighLabel: UILabel!
@IBOutlet weak var stockLowLabel: UILabel!
@IBOutlet weak var stockPriceLabel: UILabel!
@IBOutlet weak var stockVolumeLabel: UILabel!
@IBOutlet weak var stockLastTradingDayLabel: UILabel!
@IBOutlet weak var stockPreviousCloseLabel: UILabel!
@IBOutlet weak var stockChangeLabel: UILabel!
@IBOutlet weak var stockChangePercentLabel: UILabel!
While we’re here, let’s do the text field as well.
@IBOutlet weak var stockTextField: UITextField!
We need to link the button too, but this one is an IBAction.
@IBAction func stockSearchTapped(_ sender: Any) {

}
The pattern is similar for the currency view controller. These storyboard objects will link with SecondViewController.
@IBOutlet weak var currencyCodeLabel: UILabel!
@IBOutlet weak var currencyNameLabel: UILabel!
@IBOutlet weak var currencyExchangeRateLabel: UILabel!
@IBOutlet weak var currencyLastRefreshedLabel: UILabel!
@IBOutlet weak var currencyBidValue: UILabel!
@IBOutlet weak var currencyAskValue: UILabel!
@IBOutlet weak var currencyTextField: UITextField!
@IBAction func currencySearchButtonTapped(_ sender: Any) {

}
Query a Stock Quote
In FirstViewController, we’ll add a function to query the stock data.
func getStockQuote() {
    let session = URLSession.shared

    let quoteURL = URL(string: "https://www.alphavantage.co/query?function=GLOBAL_QUOTE&symbol=\(stockTextField.text ?? "")&apikey=APIKEY")!

    let dataTask = session.dataTask(with: quoteURL) {
        (data: Data?, response: URLResponse?, error: Error?) in

        if let error = error {
            print("Error:\n\(error)")
        } else {
            if let data = data {

                let dataString = String(data: data, encoding: String.Encoding.utf8)
                print("All the quote data:\n\(dataString!)")

                if let jsonObj = try? JSONSerialization.jsonObject(with: data, options: .allowFragments) as? NSDictionary {

                    if let quoteDictionary = jsonObj.value(forKey: "Global Quote") as? NSDictionary {
                        DispatchQueue.main.async {
                            if let symbol = quoteDictionary.value(forKey: "01. symbol") {
                                self.stockSymbolLabel.text = symbol as? String
                            }
                            if let open = quoteDictionary.value(forKey: "02. open") {
                                self.stockOpenLabel.text = open as? String
                            }
                            if let high = quoteDictionary.value(forKey: "03. high") {
                                self.stockHighLabel.text = high as? String
                            }
                            if let low = quoteDictionary.value(forKey: "04. low") {
                                self.stockLowLabel.text = low as? String
                            }
                            if let price = quoteDictionary.value(forKey: "05. price") {
                                self.stockPriceLabel.text = price as? String
                            }
                            if let volume = quoteDictionary.value(forKey: "06. volume") {
                                self.stockVolumeLabel.text = volume as? String
                            }
                            if let latest = quoteDictionary.value(forKey: "07. latest trading day") {
                                self.stockLastTradingDayLabel.text = latest as? String
                            }
                            if let previous = quoteDictionary.value(forKey: "08. previous close") {
                                self.stockPreviousCloseLabel.text = previous as? String
                            }
                            if let change = quoteDictionary.value(forKey: "09. change") {
                                self.stockChangeLabel.text = change as? String
                            }
                            if let changePercent = quoteDictionary.value(forKey: "10. change percent") {
                                self.stockChangePercentLabel.text = changePercent as? String
                            }
                        }
                    } else {
                        print("Error: unable to find quote")
                        DispatchQueue.main.async {
                            self.resetLabels()
                        }
                    }
                } else {
                    print("Error: unable to convert json data")
                    DispatchQueue.main.async {
                        self.resetLabels()
                    }
                }
            } else {
                print("Error: did not receive data")
                DispatchQueue.main.async {
                    self.resetLabels()
                }
            }
        }
    }

    dataTask.resume()
}
Most of this is UI code to update the labels, so don’t get too intimidated by the length. Let’s start at the top and make some sense of this. The URLSession and dataTask code launch the API call. Our API call is spelled out in quoteURL constant. There are 3 properties that we are passing to the server. The first is the function name, “GLOBAL_QUOTE”. This is Alpha Vantage’s function for getting stock quotes. The second is the symbol. We’re passing in whatever text the user has entered in the text field. The last parameter is the API key. In the code above, I set the API key equal to “APIKEY”. Put your own API key into your code.
All of this effort nets us a JSON package full of data for our requested stock ticker. We’ll convert that JSON into a dictionary. I’ve included a print to the console which helps you visualize the dictionary data. It’s basically a dictionary with one key, “Global Quote”. The value for that key is another dictionary, this time with keys “01. symbol”, “02. open”, “03. high”, “04. low”, etc. There’s one key for each piece of data we’d like. Our code simply checks each of these keys for a value and updates our labels. If there’s an error for whatever reason, most likely due to entering an invalid ticker, we log the error to the console and reset the labels. For a production app, you should show the user some sort of error, but this will be fine for a tutorial.
Query a Currency Exchange Rate
In SecondViewController, we need a similar function to query currency. Here it is.
func getCurrencyQuote() {
    let session = URLSession.shared

    let quoteURL = URL(string: "https://www.alphavantage.co/query?function=CURRENCY_EXCHANGE_RATE&from_currency=\(currencyTextField.text ?? "")&to_currency=USD&apikey=APIKEY")!

    let dataTask = session.dataTask(with: quoteURL) {
        (data: Data?, response: URLResponse?, error: Error?) in

        if let error = error {
            print("Error:\n\(error)")
        } else {
            if let data = data {

                let dataString = String(data: data, encoding: String.Encoding.utf8)
                print("All the quote data:\n\(dataString!)")

                if let jsonObj = try? JSONSerialization.jsonObject(with: data, options: .allowFragments) as? NSDictionary {

                    if let quoteDictionary = jsonObj.value(forKey: "Realtime Currency Exchange Rate") as? NSDictionary {
                        DispatchQueue.main.async {
                            if let code = quoteDictionary.value(forKey: "1. From_Currency Code") {
                                self.currencyCodeLabel.text = code as? String
                            }
                            if let name = quoteDictionary.value(forKey: "2. From_Currency Name") {
                                self.currencyNameLabel.text = name as? String
                            }
                            if let rate = quoteDictionary.value(forKey: "5. Exchange Rate") {
                                self.currencyExchangeRateLabel.text = "$\(rate)"
                            }
                            if let date = quoteDictionary.value(forKey: "6. Last Refreshed") {
                                self.currencyLastRefreshedLabel.text = date as? String
                            }
                            if let bid = quoteDictionary.value(forKey: "8. Bid Price") {
                                self.currencyBidValue.text = "$\(bid)"
                            }
                            if let ask = quoteDictionary.value(forKey: "9. Ask Price") {
                                self.currencyAskValue.text = "$\(ask)"
                            }
                        }
                    } else {
                        print("Error: unable to find quote")
                        DispatchQueue.main.async {
                            self.resetLabels()
                        }
                    }
                } else {
                    print("Error: unable to convert json data")
                    DispatchQueue.main.async {
                        self.resetLabels()
                    }
                }
            } else {
                print("Error: did not receive data")
                DispatchQueue.main.async {
                    self.resetLabels()
                }
            }
        }
    }

    dataTask.resume()
}
This is very similar, so I’ll only touch on the differences. The quoteURL calls a different function, “CURRENCY_EXCHANGE_RATE”. In addition to the Api key, there are parameters for “from_currency” and “to_currency”. I’m only interested in converting to US dollars, so I hardcoded “USD” as the “to_currency”. The “from_currency” is pulled from our text field. Once we get our data, we unpackage the JSON and update our labels. We don’t need to use all of the data this time, mostly since we’re using a fixed “to_currency”.
Finishing up the Code
The query code was the heavy lifting. We just need to make everything works gracefully now. It’s time to implement the resetLabels function that we called in case of an error. Here it is for FirstViewController.
func resetLabels() {
    stockSymbolLabel.text = "";
    stockOpenLabel.text = "";
    stockHighLabel.text = "";
    stockLowLabel.text = "";
    stockPriceLabel.text = "";
    stockVolumeLabel.text = "";
    stockLastTradingDayLabel.text = "";
    stockPreviousCloseLabel.text = "";
    stockChangeLabel.text = "";
    stockChangePercentLabel.text = "";
}
Now go to SecondViewController and add the equivalent code.
func resetLabels() {
    currencyCodeLabel.text = "";
    currencyNameLabel.text = "";
    currencyExchangeRateLabel.text = "";
    currencyLastRefreshedLabel.text = "";
    currencyBidValue.text = "";
    currencyAskValue.text = "";
}
We also need some code to make sure the keyboard dismisses appropriately and shifts the screen up so we can view what we’re typing. Make sure both of our view controllers are UITextFieldDelegates by adding UITextFieldDelegate at the top of the class.
class FirstViewController: UIViewController, UITextFieldDelegate {
Here’s the other one.
class SecondViewController: UIViewController, UITextFieldDelegate {
Put these keyboard functions in both view controllers.
@objc func dismissKeyboard() {
    //Causes the view (or one of its embedded text fields) to resign the first responder status.
    view.endEditing(true)
}

@objc func keyboardWillShow(notification: NSNotification) {
    if let keyboardSize = (notification.userInfo?[UIResponder.keyboardFrameBeginUserInfoKey] as? NSValue)?.cgRectValue {
        if self.view.frame.origin.y == 0 {
            self.view.frame.origin.y -= keyboardSize.height
        }
    }
}

@objc func keyboardWillHide(notification: NSNotification) {
    if self.view.frame.origin.y != 0 {
        self.view.frame.origin.y = 0
    }
}
We need to set up notifications for these functions in viewDidLoad and establish each class as its text field’s delegate. This is also a good chance to clear out the placeholder text in our value labels. Here’s the entirety of viewDidLoad for the stock view controller.
override func viewDidLoad() {
    super.viewDidLoad()
    // Do any additional setup after loading the view.
    resetLabels()

    self.stockTextField.delegate = self

    let tap: UITapGestureRecognizer = UITapGestureRecognizer(target: self, action: #selector(UIInputViewController.dismissKeyboard))
    view.addGestureRecognizer(tap)
    NotificationCenter.default.addObserver(self, selector: #selector(keyboardWillShow), name: UIResponder.keyboardWillShowNotification, object: nil)
    NotificationCenter.default.addObserver(self, selector: #selector(keyboardWillHide), name: UIResponder.keyboardWillHideNotification, object: nil)
}
Click on over to the currency view controller to do something similar.
override func viewDidLoad() {
    super.viewDidLoad()
    // Do any additional setup after loading the view.
    resetLabels()

    self.currencyTextField.delegate = self

    let tap: UITapGestureRecognizer = UITapGestureRecognizer(target: self, action: #selector(UIInputViewController.dismissKeyboard))
    view.addGestureRecognizer(tap)
    NotificationCenter.default.addObserver(self, selector: #selector(keyboardWillShow), name: UIResponder.keyboardWillShowNotification, object: nil)
    NotificationCenter.default.addObserver(self, selector: #selector(keyboardWillHide), name: UIResponder.keyboardWillHideNotification, object: nil)
}
We’d like to fire off queries from either tapping the search button or hitting return on the keyboard. We’ll handle the former by filling out our IBAction functions and the latter is a delegate method for the keyboard. Here’s the code for the stock view controller.
@IBAction func stockSearchTapped(_ sender: Any) {
    getStockQuote()
    dismissKeyboard()
}

func textFieldShouldReturn(_ textField: UITextField) -> Bool {
    getStockQuote()
    self.view.endEditing(true)
    return false
}
Here’s the equivalent code for the currency.
@IBAction func currencySearchButtonTapped(_ sender: Any) {
    getCurrencyQuote()
    dismissKeyboard()
}

func textFieldShouldReturn(_ textField: UITextField) -> Bool {
    getCurrencyQuote()
    self.view.endEditing(true)
    return false
}
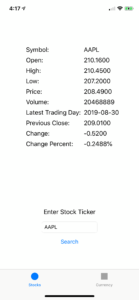
That should cover everything! Run the app and check your favorite stock. Check your least favorite stock. How about a currency? Remember to use codes for the currency, like EUR for euro or JPY for yen. You can even do digital currencies likes BTC for bitcoin.
Conclusion
We’re just scratching the surface of investment app possibilities. You can fetch all sorts of historical data and technical indicators. Take a look around the documentation at Alpha Vantage and see if anything catches your eye. If you see something you like, just amend the quoteURL in your code and do a test run to see what sort of data you get back. Once you’ve had a look at the structure of the data, you can figure out what keys to use to unpack the dictionaries. Good luck and thanks for reading the HangZone blog!


