Xamarin.Forms is a powerful tool that allows you to build native apps for iOS, macOS, Android, and UWP, largely from a single codebase. This codebase is able to then render native views for each platform. Toolbars, tableviews, and other views will all have their native appearance depending on device. You may have to use custom renderers for different platforms depending on the complexity of your app and which native classes and tools you wish to leverage, but for the most part, a single codebase is used for both UI and logic. This makes for a fast, easy way to get a consistent look and feel across platforms.
There are still areas where you will have to look outside Xamarin.Forms tools to achieve a consistent look. Icons are one of those areas. If you are developing on UWP, you would likely use native icons from the Segoe MDL2 font family. On iOS, system icons are an easy choice. Unfortunately, there is no built in set of system icons to use for Xamarin.Forms across devices. You could import images, but an easier and more flexible solution is to use Font Awesome.
Font Awesome in a font and icon toolkit. It is currently on version 5.3, which has a free version with over 1,300 icons, and a pro version with 2,600 more icons. The free version is open source and free to use in any commercial or other type of project. It has a wide array of icons that should be a great fit for most any need.
Create a Xamarin.Forms Project
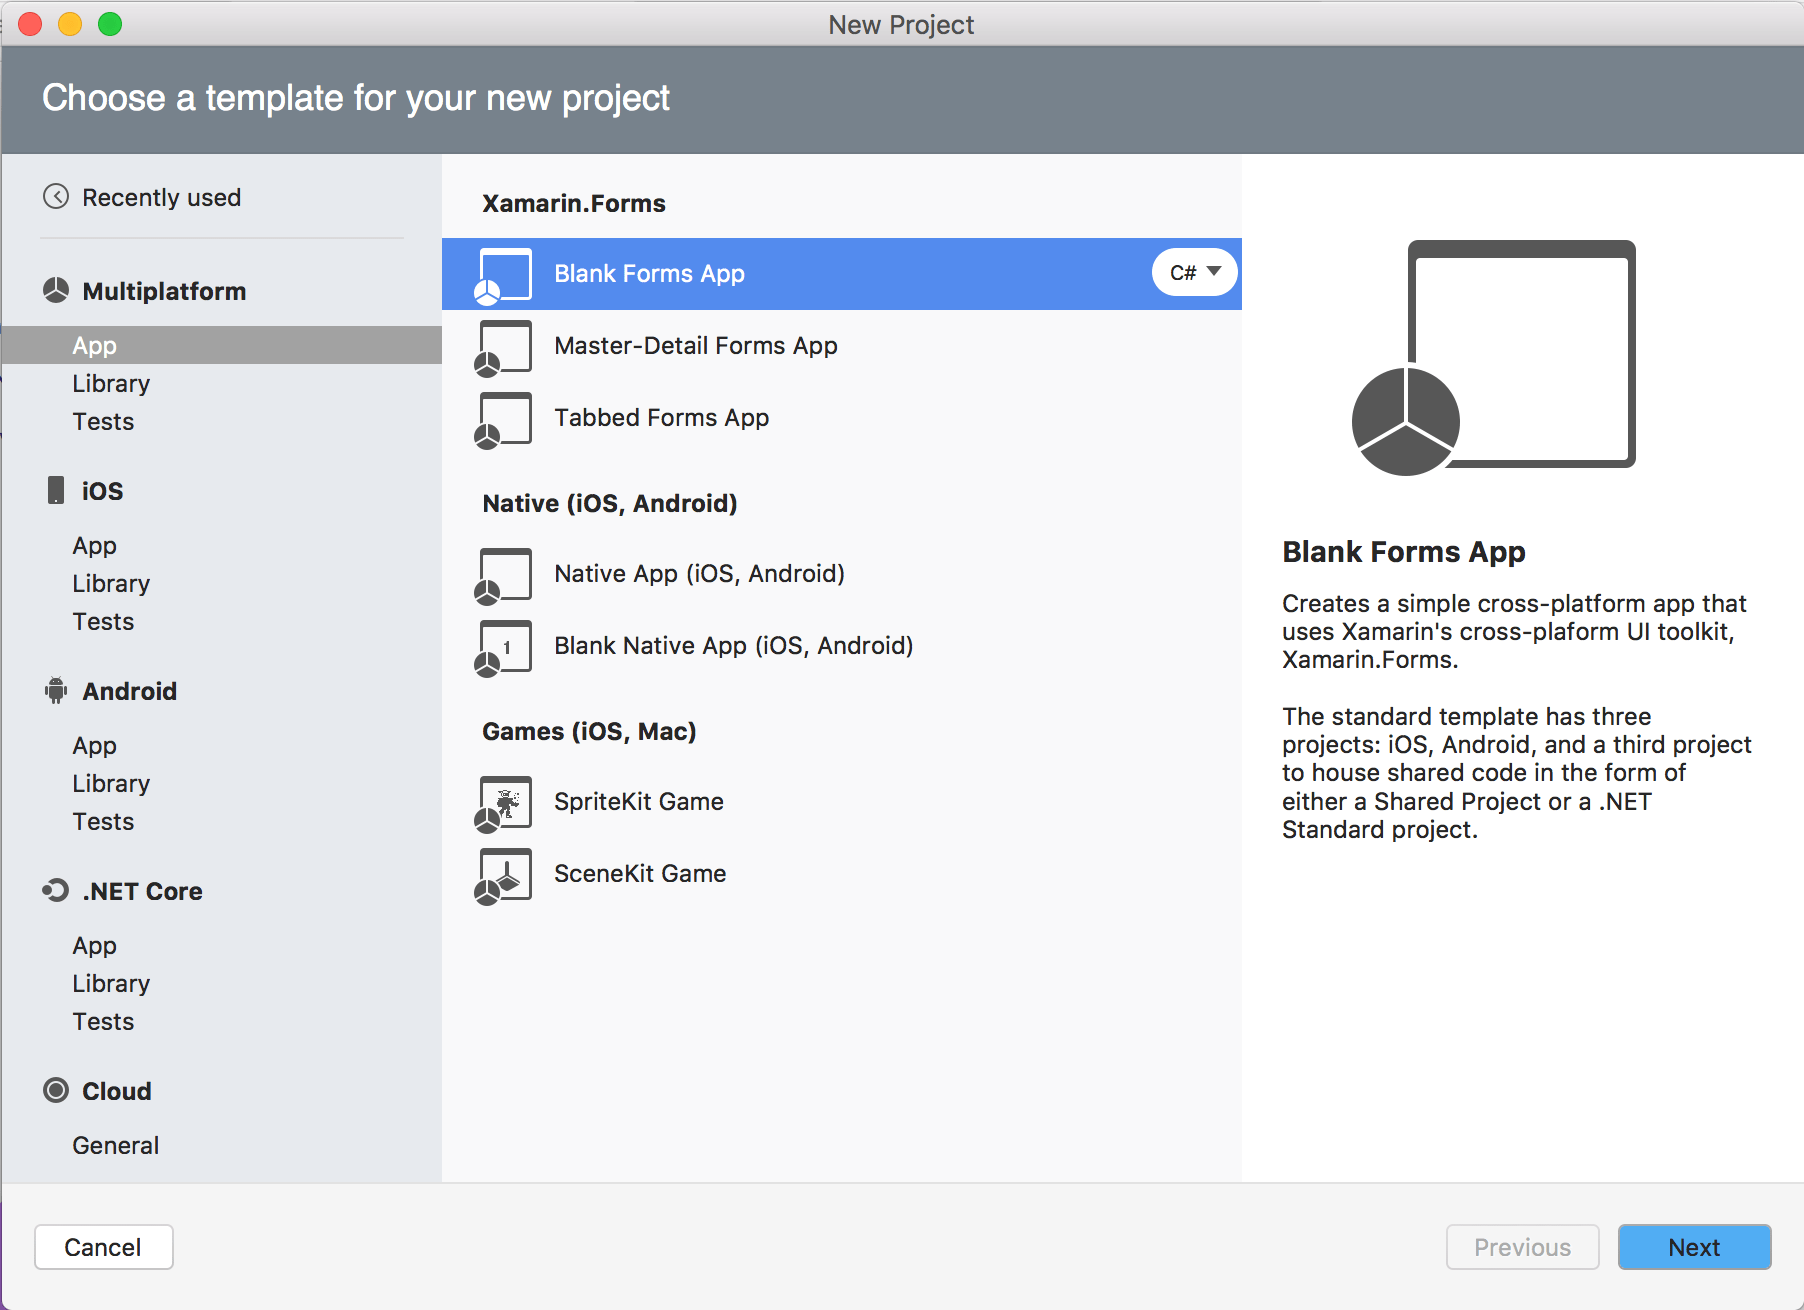
Let’s get started with using Font Awesome in Xamarin.Forms by creating a new Xamarin.Forms project. We are going to be doing this project on a Mac, but you can also do it in Windows. Start by opening Visual Studio. Press the button for “New Project.” Under Multiplatform->App, select Blank Forms App under Xamarin Forms. The language we’ll use is C#. Next, give your app a name, I called mine FontAwesomeTest, and use the .NET Standard. Press next, then create on the next page to create your project.
Go ahead and run the project. After it loads, you should see a white background, with “Welcome to Xamarin.Forms!” in the middle of the screen. We are not trying to do anything fancy with the layout, so let’s go ahead and add Font Awesome to the project.
Download and Add Font Awesome to the Project
Go to fontawesome.com. You should see a header that says “Download Font Awesome Free” with a button that says “For the Web” beneath it. This will download a folder called “fontawesome-free-5.3.1-web.” Inside this folder, there are three files that we are interested in that are inside the webfonts folder. These files are fa-brands-400.ttf, fa-regular-400.ttf, and fa-solid-900.ttf. These are all collections of icons that you may be interested in using in your project. We’re only going to work with fa-solid-900.ttf in our example, but feel free to use the others.
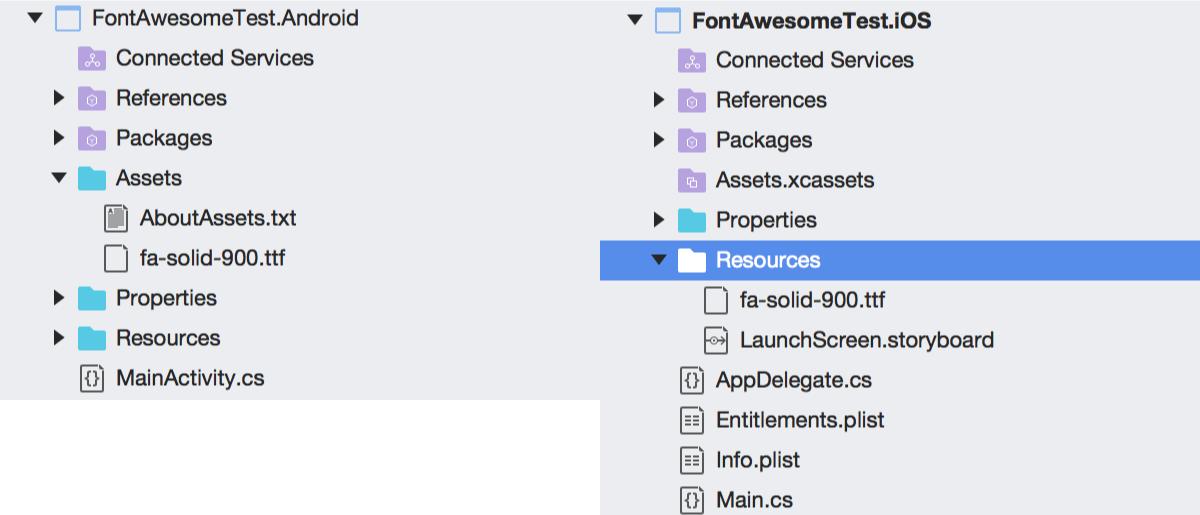
We need to add this .ttf file to the .Android and .iOS sections of our project. If we had a UWP section, it would also need to be added there under the Assets folder. Let’s start by adding the file to the .Android section. You simple need to drag the .ttf file into the Assets folder. Select “Copy the file to the directory” and press OK. Next, we drag in the file to the Resources folder in the iOS section and do the same thing.
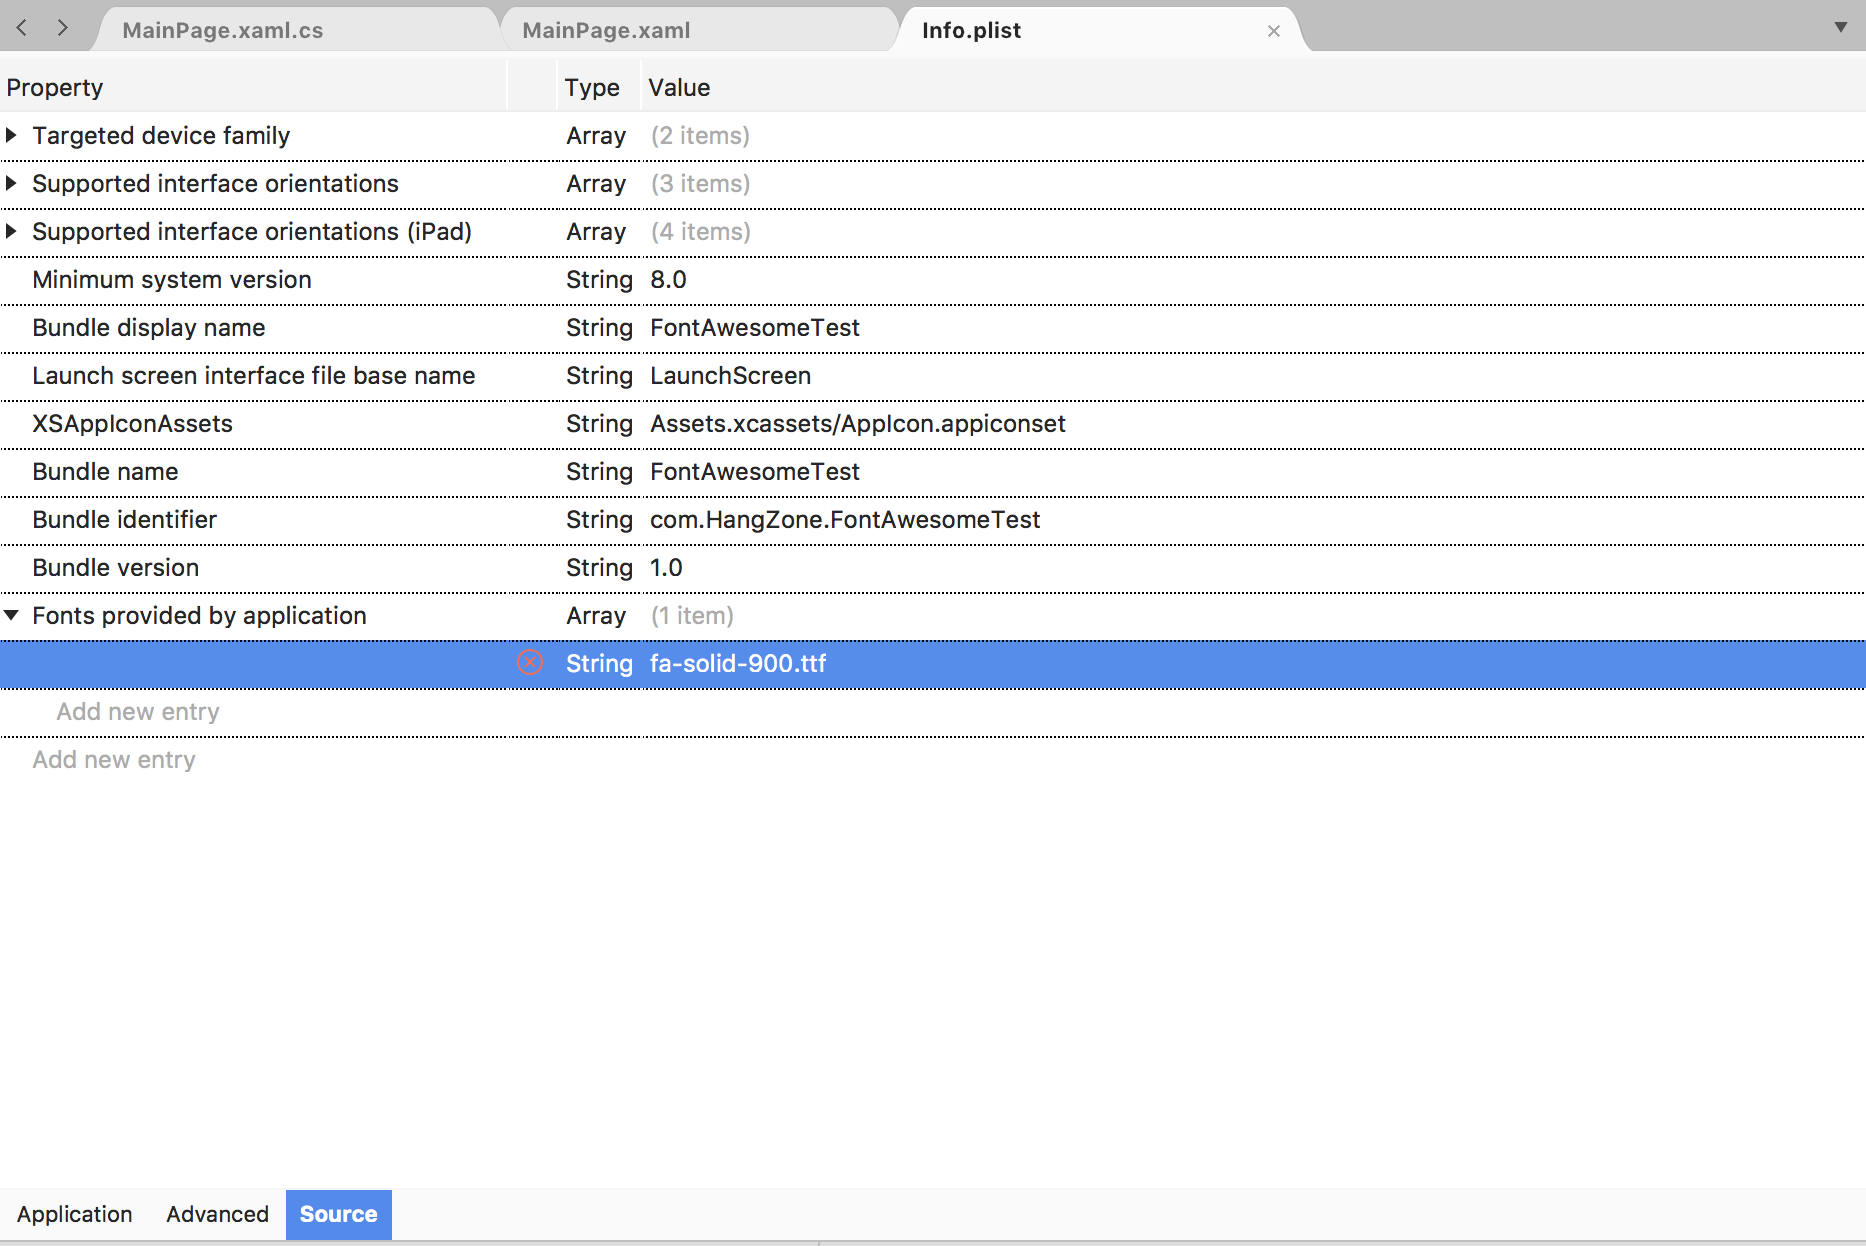
The iOS version needs one more thing. Open Info.plist, and press the Source button and the bottom. Add a new entry with the property key UIAppFonts and a string of fa-solid-900.ttf in the array it creates.
Create Button With Font Awesome Icon
It is finally time to use our Font Awesome Icons! Let’s start by creating a simple button with just the icon. Open MainPage.xaml. Let’s delete the current label and add a button with a smiley face icon.
<Label Text="Welcome to Xamarin.Forms!" HorizontalOptions="Center" VerticalOptions="CenterAndExpand" />
<Button Text="" TextColor="Black" HorizontalOptions="Center" VerticalOptions="CenterAndExpand">
<Button.FontFamily>
<OnPlatform x:TypeArguments="x:String" Android="fa-solid-900.ttf#Font Awesome 5 Free Solid" iOS="Font Awesome 5 Free" />
</Button.FontFamily>
</Button>You can see that our text input looks really strange and not a whole lot like a smiley face. You can find the correct codes for all of your Font Awesome icons on their cheatsheet, fontawesome.com/cheatsheet. Simply put &#x before the code and a semicolon after. Now, run your project, and you should see a black smiley face in the center of the screen. Tap it and you will see the typical button animation.
Creating a button with an Icon and Text
The button control allows you to set an icon and text. However, since we are setting our font awesome icon in the text property, there is no spot for a text label to accompany the icon. This means, we have to use a different solution to accomplish an icon with text. We will delete our button and replace it with a grid. We will make two columns for the grid with the width set to auto. In the first column, we will use a label for the font awesome icon. In the second, we will have a label for our text. See the code below.
<Grid HorizontalOptions="Center" VerticalOptions="CenterAndExpand">
<Grid.ColumnDefinitions>
<ColumnDefinition Width="auto"/>
<ColumnDefinition Width="auto"/>
</Grid.ColumnDefinitions>
<Label Grid.Column="0" Text="" TextColor="Black">
<Label.FontFamily>
<OnPlatform x:TypeArguments="x:String" Android="fa-solid-900.ttf#Font Awesome 5 Free Solid" iOS="Font Awesome 5 Free" />
</Label.FontFamily>
</Label>
<Label Grid.Column="1" Text="Smiley Face" TextColor="Black"/>
</Grid<Run the project, and you should see your smiley face with a text label next to it. Good job! Unfortunately, we’re not quite there yet. If you try to click on the fake button, you will see that there is no click animation. We need to add a gesture recognizer to process taps, and add an animation in that method to have our fake button look like it was tapped.

Adding a Tap Gesture Recognizer
Let’s add tap gesture recognizer inside our grid. It should look like this.
<Grid.GestureRecognizers>
    <TapGestureRecognizer Tapped="OnSmileyButtonTapped"/>
</Grid.GestureRecognizers<
Now, we need to define the OnSmileyButtonTapped method in our code-behind class. This method will use await to do a fade animation on the button when it is tapped. Because of this, the class must be defined as async. Add the following method to your MainPage.xaml.cs class.
public async System.Threading.Tasks.Task OnSmileyButtonTapped(object sender, EventArgs args)

{

    Grid tappedGrid = (Grid)sender;

    Label label1 = (Label)tappedGrid.Children[0];

    Label label2 = (Label)tappedGrid.Children[1];


    await System.Threading.Tasks.Task.WhenAll(

        label1.FadeTo(0.3, 100),

        label2.FadeTo(0.3, 100)

    );


    await System.Threading.Tasks.Task.WhenAll(

        label1.FadeTo(1, 100),

        label2.FadeTo(1, 100)

    );

}
You can see that we get our icon label and text label off the grid, which is the sender, from the children array. Then, we do a quick fade animation on both labels to lower the opacity and then bring it back to full. Run the project and you should see an icon and label combination that acts much like an iOS button. If we wanted the button to have a background, or different appearance, we could add a frame with a background color, corner radius, or other features to the object.
We can also add any actions that we want to our tapped method. Let’s try changing the screen color and label colors between black and white. Add the following code snippet below our definition for label1 and label2.
 if (this.BackgroundColor == Color.Black)

{
    this.BackgroundColor = Color.White;

    label1.TextColor = Color.Black;
    label2.TextColor = Color.Black;

} else {

    this.BackgroundColor = Color.Black;
    label1.TextColor = Color.White;
    label2.TextColor = Color.White;

}
Conclusion
There you go! We successfully added Font Awesome icons to our Xamarin.Forms project. Then, we created an icon button using a Font Awesome icon. We decided that we wanted a label with our icon, so we created a grid with a font awesome label and a text label that functioned like a button. You can give further styling to this custom button as needed. I hope you enjoyed this tutorial. As always, thanks for reading the HangZone blog.