People are very particular about sound when it comes to their mobile experience. A great music track can help to immerse a player in a mobile game. Well placed sound effects can provide helpful audio feedback, such as playing a slide flute effect when a user swipes down to update a news feed. On the other hand, some users may wish to disable the app’s audio if they’re in a public place. Moreover, most users like to keep their sound preferences in place between sessions. Today we will create a timer app that either plays a sound or vibrates at the end of a countdown, based on your persistent settings.
Create a New Project
Open up Xcode and create a Single View App. Name the app Timer. Make the language Swift. You don’t need to check any of the additional options at the bottom for Core Data, Unit Tests, or UI Tests. While you could use Core Data to store users’ sound preferences, that would be a tremendous degree of overkill to save a very small piece of data. We’ll save Core Data for a more complex project. Save the project wherever you like, and we’ll jump right into it!
Layout the Storyboard
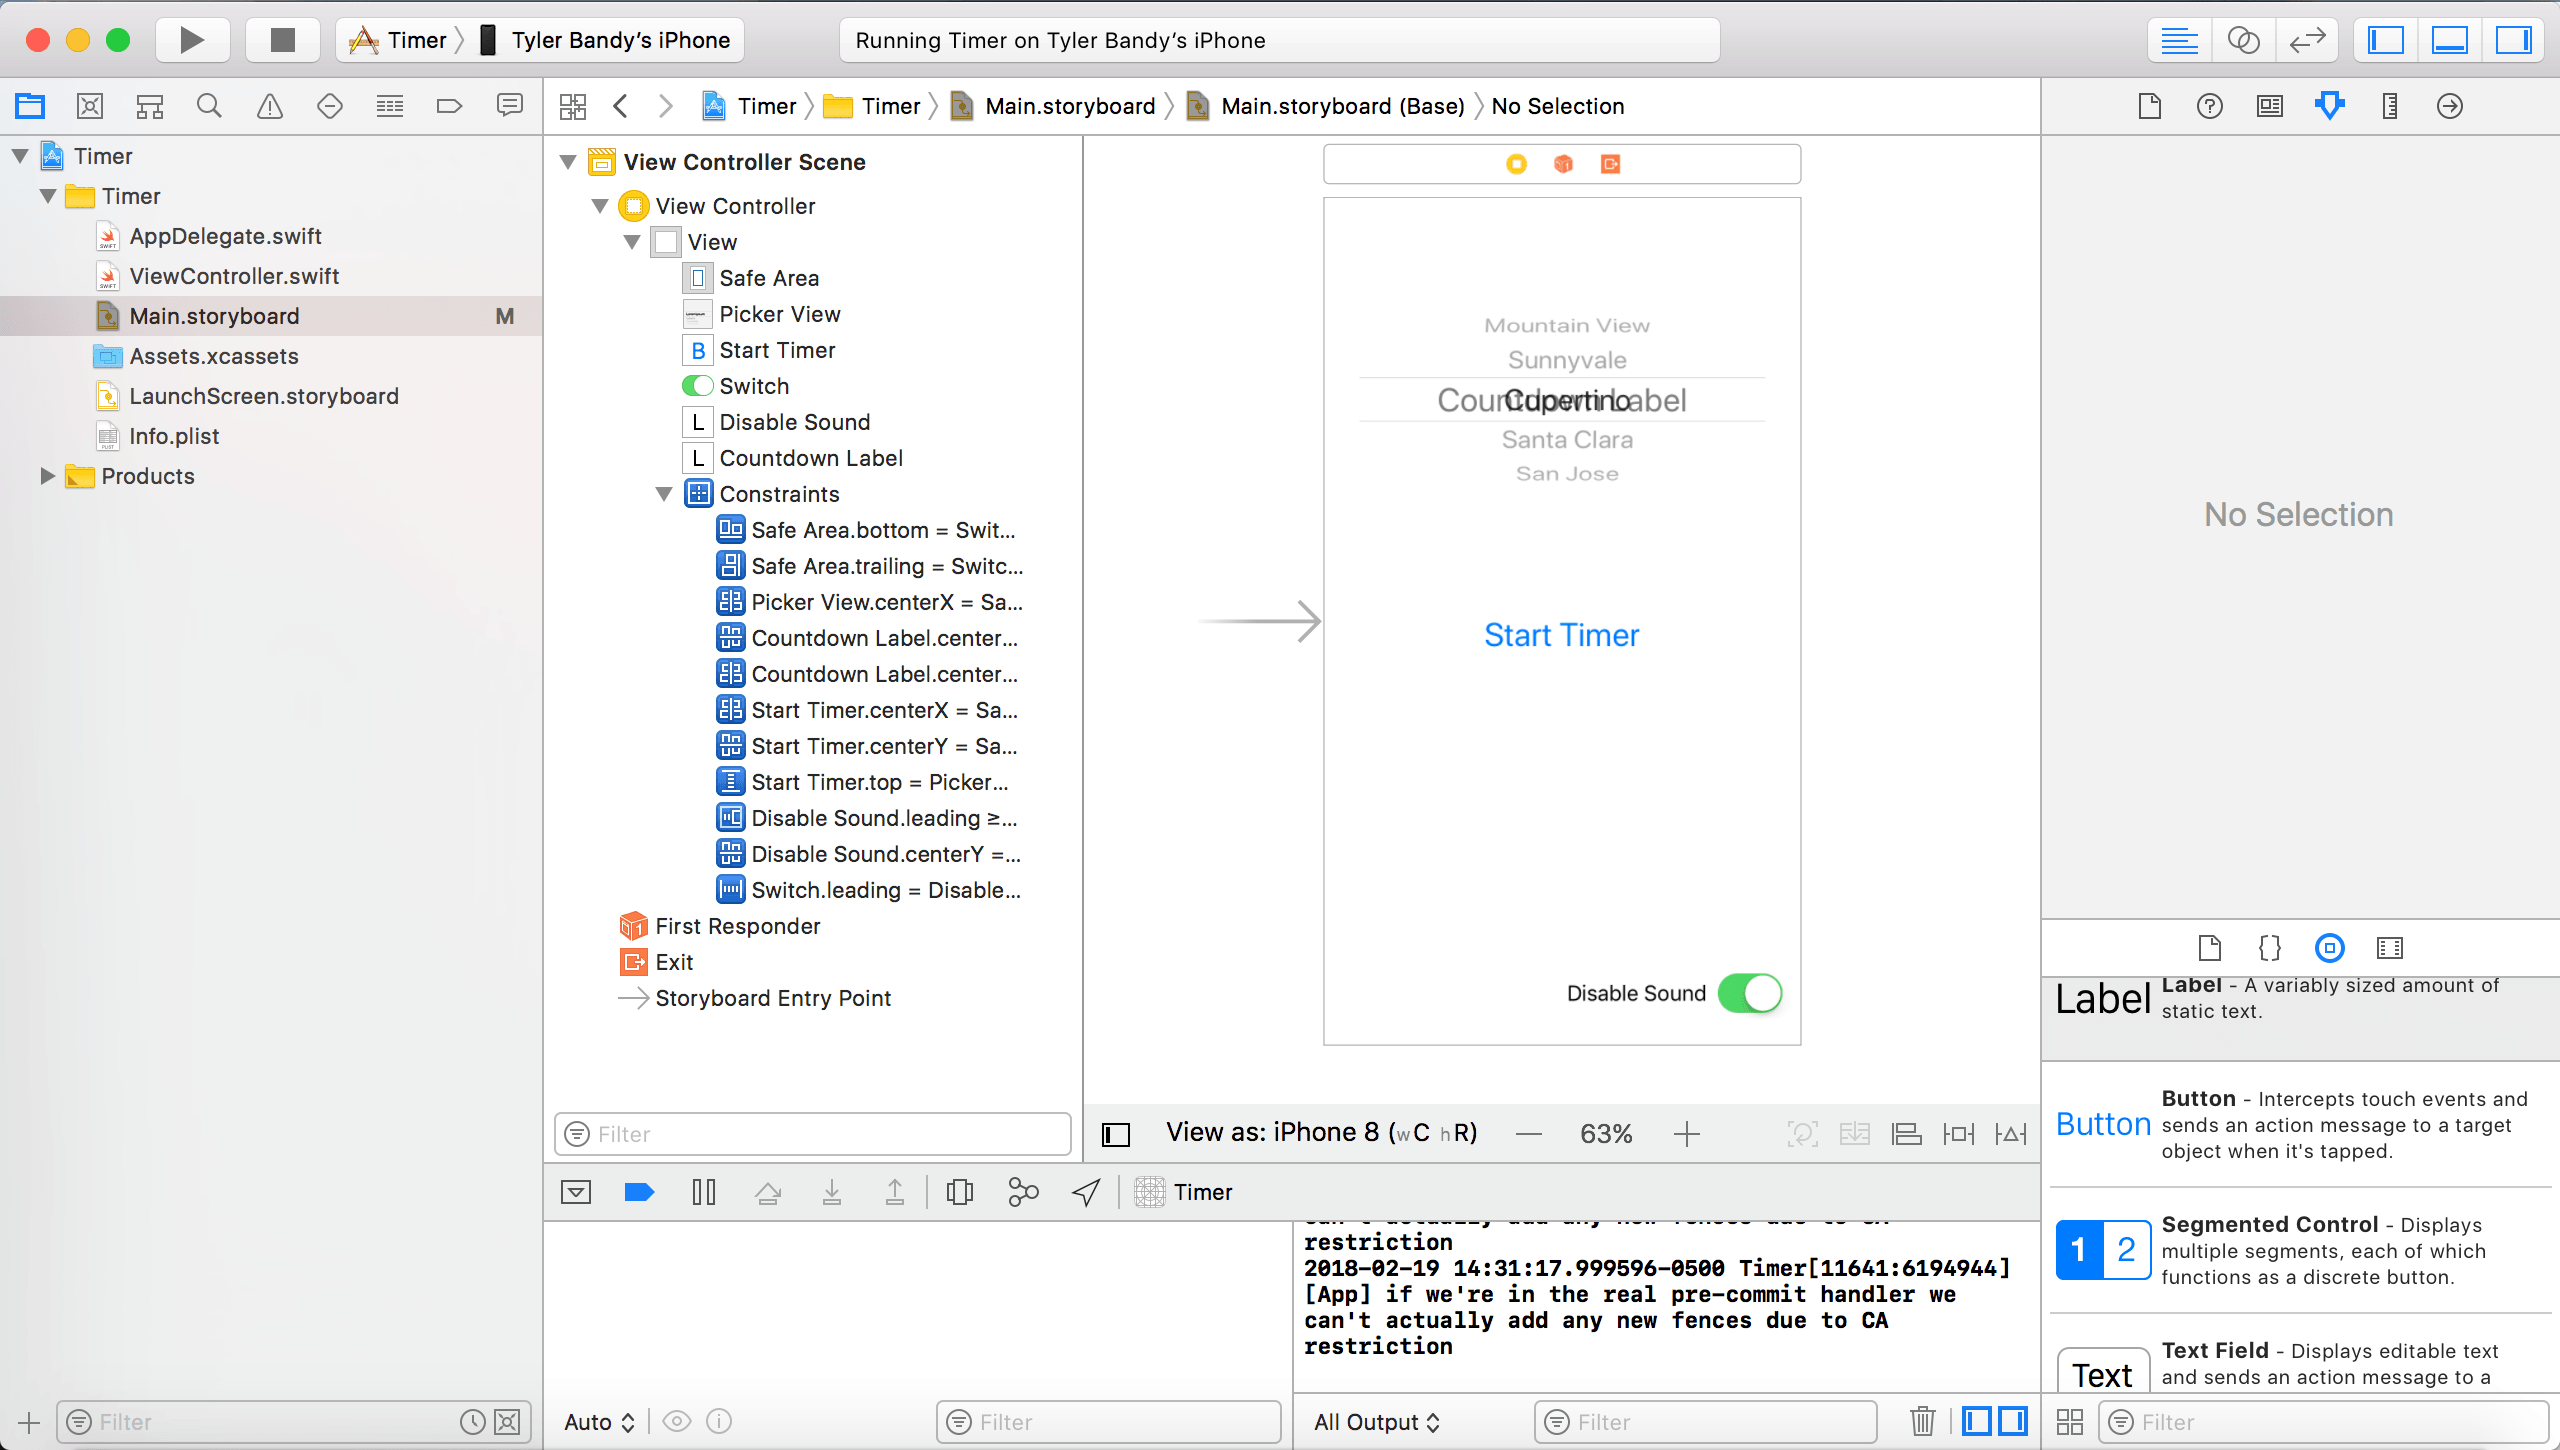
Let’s put a button in the middle of the screen, and set its text to Start Timer. Change its Font to Title 1. Give it constraints to center it both horizontally and vertically within the safe area. That should take care of the button!
Next, place a picker view above the button. This will allow users to choose how many seconds they want for the countdown. Center it vertically within the safe area, and give it a vertical spacing constraint relative to the button.
Once you’ve positioned the picker view, put another label directly in the middle of the picker view. This label will show the timer counting down. Change the text to Countdown Label. This text won’t be visible, but it helps to keep everything identified on the storyboard. Go with Title 1 for the Font, and add some horizontal and vertical constraints to center it on the picker view. Finally, make sure the text is hidden. This label will only be visible after the user has selected a time, and pressed the timer button. At that point, the picker view will be hidden, so the two UI elements won’t compete with each other.
Add a switch at the bottom right of the storyboard. This will allow the user to toggle the sound setting. Line it up with the bottom and right guidelines, and then add the corresponding trailing and bottom constraints.
We’ll add a label just to the left of the switch to explain what it does. Set its initial text to Disable Sound. This makes sense for the initial text if we want sound enabled by default. Add a constraint to center the label vertically with the switch. You will also need a trailing constraint with standard spacing from the label relative to the switch. Finally, add a leading constraint with standard spacing to the left edge of the screen, but this time, set the Relation to Greater Than or Equal.
That should cover the layout! We only designed the interface for portrait mode, so uncheck the landscape options in your project’s general settings. Hopefully, your storyboard looks something like this.
Hook up the Storyboard
We need to make a lot of connections from our storyboard to ViewController.swift. Open up the Assistant Editor and get ready to do some control-drags.
We need to make five IBOutlets: one for the picker view, one for the button, one for the switch, and one for each of the labels. The code should look like this after you make the connections.
@IBOutlet weak var picker: UIPickerView!
@IBOutlet weak var timerButton: UIButton!
@IBOutlet weak var soundSwitch: UISwitch!
@IBOutlet weak var soundStateLabel: UILabel!
@IBOutlet weak var countdownLabel: UILabel!
While we’re here, let’s connect two actions as well: one for the button and one for the switch.
@IBAction func timerButtonTapped(_ sender: Any) {}
@IBAction func soundSwitchTapped(_ sender: Any) {}
Those are all of the connections we need. You can switch back to the Standard Editor and we’ll make this app do something in ViewController.swift.
Write the Picker View Code
Let’s kick things off by adding two variables at the top of the class before we launch into the picker view.
var secondsRemaining = 1
var timer: Timer?
The secondsRemaining variable tracks how much time is left on the timer. We’re defaulting it to 1 because our picker view will start at 1. Our timer variable is used to schedule the countdown. We’ll get to that shortly.
Next we need to set-up the picker view. For starters, we need to make this class both the data source and delegate for our picker view. You can accomplish this by adding those protocols up at the top of your class.
class ViewController: UIViewController, UIPickerViewDataSource, UIPickerViewDelegate
In viewDidLoad, you also need to add the following to drive the point home.
picker.dataSource = self
picker.delegate = self
This gives us access to functions that define the style and data of the picker view, as well as track user interaction with it. We want the user to be able to choose any number from 1 to 100 seconds for the timer. There’s only one column of data to choose, so we’ll use these functions to pull this off.
func numberOfComponents(in pickerView: UIPickerView) -> Int {
    return 1
}

func pickerView(_ pickerView: UIPickerView, numberOfRowsInComponent component: Int) -> Int {
    return 100
}

func pickerView(_ pickerView: UIPickerView, titleForRow row: Int, forComponent component: Int) -> String? {
    return String(row + 1)
}
Note that row numbers start at 0, so we’ll add 1 when displaying the number. We’ll make the same adjustment when we store the number that the user selects in our final picker view function.
func pickerView(_ pickerView: UIPickerView, didSelectRow row: Int, inComponent component: Int) {
    secondsRemaining = row + 1
}
Schedule the Timer
Once the user has settled on a number of seconds, he can press the timer button to initiate the timer. We need to hide the picker view and button, then unhide the countdown label. The countdown label should display the number of seconds that the user selected, and reduce that number by 1 every second. We can make that happen by adding some code to our timerButtonTapped function.
@IBAction func timerButtonTapped(_ sender: Any) {
    // hide button and picker
    timerButton.isHidden = true
    picker.isHidden = true

    // set countdown label text to seconds remaining and unhide it
    countdownLabel.text = String(secondsRemaining)
    countdownLabel.isHidden = false

    // start the timer
    timer = Timer.scheduledTimer(timeInterval: 1, target: self, selector: #selector(decrementTimer), userInfo: nil, repeats: true)
}
You’ll notice that we’ve referenced a new function in our timer code: decrementTimer. Let’s write that now. Don’t forget to prefix it with @objc, since this is required to use the function in a schedule.
@objc func decrementTimer() {
    secondsRemaining -= 1
    countdownLabel.text = String(secondsRemaining)

    if secondsRemaining == 0 {
        // unschedule timer and reset seconds remaining
        timer?.invalidate()
        secondsRemaining = 1

        // reset picker
        picker.selectRow(0, inComponent: 0, animated: false)

        // hide countdown label
        countdownLabel.isHidden = true

        // unhide picker and button
        picker.isHidden = false
        timerButton.isHidden = false

        // sound the alarm
    }
}
This function reduces the clock by 1 each time it is called and updates the countdown label accordingly. Once the clock reaches 0, the real magic happens!
First, we scratch the timer. The invalidate method takes care of both unscheduling the timer and handles the related memory management.
We’ll reset the seconds remaining to 1. This is important because the user may not trigger the didSelect function again on the picker view before pressing the timer button. Without this line, the timer would resume counting down from zero and enter the confusing world of negative numbers. Likewise, we’ll reset the picker view back to row 0 as well. Normally, it’s nice to set the animated flag to true when adjusting UI elements. In this case, however, we’re going to set it to false since the picker view is hidden.
To circle back to our initial state, we’ll hide the countdown label, then unhide the picker view and timer button. We’re ready to schedule another timer!
Add a Good Sound Effect
We forgot to play any sound at the end of the countdown! Unless you’re staring at the timer the whole time, you may not know when all of the time has elapsed. Head over to http://www.freesound.org and pick yourself out a nice sound. I went with a ringing bell recorded by Domrodrig. Once you’ve downloaded your sound effect of choice, drag it into the left pane in Xcode along with your project’s other files. Make sure you have the boxes checked to copy it into your project and set its Target Membership.
Write the Sound Code
There are a variety of ways to play sound effects in Swift, but they all start with importing an audio library. At the top of your file, add the following code.
import AVFoundation
This gives us access to a variety of AV prefixed objects that we need to play the sound effect. Now we can add two more variables at the top of the class.
var soundEnabled = true
private var audioPlayer: AVAudioPlayer?
Remember that we only want to play sound effects when the user has sound enabled. We’ll keep track of that with the soundEnabled bool. The audioPlayer variable is for playing the sound. It requires a little more setup, though. At the bottom of viewDidLoad, add the following.
let alertSound = URL(fileURLWithPath: Bundle.main.path(forResource: "bell", ofType: "wav")!)
try! AVAudioSession.sharedInstance().setCategory(AVAudioSessionCategoryPlayback)
try! AVAudioSession.sharedInstance().setActive(true)
try! audioPlayer = AVAudioPlayer(contentsOf: alertSound)
audioPlayer?.prepareToPlay()
I named my sound effect bell.wav, so in the first line, change bell and wav to the name and format of your sound effect, respectively. With the preliminary work out of the way, we can return to our decrementTimer function and add some sound code just below the sound the alarm comment.
if soundEnabled {
    // play sound
    audioPlayer?.play()
}
Let the User Turn Sound Off
This is pretty great, but the switch still doesn’t do anything yet. Let’s take care of that. Add some code to soundSwitchTapped.
@IBAction func soundSwitchTapped(_ sender: Any) {
    if soundEnabled {
        soundEnabled = false
        soundStateLabel.text = "Enable Sound"
    } else {
        soundEnabled = true
        soundStateLabel.text = "Disable Sound"
    }
}
This toggles our soundEnabled bool and changes the instruction next to the button to ensure a user friendly UI.
Add Vibration as a Sound Alternative
Everything is functional now, but nothing happens at the end of the countdown if sound is disabled. This is a good opportunity to add some vibration! Head back to your sound code at the end of decrementTimer and change it to the following.
if soundEnabled {
    // play sound
    audioPlayer?.play()
} else {
    // vibrate
    AudioServicesPlayAlertSound(SystemSoundID(kSystemSoundID_Vibrate))
}
Are you picking up good vibrations? The app is certainly giving me excitations.
Make Preferences Persistent with UserDefaults
This timer counts down, it plays sound, and it vibrates. I’ve never asked much more of a timer, but it would be nice if the app remembered my sound preferences between sessions.
There are a variety of ways to store information locally on mobile devices. Core Data is the most robust solution. It works well for managing data relationships and efficiently processing queries. On the other end of the spectrum, UserDefaults (otherwise known as NSUserDefaults) simply stores key-value pairs. If you need to store a minimal amount of data without any complex relationships, the lack of structure in UserDefaults allows it to run faster than Core Data. Storing information in UserDefaults is also far easier than using Core Data, making it the obvious choice for a sound preference.
At the bottom of soundSwitchTapped, add some UserDefaults code to make the preference persistent.
let defaults = UserDefaults.standard
defaults.set(soundEnabled, forKey: “soundEnabled")
That handles the setting side of the equation. Now we need to do the getting. Add this code to the bottom of viewDidLoad.
// register userdefaults
let defaults = UserDefaults.standard
let appDefaults: [String:Any] = ["soundEnabled" : true]
defaults.register(defaults: appDefaults)

// load sound setting
soundEnabled = defaults.bool(forKey: "soundEnabled")
soundSwitch.isOn = soundEnabled
if soundEnabled {
    soundStateLabel.text = "Disable Sound"
} else {
    soundStateLabel.text = "Enable Sound"
}
The first few lines register a default value in UserDefaults. We want sound to be enabled by default. This registration is necessary, because UserDefaults values are initially false/0/nil before a value is assigned. If we wanted our soundEnabled value to default to false, we technically could have avoided this registration portion. It’s still good practice to do it regardless.
The last bit of code sets our soundEnabled bool to whatever was stored in UserDefaults, then adjusts the UI accordingly.

Conclusion
We got to use an assortment of iOS features in this tutorial, including schedules, sound effects, vibrations, and UserDefaults. Hopefully you’ll be able to take advantage of this functionality in your future projects! As always, thanks for checking out the HangZone Blog!