We’ve written a few Xamarin.Forms tutorials on the HangZone blog lately. Maybe you’ve even made a Xamarin.Forms app of your own! It’s easy to deploy these apps directly to your device, but what do you do when it’s time to upload to the App Store? The process involves many of the same convoluted steps you know and love from dealing with native iOS apps, but there are some new twists and turns to learn. We’ll cover it all here today! For reference, my instructions are designed for use on a Mac.
Apple Developer Account
The first step is the same as if you were developing a native app in Xcode. You have go to your Apple Developer Account and create Distribution Certificate, App ID, and Provisioning Profile. When you arrive on the main Developer Page, click Account, then Certificates, IDs & Profiles. You should see all of the options you need down the left side of the page.
Let’s do the Distribution Certificate first. Click on All on the Certificates category. Do you have a certificate with type iOS Distribution that hasn’t expired? If so, go ahead and move on to the App ID. If not, click the plus button to create a new certificate. Select type App Store and Ad Hoc. On the next page, you’ll find some instructions for creating a CSR file using the program Keychain Access. You should find Keychain Access in the Utilities folder on your Mac. Follow the onscreen instructions to make the CSR file and complete the Distribution Certificate.
Next, click on App IDs. Click the plus button to make a new one. Give your app a name, then give it a bundle ID. If I was making an app called Example the bundle ID would be com.HangZone.Example. Go to the next page and register your App ID.
Finally, go to Distribution under the Provisioning Profile section. Click the plus button, then select the App Store option. Select your App ID, then select your Distribution Certificate on the next page. The last step is to give your provisioning profile a name. For an app named Example, I would go with ExampleAppStore, to distinguish it from a developer provisioning profile or one for ad hoc distribution.
That’s it for your Apple Developer Account!
App Store Connect
Now it’s time to head to App Store Connect. Again, this step is the same as if you were uploading a native app from Xcode. Go to the Apps page, then hit the plus button to create a new app. Select the first option, New App. Check iOS for the platform. Enter your app’s name in the Name field. If you’re reading this blog, you’ll probably go with English for the Primary Language. In the Bundle ID dropdown menu, you should see your bundle ID from earlier. Select it. You can write whatever you want for the SKU, say Example1. Finish things off by setting User Access to Full Access.
Now you have an app listing! You can fill out the rest of the information at your leisure, but this is enough to advance to the next step.
Xamarin.Forms Project Settings
Open up Visual Studio. Pull up the info.plist in the iOS section of your project. Enter the appropriate Application Name and Bundle Identifier. The bundle ID should match the one you made earlier. Go with Manual Provisioning for the scheme. I use automatic in Xcode, but Microsoft suggests manual in their Xamarin.Forms documentation (at least as of this writing), and it works fine.
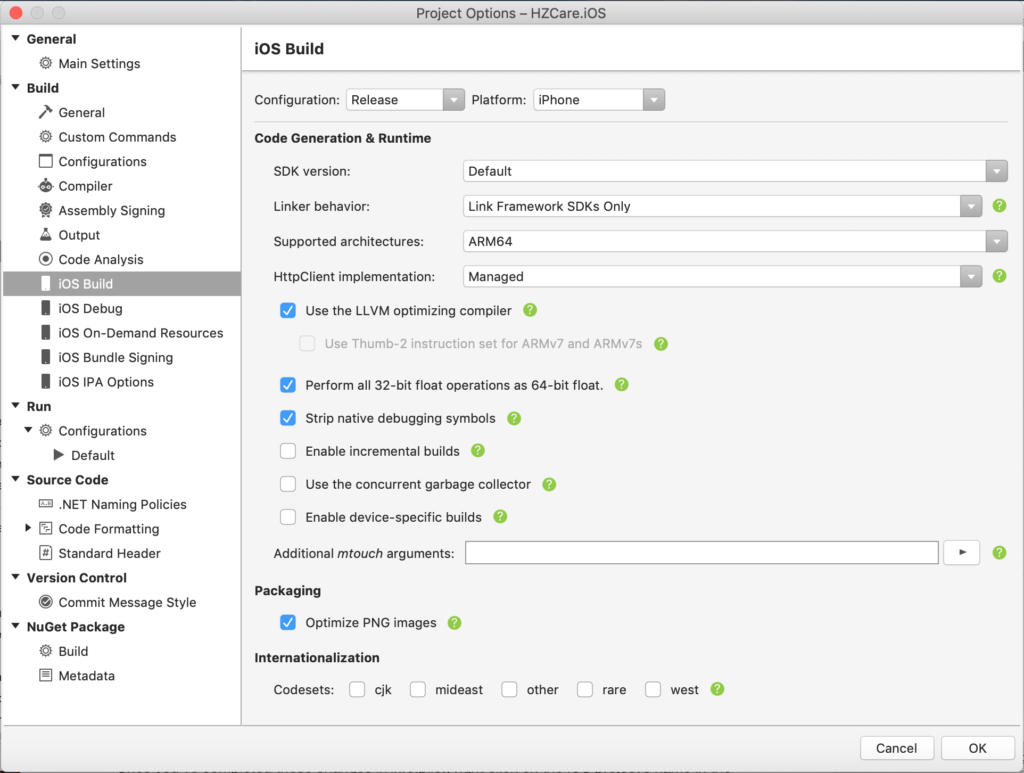
Once you’ve completed those changes in info.plist, right click on the iOS project’s name in the Solution Outline and click Options. Select iOS Build on the left. At the top, change the Configuration to Release and the Platform to iPhone. Set the following options to something like this.
Next, click iOS Bundle Signing. Again, Select Release and iPhone at the top. In the Signing Identity dropdown, select your Distribution Certificate. In the Provisioning Profile field, you should find Provisioning Profile available for selection. If the certificate or provisioning profile don’t populate correctly, try closing Visual Studio. Then open Xcode. This should download any missing certificates and provisioning profiles from your Apple Developer Account. Open up Visual Studio again and you should see the missing files.
Build an Archive
Along the top bar in Visual Studio, toggle your App from Debug to Release. In the Build menu, choose Archive for Publishing. Once the archive is complete, click the Sign and Distribute button. In the new window, select the App Store distribution option. Choose your provisioning profile on the next page. Finally, publish an IPA of your app. This step might seem weird, as you usually wouldn’t save an IPA file on your computer when publishing with Xcode unless you wanted to distribute your app outside of the App Store. Just roll with it.
Once the IPA is saved on your Mac, you’ll get an option to launch Application Loader. Use your Apple ID to get into the program, then choose the Deliver Your App option. Select the IPA file from your computer, then begin the validation and upload process. If all goes smoothly, you’ll get a successful confirmation! It may still be several minutes or hours until the build shows up in App Store Connect, so don’t worry if you don’t see it immediately.
Final Thoughts
You’ve done it! A lot of this was certainly review for seasoned Xcode users, but there are enough oddities about the Visual Studio steps that I wanted to lay out the whole process for a Xamarin.Forms app. With your new build on App Store Connect, you can distribute your app to beta testers via TestFlight, or, if you’re feeling good about it, just go ahead and submit it for worldwide release! Thanks for reading!

