Welcome to part 2 of our ARKit in iOS tutorial. In part 1, we created an iOS app using ARKit in which we could add a chair on the ground in the surrounding area. We will begin this tutorial using the app from part 1. Please visit Part 1 of this tutorial if you have not already.
Hopes for Part 2
Currently, our app shows you the area around you, which is seen through our device’s camera. Horizontal surfaces are identified, and a transparent plane is shown over the horizontal surfaces to help us understand what ARKit has determined is a surface. Then, we are able to tap any predetermined horizontal surface to add a chair object to the scene. This chair will sit perfectly on top of the horizontal surface that ARKit has found.
In this tutorial, we will start by adding additional on screen logging so that we can better understand and follow along as ARKit processes the scene to look for horizontal surfaces. Then, we will find a table model to add to our scene. Finally, we will add buttons to the screen so that we can pick whether to add a table or a chair into our scene. Although there may be less room for activities, a table to go with the chair will hopefully bring the room together.
Add Visual ARKit Logging UI
Let’s open our app and get started! We need to add a section to our display that is going to be able to handle the label that we will use for the logging. Open Main.storyboard. Unfortunately, you will see that our current View Controller only has the ARSCNView inside of it. We cannot add a label directly inside the view controller. We need to add a View directly under the View Controller, and then, the ARSCNView and our logging label will be children of that view.
First, delete the ARSCNViewController. Then, add a new View to the scene, which should automatically position itself to take up the entire space. It will automatically add “Safe Area” as a child. We will use this later for some of our constraints. Next, drag an ARKit SceneKit View onto the storyboard as a child of the View. Stretch the ARSCNView so that it takes up the entire view. Add constraints so that the left and right edges are equal to the safe area leading and trailing edges and the top and bottom edges are equal to the top and bottom edges of the superview. We use superview instead of safe area for top and bottom because we want the ARSCNView to take up the entire screen, not just the safe area.
Add Label and Background Effect
Next, we will add the label, but instead of just adding it directly, we’ll use a transparent visual effect to set it off from the scene without obscuring what’s behind it. Drag a “Visual Effect View with Blur” to the scene and place it in the bottom left corner using the guides to keep it off the edge. Add a leading edge constraint from the Visual Effect View to the leading edge of the safe area and a bottom edge constraint to the bottom edge of the safe area. Xcode may throw layout areas, but ignore them for now. They should work themselves out by the end. Then, add a new label as a child of the view inside the Visual Effect View. Set constraints between each side of the label and the effect view container, and set the constants to “Use Standard Value.” Next, give the label a width of less than or equal to 220 and a height of greater than or equal to 22. Finally, go the the Attributes Inspector for the label and set the initial text to “Initializing AR Session.” and “Lines” to 0.
Now that all of the elements are set up on the scene, we need to rig the objects to our code. Press the Assistant Editor button (the one with two overlapping circles in the top right). Control drag the ARSCNView to the “sceneView” IBOutlet variable, which we had used before. Next, control drag the label into the scene to create a new outlet called sessionInfoLabel.
Add Visual ARKit Logging Code
Open the ViewController.swift. Add ARSessionDelegate as a new protocol at the top. The line should now look like this.
class ViewController: UIViewController, ARSCNViewDelegate, ARSessionDelegate {
In the viewWillAppear method, add the following code to set the delegate immediately after the line sceneView.session.run(configuration).
sceneView.session.delegate = self
Next, add the following methods to the bottom of the class.
// MARK: - ARSessionDelegate

func session(_ session: ARSession, didAdd anchors: [ARAnchor]) {
    guard let frame = session.currentFrame else { return }
    updateSessionInfoLabel(for: frame, trackingState: frame.camera.trackingState)
}

func session(_ session: ARSession, didRemove anchors: [ARAnchor]) {
    guard let frame = session.currentFrame else { return }
    updateSessionInfoLabel(for: frame, trackingState: frame.camera.trackingState)
}

func session(_ session: ARSession, cameraDidChangeTrackingState camera: ARCamera) {
    updateSessionInfoLabel(for: session.currentFrame!, trackingState: camera.trackingState)
}

// MARK: - ARSessionObserver

func sessionWasInterrupted(_ session: ARSession) {
    // Inform the user that the session has been interrupted, for example, by presenting an overlay.
    sessionInfoLabel.text = "Session was interrupted"
}

func sessionInterruptionEnded(_ session: ARSession) {
    // Reset tracking and/or remove existing anchors if consistent tracking is required.
    sessionInfoLabel.text = "Session interruption ended"
    resetTracking()
}

func session(_ session: ARSession, didFailWithError error: Error) {
    // Present an error message to the user.
    sessionInfoLabel.text = "Session failed: \(error.localizedDescription)"
    resetTracking()
}

// MARK: - Private methods

private func updateSessionInfoLabel(for frame: ARFrame, trackingState: ARCamera.TrackingState) {
    // Update the UI to provide feedback on the state of the AR experience.
    let message: String

    switch trackingState {
        case .normal where frame.anchors.isEmpty:
        // No planes detected; provide instructions for this app's AR interactions.
        message = "Move the device around to detect horizontal surfaces."

        case .normal:
            // No feedback needed when tracking is normal and planes are visible.
            message = "Plane detected and tracking."

        case .notAvailable:
            message = "Tracking unavailable."

        case .limited(.excessiveMotion):
            message = "Tracking limited - Move the device more slowly."

        case .limited(.insufficientFeatures):
            message = "Tracking limited - Point the device at an area with visible surface detail, or improve lighting conditions."

        case .limited(.initializing):
            message = "Initializing AR session."

    }

    sessionInfoLabel.text = message
}

private func resetTracking() {
    let configuration = ARWorldTrackingConfiguration()
    configuration.planeDetection = .horizontal
    sceneView.session.run(configuration, options: [.resetTracking, .removeExistingAnchors])
}
As you should be able to see, the delegate will receive updates on what ARKit is currently doing. We use these updates to change the label and provide the user with feedback as to what is happening. Run the app, and watch it in action.
Note: Much of this logging section is derived from Apple’s “Building Your First AR Experience” project. You can download that project to see more. https://developer.apple.com/documentation/arkit/building_your_first_ar_experience
Download a Table Model
Like in part 1, I am going to download a free 3d model from Turbo Squid. I covered things in more detail in part 1, but feel free to use any model or draw your own. Remember that lower poly counts typically work better for mobile, and we need the format to be DAE. I am going to use this model: https://www.turbosquid.com/FullPreview/Index.cfm/ID/1182368.
Add Model to Project
Add the table model into the project the same way that we added the chair in part 1. You may see errors on the model when you look at it in Xcode if it has a material/texture that isn’t imported in Xcode. You can click on the object, go to the Material inspector, and remove the material to remove the visible error texture. If your model has multiple pieces, select all of them and click on the Node inspector. Name the table “FullTable” under Identity section. Then, under Transforms, set the Position to 0, 0, 0 and the Scale to 0.05, 0.05, 0.05 (if you are using a different model, you may need to use a different scale).
Add Switch to User Interface
Now that we have two items that we can place in our AR world, we need a way to decide which object to place or move. To accomplish this, we are going to add a switch to the top of our user interface. The switch will default to off, which will be for the chair, and it will change to the table when the switch is turned on.
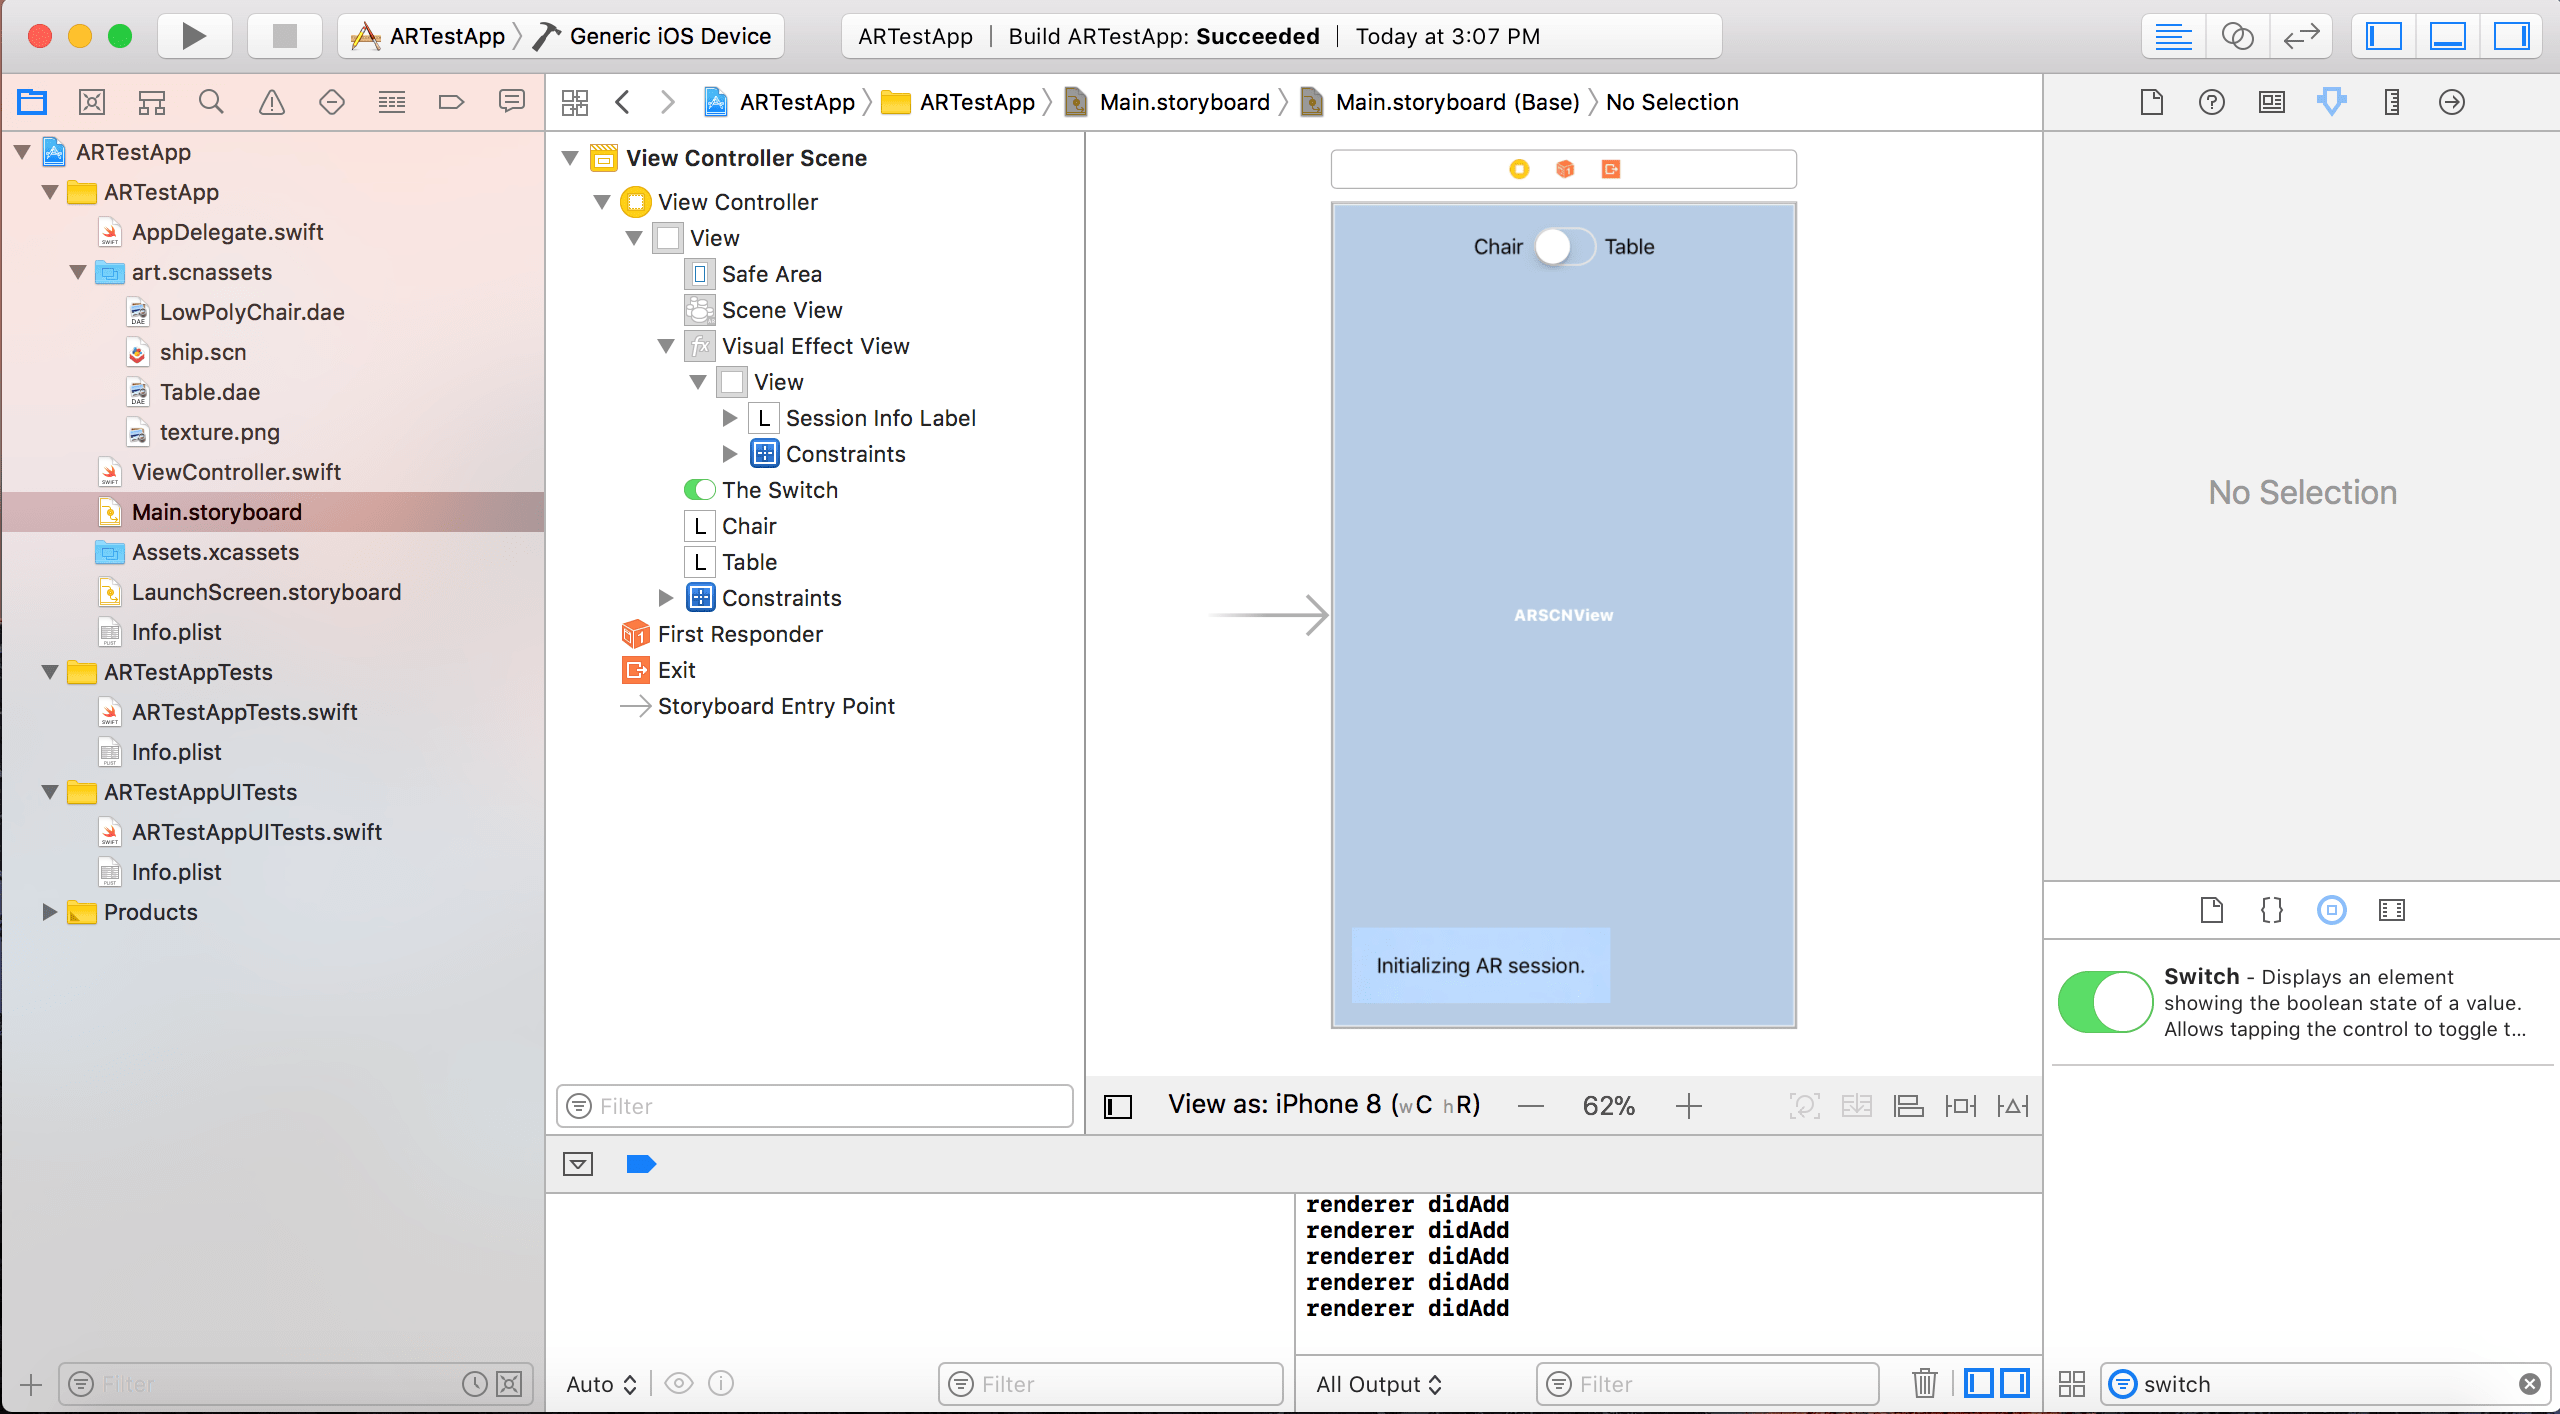
Go back to our Main.storyboard to add the switch. Drag a switch object to the top middle of the screen. Under the Attributes inspector, set the state to off. This will let our app default to the chair. Put a constraint between the top of the switch and the top of the safe area using a standard value. Then, add a constraint to horizontally center the switch in the view. Drag a label to the left side of the switch, and set the text to “Chair.” Drag a label to the right side of the switch, and set the text to “Table.” Add constraints to vertically center each label with the switch, constraints to set each label a standard value away from the switch, and greater than or equal to standard value constraints between the labels and the superview on the sides opposite the switch. Our UI is now complete, and should look like the image below.
We still need to let the code know whether the switch is on or off. Press the Assistant editor button in the top right, and control drag from your switch into the code. Create an IBOutlet called theSwitch. This will allow us to know the current state of the switch whenever we attempt to move or place one of our objects. We are all set to head to the code now!
New Code for the Project
Open ViewController.swift again. We need one new instance variables for the class. We need to add tableNode, which is type SCNNode and will handle similar duties to chairNode. Our instance variables now look like the following.
@IBOutlet var sceneView: ARSCNView!
@IBOutlet weak var sessionInfoLabel: UILabel!
@IBOutlet weak var theSwitch: UISwitch!
var chairNode: SCNNode?
var tableNode: SCNNode?
In viewDidLoad, we need to create our tableNode much like we created the chairNode in part 1. However, I ran into issues with how the table was placed based on my touch. This comes from issues with where the pivot point (much like an anchor point when dealing with regular 2d objects) is positioned on the model. To adjust this, I’ve set a new pivot point for the tableNode. If your model positions fine, you can simply ignore the pivot portion of the code. Finally, we change the way that we add the nodes to the sceneView so that we can add both child nodes.
// Create a table scene
let scene2 = SCNScene(named: "art.scnassets/Table.dae")!
tableNode = scene2.rootNode.childNode(withName: "FullTable", recursively: true)
tableNode?.pivot = SCNMatrix4MakeTranslation((tableNode?.boundingBox.max.x)! - (tableNode?.boundingBox.min.x)! * 0.5, (tableNode?.boundingBox.max.y)! - (tableNode?.boundingBox.min.y)! * 0.5, (tableNode?.boundingBox.max.z)! + (tableNode?.boundingBox.min.z)! * 0.5)
tableNode?.position = SCNVector3Make(0, 0, -3)
tableNode?.isHidden = true

// Set the scene to the view
sceneView.scene = scene
sceneView.scene.rootNode.addChildNode(chairNode!)
sceneView.scene.rootNode.addChildNode(tableNode!)
Finally, we need to adjust our touchesBegan code to place the chair or table depending on our switch. This is done with a simple if statement on our switch to see if we want our chair or table.
chairNode?.position = hitPosition;
chairNode?.isHidden = false;
if !theSwitch.isOn {
    chairNode?.position = hitPosition;
    chairNode?.isHidden = false;
} else {
    tableNode?.position = hitPosition;
    tableNode?.isHidden = false;
}
Conclusion
That’s it! We successfully added visual text logging to our app to help get a better understanding of ARKit in action. Although you likely wouldn’t have full logging like this in a production app, alerting the user of what’s happening if things aren’t working is a good idea. Then, we added another piece of furniture to our AR room. With a table and chair, we finally have a good place to sit down and do more virtual programming. Until next time, thanks for following the HangZone blog!